How to Use Liquid Flashing in a Fat Wall
In a previous article, we followed Ben Bogie and his crew as they framed the inner half of a double-stud wall and blocked out the 12-inch-deep window openings (“Framing Tips for Double-Stud Walls,” Aug. 2019). In this article, we look at the process Bogie uses to flash the openings with liquid flashing.
Why Liquid Flashing?
In areas where pressure-sensitive flashing tape is difficult or impractical to apply—including curved or oddly-shaped wall and roof penetrations, rough or irregular surfaces, and transitions between dissimilar materials such as wood and concrete—liquid flashing is a good alternative. As we’ll soon see, however, using liquid flashing to waterproof a window rough opening takes longer and is a bit messier than using tape. So why bother?
On Bogie’s project, part of the answer lies in the thickness of the wall and the fact that the windows are located not at the inside or outside of the opening, but “in between”—about 3 inches back from the exterior wall sheathing. Covering that area, plus the window jamb thickness as well as the recommended minimum 2-inch overlap onto the wall sheathing, would require tape at least 10 inches wide. While tape that wide is available, Bogie wants to protect the exposed area around the entire opening, including the head and the full height of the jambs. That would mean using multiple pieces of tape and working overhead—doable, but not ideal, especially for one person.
“The other benefit of a liquid flashing product is that you don’t have any lap situations,” Bogie says. “If we were trying to do this whole rough opening perimeter in tape, we’d end up with areas where we’d have three layers, and a number of edges and folds. In theory, those should be impermeable, but if the tape were improperly installed, it could then funnel water right into our enclosure. With the liquid product, it becomes a monolithic barrier, and we don’t have any concerns over that happening.”
Bogie also says that liquid flashing is very forgiving when working with wet substrates. “[With tape], if you’re trying to flash pans first thing in the morning and it’s wet, or you’ve got dew, you’ve got to wait for that to dry off ... This stuff, as long as you clear the standing bulk water off of it, you’re good to go.”
Follow the photo sequence for a step-by-step look at the tools and techniques Bogie uses to prep and flash a window opening with trowel-grade liquid flashing.

To promote drainage at the sill, Bogie first installs a piece of beveled siding to create a sloped surface.

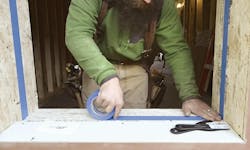
Bogie marks the opening to define the area to be covered with flashing, and uses painter’s tape to mask the boundary. “It doesn’t make it perform any better,” Bogie says, “but when the homeowner … and other contractors see it, they see that you’re giving a level of care to your installation. And it’ll drive other subs on the job to follow suit.”
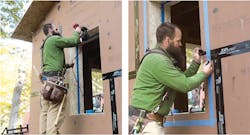
The next step is to air-nail the sheathing, which was left flapping to avoid hitting nails when cutting out the openings with a router. Follow-up with a hammer ensures that all the nail heads are set flush. The final prep step is to mask the sheathing around the window opening and remove any seam tape that’s inside that perimeter. This eliminates an extra layer that could interfere when troweling the liquid flashing.
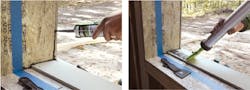
Using a sausage tube, Bogie first guns the trowel-grade flashing material into all the corners and seams, then uses a duck-bill nozzle to coat the sill. (A heavy bead applied in a serpentine pattern also works, but may require more troweling.)
About the Author

Sal Alfano
Executive Editor
Sal Alfano is executive editor for Professional Remodeler. [email protected], 202.365.9070