Framing Tips for Double-Stud Walls

ProTradeCraft.com has been following Ben Bogie and his crew as they build a house in Portland, Maine, that features 12-inch-thick double-stud walls. At the perimeter, the building has two separate 2x4 walls, with the inner wall set 5 inches inside the outer wall, allowing for a total of 12 inches of insulation and virtually eliminating thermal bridging through the studs. The framing is standard, but aligning and connecting all of the window and exterior door openings is critical. In this article we look at the approach Bogie and his crew have worked out to save time and make for a foolproof layout.


With the inner wall plates laid on edge against the outer wall, first measure 12 inches from the sheathing to mark the overall wall thickness [1A], then subtract 3½ inches and draw a line [1B]. This marks the ends of the plates at the corner where the inner walls meet [1C]. The plates won’t be cut to length after all layout lines have been transferred.
Transfer the Layout
We pick up the action as layout begins for the inner wall in a building that has otherwise been completely framed and sheathed, including floors, ceilings, and roof. The easiest way to make sure that openings in the outer walls align with openings in the inner walls is to transfer the layout.
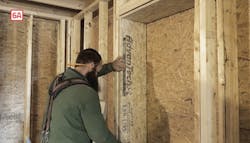
Bogie begins by laying two plates on edge on the floor against the exterior wall, butting them tight into the corner [1]. Measuring from the sheathing (not from the end of the plates), he makes a mark at 12 inches (the total width of the wall), then subtracts 3½ inches (the width of the inner wall studs) and draws a line to mark where he will cut the plates after all of the wall marks have been transferred.
With the plates still butted tight to the corner, he then transfers all of the stud locations from the standing wall to the plates [2]. He includes layout marks for all of the windows and doors, making sure that those openings are 1½ inches larger to allow for window and door bucks (discussed below). End cuts are marked so that plates break over a stud, as with regular framing. More than anything else, this is a courtesy to subtrades that ensures they won’t encounter blade- and bit-killing nails while cutting or drilling in stud bays.

Mark all stud locations from the outer wall on the inner wall plates, including king and jack studs for window and door openings [2A]. As with exterior wall framing, plates should break over a stud [2B].
Fill in Rough Openings
With all marks transferred, plates are cut to length and the walls are framed. Bogie and his crew frame the walls ¾ inch shorter than the exterior walls. This makes it easier to stand the walls under the ceiling joists, and they can fill in above with a piece of 1-by stock while plumbing them.
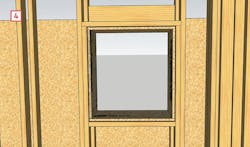
To reduce alignment problems, they frame interior openings to be slightly larger than the exterior one. They leave out sills and headers until the interior walls are standing, then fill in after transferring the layout marks [3], ensuring that the opening is about ¼ inch smaller all the way around.

Inner wall sills and headers are assembled after the walls are standing [3A]. This enables accurate transfer of layout marks to ensure that the inner wall openings are about ¼ inch larger than the openings in the outer wall [3B].
Bridge the Gap Between Walls
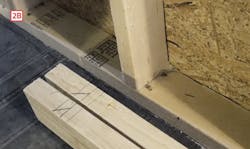
To bridge the space between the inner and outer walls at the openings, Bogie uses sheets of ¾-inch subfloor ripped to 11¾ inches—just shy of the full 12-inch wall thickness. This allows for easy adjustments should any studs in the openings be slightly bowed. The bridging also means that the rough openings need to be larger in height and width by twice the thickness of the bridge material—in this case, a total of 1½ inches [4].
To bridge the gap between walls at openings, the crew uses ¾-inch strips of subflooring material. To accommodate the added thickness, the openings have been framed 1½ inches taller and wider than the required R.O. The bridging strips are ¼ inch narrower than the wall thickness to allow for adjustments due to bowed framing.
Rather than wrestling full sheets through a portable tablesaw one at a time, Bogie uses a track saw to cut two sheets at once [5]. After flushing up a couple of sheets of subflooring material, he pins them together with 8d nails driven near the edge on the tongue side, where they won’t interfere with the track saw. He measures for the 11¾-inch cut which, allowing for the blade thickness, will yield him four strips per sheet and a final cut that just nips the tongue off the edge. Then he crosscuts the strips to length, also two at a time, for jambs and head/sill bucks.
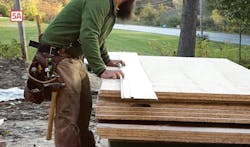


Bogie uses a track saw to rip two sheets of subflooring at once into strips that will bridge between the two walls at window and door openings [5A]. At 11¾ inches wide, the strips are ¼ inch narrower than the gap between walls, which allows for adjustment due to bowed studs, and accounting for blade thickness yields exactly four strips per sheet [5B]. Head, sill, and jamb pieces are also cut to length in pairs [5C].
Inside, the bucks are installed in order: sill first, then the head, and finally the jambs [6]. The position of inner edge is unimportant, because nothing is referenced off it, so each piece is aligned with the outer edge of the framing (leaving the sheathing in place helps), then fastened to the exterior wall. That leaves the inside edge ¼ inch shy of the inner wall framing, which avoids protrusions that would have to be shaved or sanded, and also allows for some adjustment of bowed studs. In fact, the inner edges are left unfastened for several weeks, giving the materials time to acclimate; before the windows are set, they’ll be shimmed square and plumb.

Window bucks are installed in order: sill piece first, then the head and jambs [6A]. The bucks are aligned tight against the sheathing and fastened to the exterior framing. The inner edges are left unfastened for a couple of weeks to let the materials acclimate; before window installation, the inner edges are shimmed plumb and square, and fastened to the inner wall [6B].
Cut the Openings with a Router
All that’s left is to cut out the sheathing. Rather than blind-cutting with a worm drive, Bogie uses a router with a flush-cutting bit. From inside, he drills a starter hole near the same bottom corner of each window [7A]. Outside, he pokes the bit into the holes and guides the router around the opening until he’s back to where he started [7B]. After the corners and edges are cleaned up, the window openings will be ready to receive liquid flashing.

Rather than blind cut the sheathing with a saw, Bogie uses a router with a flush-cutting bit. From inside, he drills a starter hole near the same bottom corner of each window [7A]. Back outside, he pokes the bit into the holes, moves the router slightly down and to one side until he bottoms out on the framing, then guides the router around the opening until he’s back where he started [7B].
This article is adapted from “Framing Double-Stud Walls,” a video produced by Dan Morrision for ProTradeCraft.com, and the fifth in a seven-part series on framing, flashing, and sealing a double-wall house. Thanks to Ben Bogie and his crew for giving us access to their jobsite and sharing their methods.