Constructing Site-Built Insulated Panels for Exposed Floors
Building on a pier foundation is an excellent way to forego some of the cost and carbon footprint of a concrete foundation and minimize site disturbance. Unfortunately, it also opens the possibility of another issue: a chilly floor. Even with first-rate insulation detailing, the floor joists can transmit cold temperatures directly to the inside because wood has a much lower R-value than most insulation products. This heat flow phenomenon is called thermal bridging—where framing members bridge the insulation in an assembly. The only way to cure thermal bridging is to obstruct it.
Insulated Panels Provide Utility and Finished Surface in One Step
One solution is site-built insulation panels. These panels are constructed with PVC sheets, a layer of adhesive foam, and extruded polystyrene (XPS) insulation. Installing these panels underneath the exposed floor will break the bridge and should keep the floor warm under your clients’ feet.
Waterproof Layers Make a Tight Assembly
XPS and PVC are great options in this application because both are generally rated for ground contact. Both are also impervious to air and mostly impervious to vapor movement. Adding closed cell polyurethane spray foam over the panels completes the air seal and amplifies the R-value of the floor assembly with the added benefit of additional structural integrity. Obviously, it is more effective to install the spray foam from above after the insulated panels are in place, so, do this before installing subfloor and constructing walls on top. If you don’t want to use spray foam, seal the framing to the panels with canned foam or acoustical sealant before installing fibrous insulation between the joists.
These panels will not only help keep the floors insulated and protected but could also be great for areas prone to flooding. It is a redundant waterproof assembly that eliminates the hassle of having to remove wet insulation after a flood.
Step 1: Assemble the Panels
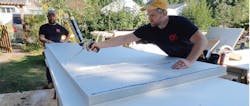
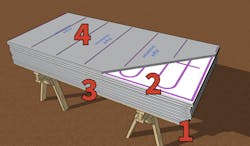
Begin with a flat base and place a sheet or two of 3/4-inch OSB atop a pair of sawhorses and then lay a PVC sheet over that (1). Apply adhesive along the edges and center of the PVC sheet and set a sheet of two-inch XPS atop it (2). Additional panels can be constructed over this one until enough are prepared, or the stack is too high to reach (3).
Before installing the panels, apply adhesive to the insulation panels where they will rest against the joints (4). This adhesive acts as a secondary air seal, cutting air leaks and helping to lock together the assembly.
Step 2: Install the Insulated Panels
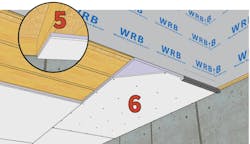
Panels should break on joists, as any other sheet product would (5), and the adhesive should align with the joists. Attach the panels to the floor joists with screws long enough to penetrate the framing at least an inch (6).
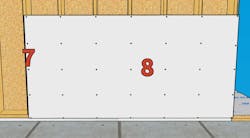
The fastening pattern for PVC should follow the manufacturer’s guidance, but likely will be within 1/2 inch from the edges (7) and every 12 inches into each framing member (8).
Step 3: Seal and Insulate the Assembly
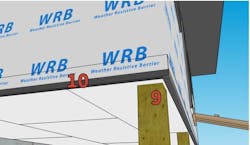
As you install the outer row, notch around the posts and seal the edges with canned foam (9). Seal the outer edge with flashing tape tucked under the building wrap (10). This will keep air from infiltrating the assembly and shed water out and away.
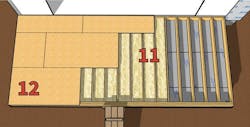
Install spray foam from above, sealing the panels to the framing and accumulating sufficient R-value to keep the floor comfortable (11). Glue and screw the subfloor on top (12). Some remodelers only glue the joists, skipping the perimeter where exterior walls will sit, believing that the subfloor adhesive is to prevent floor squeaks, which it is. However, a bead of sealant at the perimeter acts as an air barrier, preventing sideways air leaks into the assembly.
About the Author
Daniel Morrison
Editorial Director
Daniel Morrison is the editorial director of ProTradeCraft, Professional Remodeler, and Construction Pro Academy.
