A Look at the Process
Each year, Professional Remodeler partners with a remodeling company for the Model ReModel. a whole-house remodeling project, that we follow from the design stage through construction and punchout. Along the way, we explore the innovative new products and technologies being used in the house; highlight the craftspeople and trade contractors doing the work; and share tips and time- and money-saving techniques during its construction.
The 2018 Model ReModel project is located in the Los Angeles suburb of El Segundo, not far from the beach. The 1,250-square-foot home had gone 30 years without a remodel, and its interior was an outdated hodgepodge of cramped rooms. Custom Design & Construction, a design-build firm with a showroom nearby, took on the project and has nearly completed transforming the space into a contemporary 3,200-square foot home that’s custom-made for modern coastal living.
The design turns traditional room configuration on its head. The master suite is located at ground level, along with a guest suite, two additional bedrooms, and a third bath. The second floor addition holds a living area and open chef’s kitchen within a single vaulted space that takes advantage of the view. A graceful transition onto a new wrap-around deck and convenient powder room completes the second floor layout.
Framing & Sheathing
Earthquakes are an all-too-common occurrence in California, and over the years, code-approved construction details have come to include specifications for metal connectors and fasteners—requirements designed to limit damage to structures during seismic events. For this project, Custom Design & Construction is using MiTek brand hardware, including hold-downs for wood-to-concrete anchors, beam saddles, joist hangers, plated trusses, a variety of framing angles and straps, as well as all the necessary fasteners. To ensure longevity in the coastal environment, all MiTek connectors and fasteners feature either stainless steel, hot-dip galvanized finish, or its proprietary Gold Coat corrosion-resistant finish.
The exterior wall sheathing in the 2018 Model ReModel is ZIP System from Huber Engineered Woods. ZIP System panels are 7⁄16-inch OSB with a higher resin content for durability, plus an exterior coating that’s water resistant but also permeable to water vapor. This enhances drying to the outside, and eliminates the need to cover the envelope with housewrap.
“I’ve been using wrap for years,” says on-site subcontractor Julio Mejia. “My grandfather worked with felt wrap, but they’re always improving products and coming up with new techniques, and I’ve been very impressed with ZIP.”
Integral to Huber’s ZIP System is a companion tape product for sealing the joints. The rugged tape has four plies: a slip-resistant outer layer; a second layer that provides weather and UV protection; a bonding layer between the two outer layers; and a bottom layer of the advanced acrylic, all-weather adhesive. Together, these four layers make for a permanent physical and chemical bond with the ZIP panels. The tape also resists UV light, and has a greater temperature range than butyl, according to the manufacturer.
The tape is applied at all joints and penetrations in the sheathing. Installation is a simple matter of cutting the needed length off the roll with shears or a razor, and pressing the tape in place with roller designed for the purpose. (A “tape gun” is also available to apply and press the tape in a single motion.)
Windows
The house has 18 windows supplied by MI Windows and Doors in a variety of sizes and styles, including sliders and single-hungs, plus two large fixed trapezoids on the west wall, and a 10-by-8-foot fixed window on the south wall. All are white vinyl inside and bronze-finish metal cladding outside, and the dual-glazing is argon-filled for maximum sound dampening and energy efficiency.
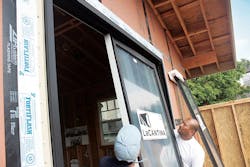
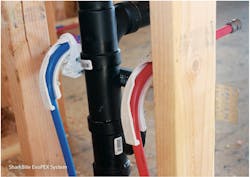
The home is equipped with LaCantina doors (above) including the company's Stacking & Pocketing Multi Slide Door system. The units rely on thermal struts and various glazing options to achieve excellent thermal performance. Behind the walls, Custom Design & Construction used the Evo PEX system from SharkBite (below). The rough-in plumbing solution dramatically simplifies the job of connecrting fittings thus reducing labor costs. The system comes with a 25-year warranty.
The flashing methods used for window installation in stucco-clad walls are prescribed by local codes. The process begins at the rough opening, where a layer of SubSeal-40, a self-adhering membrane, is applied to the rough sill. About half the width is left overhanging with the release paper intact (it will be removed later to provide a sealed overlap of the stucco paper that will run underneath the opening).
Next, strips of Moistop PF are stapled over the sheathing at the jambs, overlapping the SubSeal at the sill and extending several inches above the window head. Finally, a strip of Moistop is stapled horizontally to the sheathing above the opening, overlapping the jamb flashing on both sides.
After caulking the sill and jamb flanges, the windows are installed on top of the flashing, except at the head, where the paper is lifted to allow the flange to slip underneath. After fastening the window with screws through the predrilled flanges, the flashing paper at the head is set into a bead of caulk. Final prep for stucco involves caulking the flanges, then stapling two layers of stucco paper—60# followed by 40#—then attaching the wire lathe.
Doors
The project features LaCantina doors throughout the house, including LaCantina’s Aluminum Thermally Controlled Stacking & Pocketing Multi Slide Door system. These sliding doors have a narrow 2 15⁄16-inch stile and rail profile, but their 2¼-inch thickness makes them suitable in high wind areas. The doors achieve excellent thermal performance from thermal struts that block conductive heat loss between the inside and outside of the door, as well as a variety of glazing options.
To ensure a watertight seal at the sills, the Custom Design & Construction crew used an on-site brake to fabricate ⅝-inch-deep sill pans. The sides of the pans are folded over and caulked to create the insideThe pans are glued and screwed into place, then the LaCantina frames are dryfitted. Before final setting of the frames, the pans are liberally caulked to ensure a watertight seal.
Electrical
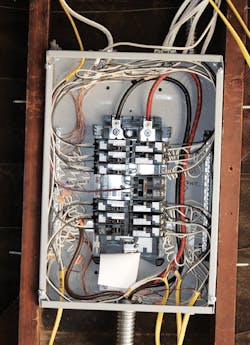
Electrician Carlos Linares is still young, but has 10 years of experience in the business. Watching him methodically plan his Romex runs, it’s clear he takes his work seriously. “We always show our runs on the plans,” Linares says. “That way, everyone is literally on the same page, and anyone coming along after me knows precisely what’s been done and where.”
Sometimes, however, not every detail is set in stone. For example, Linares had to start his work before the exact locations for the flat-screen TVs had been finalized. His solution is to place an outlet in the approximate location on its side and extending much farther out from the wall than usual. This serves to visually alert other trades, like drywallers, that work is still in progress and to avoid covering up that area just yet.
Every so often, a tool, product, or technique comes along that upends the apple cart. Such is the case with the SharkBite EvoPEX system, which the crew is working with for the first time. It’s not surprising that they were at first a little skeptical of a product that pretty much does away with the old way of putting together water lines. Gone are the soldered joints of copper piping, as are the tools and time requirements of crimped, expansion, and compression fittings for PEX tubing. Now, it all can be done with color-coded blue (cold) and red (hot) flexible PEX and push-together fittings that include a green indicator to show when the connection has been made successfully. The learning curve for the SharkBite system is short, and the labor savings—especially during a time of labor shortages—more than make up for the higher initial cost of the fittings.
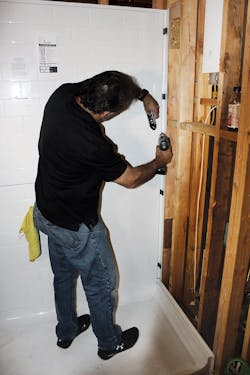
Besides being an easy design solution for any bathroom, Bestbath products are also made to adapt to the needs of homeowners whose physical abilities change due to injury or aging. The product has a five-layer system of gel coats, fiberglass, and proprietary resins to ensure durability, and it incorporates a plywood backing at strategic locations to allow for easy installation of grab bars and accessories if needed in the future. The barrier-free design includes a flexible, rubber WaterStopper dam that easily flexes when stepped on or rolled over with a wheelchair, providing users with safe, dignified access to the shower, regardless of their physical abilities.
The first step for the crew from HH Drywall is to check that the framing is in plane and all required blocking is in place. They use straightedges and chalk lines, and when they find anomalies, they fix them on the spot. Studs that bow into a room are shaved down with a power planer, while sections that bow out are shimmed with cardboard. The thin but dense cardboard—precut into 45-inch strips, 1½ inches wide—is stacked as needed to bring the area into plane.
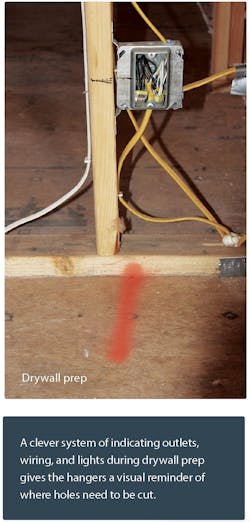
Supervisor Victor Lopez also looks for blocking that might be out of place or missing, and plumbing or electrical fittings that could create a bump in the drywall. Lopez has seen enough buried outlets in his 40 years of experience that he now uses bright orange spray paint to mark the location of outlets (shown with a simple line), loose wiring that needs to be pulled through the gypsum (marked with a “W”), or a can light in the ceiling (marked with an “O”). The marks on the floor give the hangers a visual reminder of holes that need to be cut, and in the now-rare event that something gets covered, the marks show exactly where the problem lies.
If you do some of your own taping, here are a few tips from the pros. Mix joint compound thick enough so it holds together and isn’t runny, but is still thin enough to need only minimal sanding. It will shrink when it dries, so if it goes on too thick, it can pull away from the drywall. In general, it’s better to underapply mud and fill a hole or imperfection in two coats rather than overfill and have to sand more later. Sanding adds labor time and increases the risk of introducing additional imperfections. Part Two of this series will appear next month.
