How to Attach a Patio Roof to an Existing House
Are you ready to elevate your clients' outdoor living spaces to new heights? As a residential home contractor or remodeler, you understand the transformative power of adding a patio roof to an existing house. This addition not only expands living areas but also significantly enhances the overall appeal and value of the property.
With a well-designed patio roof, you can create a seamless transition between indoor and outdoor spaces. In this comprehensive guide, you’ll discover everything you need to effectively attach a patio roof to an existing house. It's the go-to resource that will equip you with the knowledge and insights to ensure your projects shine for all the right reasons.
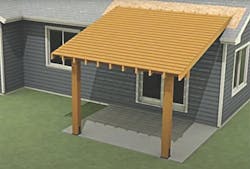
Patio Roof Attachment In Action
Before sawing and hammering a patio roof, necessary preparations are needed. This includes selecting materials, managing the project’s budget, and settling on a design with homeowners. Let’s look into an actual scenario of attaching a patio roof to an existing house that designer-builder Peter Brown shared.
Homeowners at the Cook residence in Bozeman, Mont., sought Brown’s help with their uncovered west-facing patio, which made them feel exposed and uncomfortable during sunny afternoons. The homeowners asked Brown to design and build a roof for the exposed patio, which sits outside the dining room, so he set about considering the options. Let’s take a look at this video to see how Brown tackled this project.
The homeowners asked Brown to design and build a roof for the exposed patio, which sits outside the dining room, so he set about considering the options.
The Design Process of a Patio Roof Attachment
Designing a patio roof that aligns well with the existing house structure is as much an aesthetic consideration as a practical one. If the home has a roof with a different pitch than the envisioned patio cover, it is crucial to ensure that the materials and design account for snow loads or rainfall to avoid structural mishaps. Here are the three steps that Brown did for this project, which you can also use as a guide for your own project:
Step 1: Consider Ledger Installation
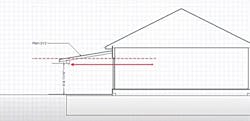
Brown initially explores the option of installing a ledger under the eave for a shed-roof structure. However, he realizes that this approach would obstruct sightlines from inside the house due to a combination of factors, including low ledger height and minimal roof slope.
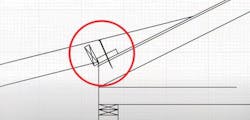
“Again, this is illustrated in a cross-section view,” he says. “We first calculated a sight-line clearance height. Then, going with a beam depth of 8 inches, a roof pitch of 3/12, and a 2x6 roof structure, we were able to determine the contact and bearing points of this new roof onto the existing roof.”
“A cross-section view of this option shows that the combination of a low ledger height, minimal roof slope, and the depth of the supporting beam will block the views from the dining area,” Brown explains. See image [1].
Step 2: Explore Supporting Post and Beam Structure
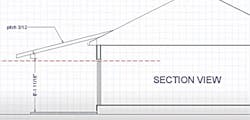
Upon further examination, Brown determines that a better option is to utilize a supporting post and beam structure. By working backward from a beam height that preserves the view, he ensures that the patio roof designs enhance rather than obstruct the sightlines from the dining area.
From exploring the options in the cross-section views, Brown determined that “A better option will be to use the supporting post and beam structure but work backwards from a beam height that preserves the view.” See image [2].
Step 3: Determine Eave Removal and Wall Plane Extension
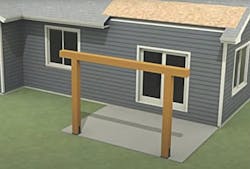
To accommodate the new roof design, Brown and the homeowners decide to remove the existing eave. This necessitates extending the wall plane up to the new roof decking and closing off the cut-off eave ends in a neat manner. Additionally, Brown verifies with the original truss manufacturer that removing the eave area won't compromise the structural integrity of the existing trusses.
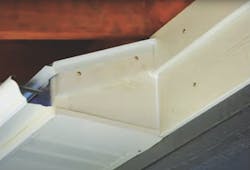
The existing roof—the eave specifically—is obviously the tricky point. The aesthetics are subjective, but Brown and the homeowners agreed to remove it underneath the new roof. That decision necessitated extending the wall plane up to the new 1x6 roof decking while also closing in the cut-off eave ends in a tidy fashion. See image [3].
In addition, the home’s existing 6/12 roof uses trusses, so Brown needed to determine if and how he could cut them off. “We were able to contact the original truss manufacturer in order to verify that removing the eave area would not compromise the structural integrity of the existing trusses,” he notes.
Choosing the Right Materials for the Patio Roof
The materials selected for the patio roof shape its durability, aesthetic appeal, and maintenance needs. Aluminum, wood, and vinyl are among the most prevalent choices, each offering unique benefits and considerations. Aluminum is celebrated for its longevity and minimal upkeep, while wood boasts traditional charm, and vinyl provides versatility in design.
For those seeking specialized solutions, the market offers innovative options like Equinox louvered roofs, which allow for adjustable shading and ventilation, and insulated roofs, which provide temperature control.
Selecting the right materials involves balancing vision with practicality and the project's budget. Look for materials that complement existing architecture, withstand local weather conditions, and fit within the estimated expenditure for the project. Additionally, ensure open communication with your client throughout the material selection process to guarantee their preferences and expectations are met.
Materials For a Sturdy, Rough-Hewn Look
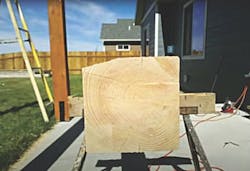
With the design finalized, Brown helped the Cooks choose materials. To make the structure stand out, they aimed for a sturdy, rough-hewn look. Instead of the usual sizes, they opted for 8x8 rough-sawn posts and beams and 2x6 rough-sawn rafters.
“It’s safe to say that this new structure will be the prominent architectural feature on that side of the home,” he notes. “With that in mind, we decided to go with a sturdy, rough-hewn look. A typical exterior porch construction would be 4-by or 6-by posts and beams. We decided to up the ante and go with 8x8 rough-sawn posts and beams, and 2x6 rough-sawn rafters.”
For the decking, they went with rough-sawn 1x6 material topped with black roofing felt, ⅝” OSB, and matching asphalt shingles. Brown suggested custom chunky black steel pieces for the post-beam connectors and bases/brackets to add style and support.
12 Steps on How To Attach a Patio Roof to An Existing House
Below are the steps that Brown followed when creating the patio roof. As a contractor, you’ll find this helpful when working on a similar project for your clients.
Step 1: Chamfer the Edges of Lumber
Begin by using a power plane to chamfer the edges of the new rough-sawn lumber. This extra step adds a touch of elegance to the finished patio structure.
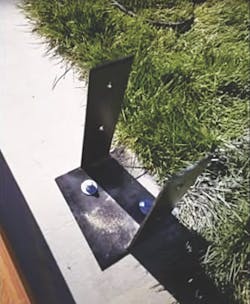
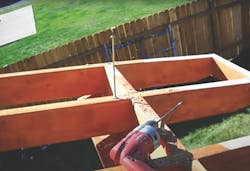
Following that is laying out all the 1x6 decking, 2x6 rafters, and 8x8 posts and beam for pre-staining with a nice-looking medium-brown stain. The post brackets Brown specified are next up for layout and installation. “The use of 8x8 posts and beam required that we weld our own custom brackets and connectors,” he explains. “The two brackets to connect the post to the patio slab consist of 8-inch plate with vertical fins.
These plates are attached to the slab with two 5/8x6” concrete anchors. Each vertical post is cut to length, secured to the brackets with lag bolts, and braced into a plumb position,” Brown notes. See image [4].
Step 2: Chamfer the Horizontal Beam
Create a 15° chamfer on the horizontal beam at the bearing point for the rafters. This chamfered edge provides a secure resting place for the rafters and adds architectural interest to the patio roof.
With the posts in place, the horizontal beam gets a 15° chamfer at the bearing point for the rafters. Then, it’s hoisted into place and temporarily secured to the posts. See image [5].

Step 3: Placement of Outside Rafters
Position and square the two outside rafters into place to establish roof reference points. Proper placement of the rafters ensures structural integrity and a level roof surface.
Now that the beam is in place, the two outside rafters are placed and squared into position. See image [6].
Step 4: Determine Removal and Attachment Areas
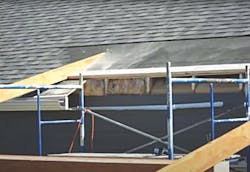
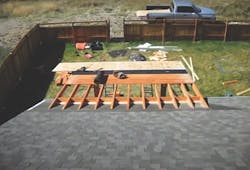
Assess areas for shingle, decking, and eave removal, as well as where new components will attach. This step ensures precise installation and minimizes disruption to existing structures.
With the rafters in place, the crew can see exactly how much of the shingles, decking, and eave to remove, in addition to where the new components will be attached. See image [7].
Step 5: Attach Continuous 2x6 Across Existing Roof
Secure a continuous 2x6 across the existing roof surface for additional support. This provides a stable foundation for the new patio roof and helps distribute weight evenly.
“Once the eave is trimmed back and the exact bearing point location for the rafters is determined, a continuous 2x6 is attached across the existing roof surface,” Brown explains. See image [8].

Step 6: Pre-cut and Install New Rafters
Pre-cut and attach new rafters on 14” centers for ventilation and stability. Properly spaced rafters ensure structural integrity and allow for proper airflow beneath the roof.
Each new 2x6 rafter is precut, seated on a 14-inch layout over the 2x6, and attached with an 8-inch structural screw. Blocking is attached to the low side of the 2x6, leaving a small gap at the top for ventilation. See image [9].
Step 7: Install Ventilation Block
Attach blocking for ventilation and a clean termination point for the wall below. Adequate ventilation prevents moisture buildup and extends the life of the patio structure.
It will get screened later. The blocking gives the wall below a clean termination point, as shown in the diagram. See image [10].
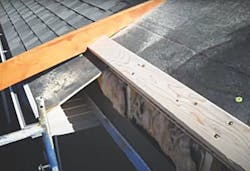
Step 8: Attach Rafters to the Beam
At the eave end of the new patio roof, the rafters rest on the chamfered area of the beam. Using 10-inch structural screws, each rafter is securely attached through the top. To enhance aesthetics and structural integrity, blocking is installed between the rafters, resulting in a polished finish.
Down at the eave end of the new patio roof, the rafters bear on the chamfered area of the beam. They attach through the top of each rafter with a 10-inch structural screw. Blocking between the rafters provides a more finished appearance. See image [11].
Step 9: Attach Rough-Sawn 1x6 Decking
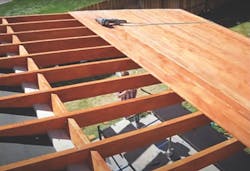
Attach rough-sawn 1x6 decking with ¼” spacing to the rafters. This decking provides a sturdy surface for the roof and adds visual appeal to the patio structure.
Atop the rough-sawn rafters, the pre–stained, rough-sawn 1x6 is attached with ¼” spacing. See image [12].
Step 10: Install Roofing Components
Install roofing felt, OSB, and asphalt shingles to match the existing shingles on the house. Proper installation of roofing components ensures weatherproofing and protects the patio from the elements.
Next up is the roofing felt, then ⅝” OSB, and asphalt shingles to match the existing shingles on the house. See image[13].
As mentioned earlier, the upper part of the new roof has an area that could be an enclosed, unventilated dead space between the rafters. “Unventilated roof spaces can be trouble. So as a precaution, we have set the blocking low and installed 1/8 inch screening,” Brown notes.
Step 11: Finish Cut Ends
Determine the aesthetic finish for areas where eaves are removed for a clean, cohesive look. This step adds a polished appearance to the patio roof and blends seamlessly with the existing architecture.
Much like the decision to cut off the eave, how to finish off the cut ends is a mostly aesthetic decision. As Brown explains, “An area of concern during the design process was how to finish the areas where we removed the eaves. The eave terminations and wall area are very visible. We experimented with some mock-ups and came up with a clean final finishing detail that blends well with the existing eave.” See image[14].
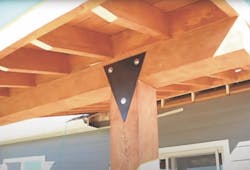
Step 12: Design and Install Custom Connection Plates
Design and install custom connection plates for a functional and visually appealing touch. These plates add structural support and are decorative elements for the patio structure.
The post-to-beam junction requires a connector, and while it’s possible to buy a variety of different pieces off the rack, custom pieces are fun to design and make. That’s the approach Brown took for the Cook’s project. It was also a way to match his approach with the post brackets.
“One of the last details before roofing the new structure is adding permanent post and beam connections,” he explains. “As an artistic flair we had 3/16” plate sheared into triangle shapes drilled and finished. These simple connection plates add an interesting and functional finished detail.” See image [15]
With the patio roof finished, the wisdom of this more ambitious design is clear. Simply attaching a ledger would have been quick and easy in comparison but also a bit flat and boring. “Mike and Gina are very pleased with the final product. This covered patio area greatly increases the livability of their backyard,” Brown notes.
Adding Accessories and Finishing Touches to the Patio Roof
Once the patio cover stands sturdy and protective, the focus shifts to the details that elevate its functionality and style. The finishing touches, such as installing drip edges and gutters, are not just functional; they can help prolong the life of the patio by directing water away efficiently. Also, incorporating drip irrigation systems into planters and hanging baskets allows a lush and hassle-free garden experience while enhancing the aesthetics of the covered patio.
Accessories such as sun shades and awnings offer the added benefits of protection against harsh sunlight and increased comfort for those enjoying the patio space. But the atmosphere isn't complete without proper lighting. The right fixtures can extend the usability of the patio into the night, creating a cozy ambiance perfect for evening gatherings.
Finally, consider the placement of outdoor furniture and decorative accents to personalize the space. Such details breathe life into a simple patio cover, making it not only a stylish retreat but an extension of the home's living area.
Elevate Outdoor Living with a Professionally Attached Patio Roof
Follow these steps to confidently attach a patio roof to your clients' existing houses. Use your expertise as a residential home contractor or remodeler to build a strong reputation for high-quality remodeling services. Start transforming outdoor areas today and make your clients' dreams come true.
Subscribe to our newsletters for expert tips and quality content to elevate your clients’ outdoor spaces. Don't miss out on transforming their backyard into a paradise.
FAQs on Patio Roof Attachments
Attaching a patio roof to an existing house requires precision and skills. Because of this, there are commonly asked questions about patio roof attachments that will help you gain more knowledge and improve your abilities in installing patio roofs. Here are some of the questions below:
1. Can You Build A Patio Roof Attached To House?
Yes, it's entirely feasible to construct a patio roof attached to your client’s house. This type of structure is commonly known as an attached patio cover. As a home remodeler, you can offer this to your clients looking to extend their outdoor living space while providing protection from the elements.
2. What Is The Cheapest Material For A Patio Roof?
One of the cheapest materials commonly used for patio roofs is corrugated metal or polycarbonate panels. They offer durability, weather resistance, and easy installation, making them popular choices for contractors and home remodelers seeking cost-effective solutions.
3. Do You Need A Footer For A Patio Roof?
Patio covers might need footings. If patio cover columns hold 750 pounds or less, they can sit on a 3.5” concrete patio slab. But, if they carry more than 750 pounds, footings are needed.
4. How Deep Do Footings Need To Be For A Patio Cover?
Use spread footings for a strong base on a surface foundation. Make them at least 12 inches deep and 24 inches by 24 inches wide. Reinforce them with #3 bars spaced 6 to 4 inches apart. Pour concrete under the existing foundation for support when installing vertical supports. This setup ensures a sturdy foundation for your project.
Steve Hansen is a Colorado-based writer with a focus on the built environment—architecture, construction, renewable energy, and transportation. He can be reached at LinkedIn.