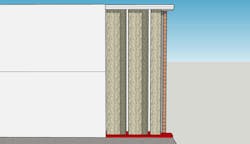
Flood Resistant Retrofit Details for Brick Cladding and Slab on Grade
In an episode of the building science podcast, 7 Minutes of BS, Dr. Joseph Lstiburek, PhD, P. Eng, ASHRAE Fellow, and founding principal of Building Science Corporation, explained why flood water cleanup is critical and how to rebuild with flood tolerance in mind.
Two ways to reduce flood damage: height and materials
Flood-resistant construction usually consists of one or both approaches: building above the flood level so that flooding won’t matter. It is an obvious and logical way of doing it; you don't have to use special materials once you get above the flood level.
The second is to assume the materials in the assembly will get wet—probably saturated—and build it such that the assemblies are easy to dry out, clean the building, and put it back together after the event happens.
How construction resists floods
Many natural phenomena can cause floods, from heavy snows and warm weather in the mountains, to heavy rains over long periods, to massive hurricanes. The mechanism of property damage goes beyond the gallons of water soaking into the building materials; it is the fact that the water is so dirty.
“Flood water is not clean. They call it category 3 water for a reason, there's sewage in it, there are animal parts, there are oils, it's just not good stuff," remarks Lstiburek.
If the flooding and the wetting were from clean water, cleanup would be easy. Exceptionally dirty water makes cleanup exceptionally more difficult.
“If all you do is dry the materials out after a flood with category 3 water, then you just got yourself a category-three nasty wall,” he points out.
One solution to houses in flood zones is to eliminate houses in flood zones. For several practical reasons, that’s not in the cards, so if we are going to continue building houses in flood zones, we should use flood-resistant construction details on new houses. But what about existing houses?
The more difficult stuff is what happens if you have a building that wasn't designed to be cleaned and rehabilitated, such as a slab on grade, with brick veneer over stud framing, fiberglass batts, and drywall. When that house gets soggy, it must be taken apart: take out the water-damaged stuff that can't be saved, including drywall, carpet, trim, cabinets, furniture, rugs, dog beds—toss them out. You're left with bare studs and probably the backside of the brick veneer from the inside.
It is a fact of life that some places are prone to flooding. It is also a fact of life that floodwater is quite dirty from muck, poison, and biological waste. It gets absorbed into your walls and floor coverings, which can pollute the indoor air even after they have dried out.
Step 1: Get rid of wet building materials
Remove the interior trim and wallboard. Chances are, the sheathing was soaked with dirty water, so that will need to be removed, too.
With the brick exposed, turn your attention to cleaning up the drainage path for future water events. There are usually large blobs of mortar that not only bridge the gap behind the brick but can also fall down and block the escape route for water.
Chisel excess mortar away from the framing and suck it out of the cavity with a shop vac.
Step 2: Clear a drainage path
When reconstructing a formerly soggy house, kill the bad stuff: clean and disinfect with a power washer. Dry it out and do it again with disinfectants and water until the porous parts are clean.
All this demo and cleanup get labor-intensive and can be expensive. When putting it back together, do it to resist absorbing water: category three or otherwise.
Begin with a water-control layer. When water passes through the cladding, it must be able to drain out the bottom of the brick to the outside.
There are typically a lot of mortar droppings on the back side of the brick because mortar squeezes out and is never removed during construction, because the back side is never seen. Unfortunately, mortar droppings make drainage harder, so they should be removed when possible.
With the drywall and wall sheathing removed, you’ll never get a chance like this again to clean them out. Take special care to clean away any mortar drops at the bottom, which can prevent water from draining out.
Use a shop vac to suck the channel clear. Now, when water drains down the back of the brick, it can drain out the bottom of the wall.
Step 3: make a wall gutter with downspouts
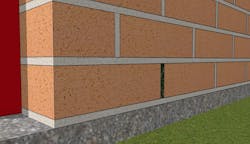
With a clear path for water to drain down, give it a place to drain out. Cut out the mortar joints between every third brick along the bottom course and insert a weep screen that will keep insects out while letting water escape.
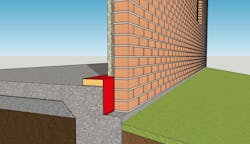
With the base of the wall able to expel water and the cavity behind it clear for drainage, we are ready to flash the bottom of the wall.
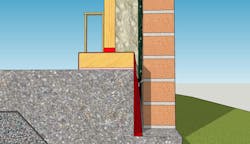
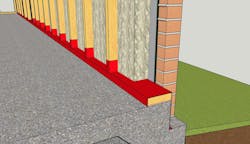
The best way to protect the wall from future flood damage is with a waterproof membrane. Paint over the bottom plate, up the studs a little bit, and down the front of the slab to form a pan that will direct water out of the weep holes we cut earlier.
Drainage mesh with a facing or filter fabric is installed against the brick. This allows rainwater to get past the brick to drain out of the cavity.
From there, closed-cell spray foam can be installed in the cavity. Closed-cell, 2-pound density polyurethane spray foam will not absorb the water from the next flood, so it will not need to be replaced next time. This adds thermal resistance, water resistance, and structural integrity to the wall.
One last step before closing it up is to paint the framing with latex acrylic paint. Cover it with non-paper faced drywall and with any luck, the next flooding repair will be much less invasive.
About the Author
Daniel Morrison
Editorial Director
Daniel Morrison is the editorial director of ProTradeCraft, Professional Remodeler, and Construction Pro Academy.
