
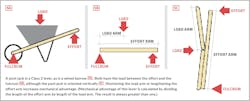
Some construction tasks―hanging drywall or installing siding from a scaffold, for example―are easier with two people. Lifting heavy loads falls into that category, too, but with the proper tools it can be done by one person working alone. Leverage is the key, and while many levers are stored in a tool box, some can easily be built on site.

Typically, you would use a hydraulic jack and a 4x4 to take the weight off the header. “But there’s another trick,” says Wadsworth, “that has all sorts of applications on the jobsite for lifting and holding, especially when you’re by yourself.” Using a couple of custom-cut studs and leverage, the method enables one person to lift significant weight, keep the load stable while doing the work, and safely release the load when the job’s done.
Building the Assembly
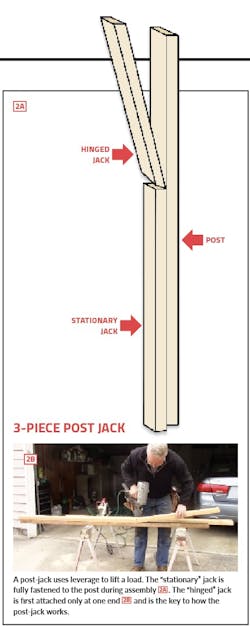
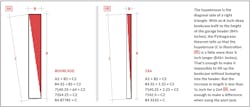
The method employs what Wadsworth calls a “post-jack,” which he puts together from three pieces of 2x4, cut and assembled in a particular way . One of them―we’ll call it the “post”―will act as a lever and is cut to an overall length that is a couple of inches short of the height from the concrete driveway to the garage header. The other two pieces― the “jacks”―will actually lift and support the wall. When placed end-to-end, the total length of the jacks will add up to the net height to which Wadsworth wants to lift the wall. In this case, the distance from the concrete to the garage header is 84½ inches. To be able to slide the jamb wall back into place, Wadsworth decides that he needs to lift the header just ¼-inch, so he cuts the two jack pieces so that they add up to 84¾ inches.
Wadsworth doesn’t give the pieces a name, but for clarity sake I’m calling the lower piece the “stationary jack” because it’s fully fastened to the post. I’m calling the upper piece the “hinged jack” because it is at first attached only at the end where it meets the stationary jack. This creates a “hinge” that is the key to how the assembly works. It not only makes it possible for the post-jack assembly to fit into the space between the concrete driveway and the header, but once in position, pushing against the top of the post moves the hinged jack into alignment with the stationary jack, which is what lifts the weight . As Wadsworth puts it, the post-jack uses “the leverage that is available in the last few degrees between [the piece when it’s] angled and the piece when it becomes straight to create a big mechanical advantage.”
With the post-jack supporting the load on the header, Wadsworth employs more leverage, this time against the weight of his truck, to persuade the wall back into position . After screwing the wall plate back down to the mudsill, all it takes is a few taps wit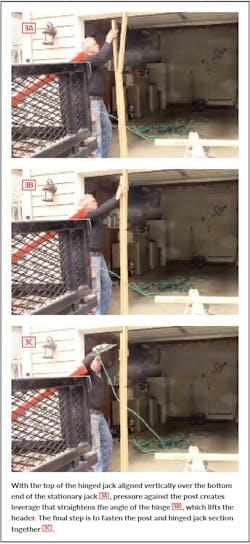
The Fine Points
A post-jack is easy to build and intuitive to use, but there are some fine points worth mentioning. Other than their overall combined length, Wadsworth doesn’t give exact dimensions of the two jack pieces, but the upper section―the one that will contact the header―is shorter (the ratio is about 3:2). Although Wadsworth doesn’t explain the reason for this in the video, it has to do with the leverage needed and the stability of the jack. The longer the hinged jack is, the more leverage can be applied , but depending on the load being lifted, the material used might need be stiffer to avoid bending.
Wadsworth also cuts bevels at the bottom of the stationary jack and at both ends of the hinge jack. (These are visible in the screen grabs, and we’ve reproduced them in the illustrations.) To explain why, he says that knocking off the corners “reduces the net increase in length that happens across the hypotenuse of a triangle, but it leaves the square end at the net distance.” In other words, he wants to prevent the kind of uh-oh moment you have when you build an 8-inch-deep bookcase to the exact dimension between the floor and the ceiling, then discover when you go to stand it up that the corner hits the ceiling before the cabinet is plumb.
While this precaution makes sense for a deep bookcase , I agree with one commenter to the video that it’s not necessary for the post-jack. The “net increase in length” Wadsworth refers to is just over ⅜ inch for the bookcase―enough to make it impossible to install without serious damage to the ceiling or the bookcase, or both―but it’s less than 1⁄32 inch across the end of a 2x4, which is not enough to make a difference. (With a 4x4, it’s still just over 1⁄16 inch.) It doesn’t help to get the post-jack into position, either. Even though the two sections making up the jack are ½ inch longer than the available space under the header, the hinge at the joint between makes it easy to slip them under the header.
Nailed It
Finally, Wadsworth uses a nail gun to attach everything. That’s fast, and also convenient, especially when working alone and trying to fully fasten the hinge jack to the post with one hand while it’s supporting the load. But hammer and nails would work for the assembly done at the sawhorses; nailing the hinge jack in place is trickier, but could be done provided you tacked a few nails into the lever ahead of time so that once the jack takes the weight, all you’d need to do is drive them home.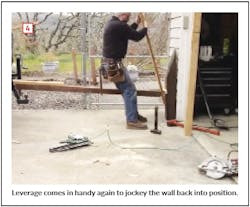
That said, hand-nailing, besides being a bit retro, could also knock the jack out of position. These days, I think most carpenters would use structural screws everywhere, including to fasten the hinge jack in-place. Working alone, it would still make sense to tack these screws in place before positioning the post-jack so all you had to do after levering it into position was drive the screws home.
This article was adapted from “2x4 Becomes a Jack - Cool Trick,” an original video produced by Scott Wadsworth and his son Nate that is part of a large inventory of content at their Essential Craftsman website and YouTube channel, all of which is devoted to advancing and preserving craftsmanship in a variety of trades.
About the Author

Sal Alfano
Executive Editor
Sal Alfano is executive editor for Professional Remodeler. [email protected], 202.365.9070