Not many remodelers enjoy hanging drywall as much as I do, but they have to do it anyway from time to time. Full sheets are not so bad, but electrical box cutouts for lights, switches, and outlets complicate things. Most carpenters take measurements of the boxes and transfer them to the drywall, but in my experience that method isn’t accurate enough. If the hole is off even a little bit—3⁄16 to ¼ inch—the coverplate won’t hide it, and repairs will be needed. Each repair may take just 10 minutes or so, but the time adds up quickly if you make multiple mistakes.
Prep Work. The fastest and cleanest way to make cutouts in drywall is to cut them in place. This entails hanging sheets of drywall over the top of electrical boxes, which means you need a reliable way to find them again. I’m going to discuss three ways to locate the boxes, plus walk through the proper way to use a drywall router to cut the holes.
Mark the location. Regardless of which method we use, the first step is always to mark the location of all outlets and switches on the subfloor. We use a black Sharpie to mark the studs and blocking, and a red Sharpie to mark the centerline of the boxes [1]. Next to the line, we write the vertical dimension from the floor to the center of the box. Most electricians use a consistent dimension for outlets and switches, but we measure each one just the same. (I’m focusing here on wall boxes, but this works for ceiling boxes, too, except that we locate box centers by measuring from two walls at right angles to each other.)
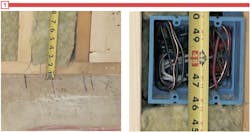
In addition to marking the subfloor with black lines to locate all studs and nailers, use a red Sharpie to mark the center of all electrical boxes (left). Also include the height dimension measured from the subfloor to the center of the box (right).
Check the wires. While we’re marking box locations, we also check to make sure the wires are tucked into the back of the box. This is really the electrician’s job, but we always double-check—the last thing we want to do is nick a wire while making a cutout.
Tack the drywall. Because we’re hanging drywall over top of the boxes and making the cutouts in place, we tack the drywall with just a few screws. A screw driven too close to the bulge made by the box will pull through, and if there is too much pressure on the drywall where it covers the box, it will bust out while making the cutout.
Locating Boxes. The simplest method for locating the boxes behind the drywall doesn’t require anything more than a tape measure and a pencil. We simply check the marks and dimensions on the subfloor, measure up the wall, and make a mark. We can then poke the drywall router bit through at this mark, which falls near the center of the box. From there, we cut our way to the edge of the box, and use the outside of the box to guide the cutout (see “How to Use a Drywall Router").
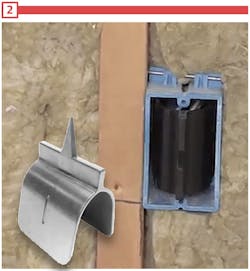
The Mark-N-Guard is a reusable plastic insert that friction-fits inside an electrical box. When drywall is pressed into place, the point on the insert pokes through the drywall, locating the center of the box. The insert also protects wiring inside the box from being nicked while making a cutout ($10 for 5-pack).
Inserts. Another way to locate the box is to insert something into the box that pokes through the drywall. We’ve used a flexible plastic insert called a “Mark-N-Guard” [2]: When the drywall is pushed into place, the point on the insert pokes through at the center of the box. The insert also protects the electrical wires from accidentally being nicked while making the cutout.
Magnetic locators. Another method for locating boxes uses magnetic locators from Calculated Industries. The locators come in four models (Blind Mark, Plug Mark, Multi Mark, and Center Mark), but they all use powerful, permanent magnets embedded in plastic blocks that fit inside a variety of electrical box shapes and sizes [3]. Some models are friction fit, others clip into screw pockets in the box. After placing the magnets inside the box and tacking the drywall in place, you use a matching magnetic block to locate and trace the box outline on the surface of the drywall [4].
The Plug Mark model can be used to locate unmarked boxes already wired with an outlet. Plastic prongs plugged into the neutral sockets hold a thin, magnetic block in place. From there, the process of using a second magnetic block to locate and trace the buried box is the same.
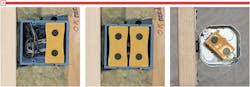
Blind Mark magnetic locators are reusable plastic blocks embedded with strong, permanent magnets. Each block fits a single electrical box (left), and two can be used at either end of ganged boxes (center); another model clips into the box’s screw tabs and fits octagonal boxes (right). ($20 to $30 per set.)
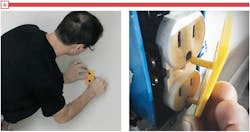
When drywall is placed over a box with a magnetic block inside, the magnetic attraction of a second block orients it precisely over the concealed block. The block can then be used to trace the outline of the box (left). The Plug Mark model has a thin, magnetic block that plugs into the neutral sockets of a wired outlet (right); another model locates and traces round, recessed cans.
About the Author

Myron Ferguson
Myron Ferguson is a drywall contractor and construction trainer. He contributes content to Professional Remodeler's sister site ProTradeCraft.com and has a blog at ThisIsDrywall.com.