How To Cut and Install Stair Stringers
In an earlier article on building stairs (“How to Build a Straight Run of Stairs,” Nov/Dec 2021), we calculated rise and run, laid out the stringers, and adjusted the bottom riser height to allow for finish flooring at the landings and to account for the thickness of the stair treads. In this article, we’ll look at how to cut and install the stringers, including how to attach stringers between full-height walls and how to anchor freestanding stairs.
RELATED: Part 1: How to Build a Straight Run of Stairs
Cutting the Stringers
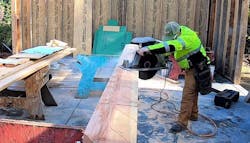
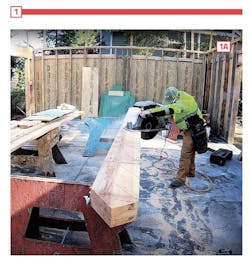
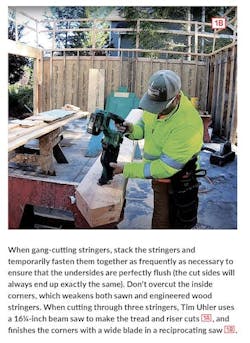
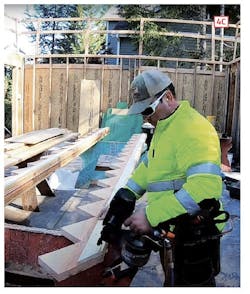
Some carpenters cut one stringer, test it for fit, then use it as a template to cut the rest; others gang cut two or three stringers at once. Either way, it’s important not to overcut the corners, which weakens both sawn and engineered lumber stringers. This means that no matter how deep your circular saw will cut, you’re still going to have to make four cuts at each cutout [1]: two with the circular saw (one each for the tread and riser), and two to finish off the inside corner using a handsaw, a jigsaw, or―if you’re gang cutting as Tim Uhler demonstrates in his video “Stair Layout and Framing”―a reciprocating saw.
But before you start cutting stringers, you may need to make one more adjustment at the top and bottom, depending on how the stringers will be attached. These adjustments can be made after the tread and riser cuts are made, but if you’re gang-cutting, it makes sense to make them before you separate the stringers.
Kickboards
In a minute, we’ll look at how to anchor stairs by attaching the outer stringers to full-height walls. Even then, though, secure connections at the top and bottom landings help to support and stabilize any stringers in the middle. But when stairs are freestanding or abut a wall on just one side, top and bottom connections are critical to managing vertical and lateral loads.
Section R311.5 in the 2018 IRC (version 4, Sept. 2020) requires stairs to be either “self-supporting” or “positively anchored to the primary structure” and prohibits “use of toenails or nails subject to withdrawal.” This language appears to be addressing exterior stairs, which are subject to frost heaves, soil subsidence, and repeated wet/dry cycles. While none of those factors are likely to act on interior stairs, your local inspector will probably argue that what’s good for the goose is good for the gander. So toenails won’t cut it.

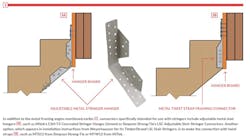
Common practice is to anchor stringers at the bottom by notching the stringers to mate with a cleat or “kickboard” attached to the floor [2]. This keeps the stairs from sliding away from the upper landing, but can also cause problems, particularly for exterior stair stringers resting on poorly-drained concrete. The wicked moisture eventually rots the seat cuts and the stringers slowly drop, transferring the load to the notch and pulling on the nails at the top. Eventually, the first tread splits, and in extreme cases, the nails withdraw from the header and the stair collapses.
That said, a kickboard is a good solution for indoor stairs, where weather isn’t an issue, but a sloppy notch can still cause a split at the first tread. Notches should fit snugly or be shimmed to ensure uniform bearing. Alternatively, you can skip the notch and use metal connectors attached either directly to the floor or to 2-by material securely fastened to the floor and cut to fit between stringers. As always, make sure your local building inspector approves.
RELATED: A Lesson in Universal Design: How to Make Stairs Safer for All
Hanger Boards
If the plan is to butt the plumb cut of the stringers directly against the header framing, then no further adjustment is needed, because adding the finish riser at the header will ensure the top tread is the same depth as all of the others. But when the landing header isn’t deep enough to provide full bearing for the plumb cuts, carpenters add a hanger board, which, for interior stairs, is typically a piece of plywood that extends down beyond the bottom of the landing header. The hanger board can be fastened to the header first, then stringers fastened in-place, one by one; alternatively, the stringers can be fastened to the hanger board while everything is lying on the deck, and the whole assembly lifted into place.
Note that while the hangerboard is not part of the total run, it should be factored in early. This is especially true in a tight space, where its thickness could reduce the required landing area below the minimum. If that happens and the hangerboard is thicker than 3/8-inch, reducing the plum cut on the stringer is not a solution because it will reduce the depth of the top tread by more than the code allows.
Plumb Cut Connection
But the question of the actual connection at the top of the stringers still remains. Even if the stair is firmly anchored at the bottom, toenails at the top probably won’t pass inspection, and neither will any fasteners driven through from behind the hanger board, which are considered to be non-structural. Side-fastening to solid blocking between stringers will work, but a good solution is metal connectors [3]. Most metal connectors are intended for use with exterior stairs, but I see no reason why they won’t work for interior stairs, provided you allow for the thickness of the metal and fasteners when installing finish materials.
Installation Tips
While freestanding stringers require anchoring top and bottom, in many cases the outside stringers can be fastened to wall studs. While your local inspector may still require anchors top and bottom, fastening stringers to studs makes for a rock-solid stair. But how you do it can eliminate headaches for drywallers and trim carpenters.

In “Tips and Tricks for Framing Stairs,” a video contributed to ProTradeCraft.com by longtime construction editor David Frane, California framing contractor Dave Osland is installing a stringer for site-built stairs that will be carpeted. (Note that Osland uses the term “stair jack” to mean what carpenters in New England, where I learned the trade, call a “stringer.” The discussion this inspired in the comments section is worth checking out.)
“If we slam the stair jack tight up against the framing,” Osland says, “the drywall guy is gonna hate our guts” because the drywall will have to be notched around every tread and riser. His solution is to fasten a 2x4 spacer to each stud, flush with the bottom of the stringer [4], then fasten the stringer to the 2x4 every 12 inches. “That way,” Osland says, “… you just make one angled cut and drop everything down behind.” If the skirtboard is omitted or doesn’t completely fill the space, the finish treads and risers, which butt against the drywall, will cover the gap.
Tim Uhler does something similar, but because he’s not planning for a skirtboard, he uses a 1-by spacer. He also attaches the thinner spacer to the stringer first, then fastens the assembly to each stud with FastenMaster LedgerLok screws driven through the continuous bottom section of the stringer.
L- or U-Shaped Stairs
Think of a landing that interrupts a run of stairs as a very deep tread that occupies the space of one riser. The overall adjusted rise and run remain the same, regardless of whether the stairs change direction at the landing―90- or 180-degree turns are most common, but other angles are possible―or continue in the same direction. The hardest part is locating the landing; from there, it’s a simple matter of laying out two sets of stringers, one going up and one going down.

Locate Framing for the Landing
Let’s look at an example of a U-shaped stair. Assuming the same room dimensions from Part 1, the unit rise is 77⁄16 inches, the unit run is 10 inches, and there are 16 risers and 15 treads. To locate the landing in a remodel, we would have to consider clearances to walls and available headroom. But for simplicity’s sake, let’s assume an open staircase with a landing that falls in the middle. That puts it at the eighth step, so to locate it multiply the unit rise (77⁄16) by 8, which yields 59½ inches [5], finish floor to finish floor. (In the example, this dimension for the landing to the second floor is 59⅝ inches due to rounding. The ⅛-inch can be made up at the top or bottom tread or split to 1⁄16 inch between the two.)
Subtracting the thickness of the subfloor and hardwood flooring at the landing (both ¾ inch) puts the top of the landing framing at 58 inches above the finish floor (59½ - 1½). But remember, we are building the stair on the subfloor, so we have to add the 1⅝-inch-thickness of the lower level finish floor, which puts the framing at 59⅝ inches off the subfloor. Because the existing floor under the landing may be out of level, this dimension should be located in relation to the level line used in Part 1 to take the rough total rise measurement. For example, if the line is 48 inches above the subfloor at the base of the stair, then the top of the landing framing would be set 11⅝ inches above the line.
Adjust the Lower Set of Stringers
The hard part is over. All that’s left is to lay out the two sets of stringers. After stepping off the lower set, adjust the seat cut as outlined in Part 1. This involves subtracting the 1-inch tread thickness, then adding back 1⅝ inches to account for the fact that the stringers will be installed on the subfloor, which is lower than the finish floor. And if you’re using a hanger board, subtract its thickness from the plumb cut.
Adjust the Upper Set of Stringers
Also, adjust the seat cut for the upper set of stringers by subtracting the 1-inch thickness of the stair tread material. The first riser on the landing would be taller than all the rest after the flooring and treads were installed if we didn’t do this, and the riser at the top would be shorter. Finally, if there will be a hanger board at the upper landing, subtract its thickness from the plumb cut of the upper stringers.
About the Author

Sal Alfano
Executive Editor
Sal Alfano is executive editor for Professional Remodeler. [email protected], 202.365.9070