House Wrap Can Stop Water, Air, Both—Or Neither
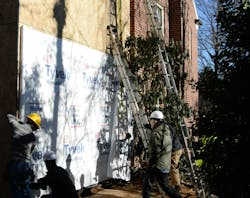
Despite what many think, siding leaks. Brick leaks. Stone leaks. Wood leaks. EIFS leaks. Vinyl leaks. Not because they’re defective products, but because people install them. And they don’t leak because the people who install them are bad, they leak because wall claddings are not monolithic layers. They are not waterproof systems; they are decorative first lines of defense. Water always gets behind them, so the house wrap must manage that water and drain it out.
BOWA’s internal training seminar for site superintendents, which the company shared for technical review of this article, centers on that simple premise: because the siding will leak, the backup layer must work correctly.
In the building code, house wrap is referred to as a water-resistive barrier, or WRB. That is fine, but high-performance builders also detail that layer to control air movement. Moisture vapor and energy are transported on air currents, so controlling air is critical, the house wrap layer is an obvious excellent place to do it.
Start at the bottom, and shingle up
The first rule is basic and frequently ignored: install house wrap shingle-style. Horizontal seams should lap at least 6 inches, upper layer over lower. Vertical seams should overlap 6 to 12 inches. This cannot be overstated. If water can run downhill into a seam, the house wrap has been converted from a water control later to a water injection system.
House wrap should extend below the mudsill—not only to help with drainage, but also for air sealing. Seal the bottom of the wrap to the sheathing with tape or sealant. That lower edge is often overlooked, yet it’s a prime air leakage point.
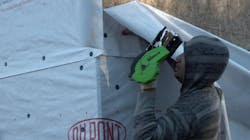
Fasteners matter, too. Not only does Horgan strongly prefer cap nails or cap staples, house wrap manufacturers specify them. Slap staples puncture the membrane and can leak water and air. While Tyvek allows limited staples if taped and immediately covered by siding, BOWA treats that as a bare minimum—not a best practice.
Seam taping also demands care. Two-inch tape works for flat wrap; drainage-style house wrap surfaces may require 3-inch tape. Improper taping can create its own problems—poorly taped horizontal seams can develop “fish mouths” that act as a trough, channeling water sideways until it finds a window or door where it can dump water into the wall framing.
“A great way to pour water into a taped seam,” Horgan says, “is to tape halfway up a button-cap fastener.” BOWA trains installers to keep fasteners away from seams and to completely tape over any caps that land too close.
Flash penetrations shingle-style
Pipes, vents, outlet boxes, and blocks all interrupt the drainage plane. They must be flashed the same way—starting at the bottom and layering upward.
For round penetrations, such as a pipe, cut a flap above the pipe and fold it up, install flexible two-piece saddle-flashing some the pipe, folds the flap back down, and tape the seams.
Repairs follow the same logic. A hole in Tyvek can be patched by cutting a horizontal slit, sliding in a new piece of wrap so it laps over the lower layer and under the upper, and taping the seams. The key is always the same: preserve the shingle effect.
Some penetrations are unforgiving. Meter bases are a prime example. Ideally, a large peel-and-stick membrane goes behind the base before installation. If the meter is already installed, Horgan is blunt: “You’re screwed,” he says, before suggesting to seal the house wrap to the base with flashing tape or sealant as damage control.
Railing attachments create similar challenges. One solution is design: hold railings off the siding so they are self-supporting and do not penetrate the drainage plane.
Windows are three-dimensional holes in your wall
Windows demand a higher level of coordination. As Horgan puts it, they are “three-dimensional holes.” Best practices have evolved, the old method of cutting an X in the WRB and wrapping it into the rough opening is no longer recommended. That practice can create air pockets that promote leakage and air movement.
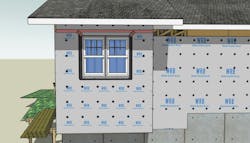
Instead, cut the WRB flush—or up to an inch past—the rough opening on all sides. From the top corners, 45-degree cuts extend outward to create a flap that will later cover the head flange. Horgan recommends building a mock-up window installation on site, particularly on large projects, so that every trade follows the same sequence.
The sill must be sloped. Some installers use beveled siding, but Horgan considers that unnecessary. The simplest solution is to slope the sill itself—often as straightforward as adjusting it and shimming appropriately.
Before installing pan flashing, BOWA installs a through-wall flashing—sometimes called a skirt—that extends the sill pan through masonry claddings. It is stapled about an inch below the opening to avoid stacking materials that could kick the window flange outward.
Flexible flashing tape is then applied over the sill and down over the through-wall flashing. Installers are trained to leave the outer release paper on until the tape is in place to prevent self-adhering mishaps. Corners are pressed tight with a block and rolled firmly with a J-roller. Rolling is a best-practice for almost all adhesive materials and mandatory at BOWA. Rolling, pressing, or otherwise tooling the tape pushes the adhesive into the substrate, keying it in like plaster keys into lath. On a micro level. This “wetting out” process drastically extends the life of the bond.
We covered window flashing in a previous issue, so we’ll skip the rest after this extra house wrap tidbit: In high-exposure conditions, BOWA adds a pressure skirt: a strip of house wrap taped to the flange and extending roughly 12 inches past the jambs. It hangs down in front of the sill flange, protecting against pressure-driven rain while still allowing drainage behind it.
Where trades collide
Wall-to-roof connections are notorious leak points because they involve multiple trades. “It’s an area where you have two different trades,” Horgan says, “it’s really on us to make sure this gets done right.” Roof paper should run up the wall at least five inches to back up the step flashing. Doug specifies running it higher than the step flashing, so that superintendents can verify it without even getting out of their truck. The WRB should be cut so the roofing underlayment can tuck beneath it, preserving the shingle principle.
Kickout flashing is non-negotiable. BOWA has required it for a decade, and it is now in the code, yet many crews still omit it. Four-inch step flashings are also essential, especially where siding manufacturers require a 2-inch clearance above roofing.
Stoops are another chronic moisture trap—and often a starting point for termite damage. Masonry stoops must be separated from wood framing. Fluid-applied waterproofing or heavy-duty sheet membranes can create that break and prevent wicking.
Deck ledgers demand similar attention. Self-adhered membrane should be installed behind the ledger location, extending 4 to 6 inches above it and overlapped by the WRB, which also covers the deck flashing.
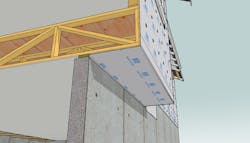
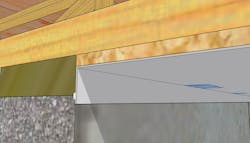
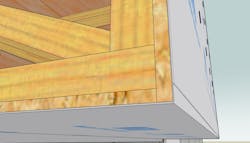
Cantilevers need more than just a WRB. Frequently overlooked by multiple trades, cantilevers should be covered with rigid sheathing as the primary air barrier and house wrap as the secondary air barrier and water barrier.
About the Author

Daniel Morrison
Editorial Director
Daniel Morrison is the editorial director of ProTradeCraft, Professional Remodeler, and Construction Pro Academy.