Beautiful Hazard: How to Design Safe, Functional and Beautiful Stairs
While on a recent trip to Dallas, I had dinner with a friend at an outdoor restaurant. One of topics we discussed was this very article on designing better stairs. I told her that I wanted to make an important point: Often accidents are caused by many conditions—only one of which is the stairs themselves. For that reason remodelers should take extra measures when designing stairs and think about what could go wrong.
After dinner, we were walking down several flights of smooth, stone stairs and I proved my point. Dim lighting? Check. Dark stairs with no contrast? Check. A couple of beers? Check. Distracted by conversation? Check. Not holding onto a railing? Check.
I got to the bottom of the run, and for some unknown reason, the designer had made the first tread about twice as deep as all the others, so I was expecting to step down onto the plaza, and instead caught my toe on the outsized step and went flying. Luckily, only my dignity was injured. But it could have been a lot worse. Oh, the irony!
Stairs are part of life, and our bodies navigate the rise and run without us needing to think about it. Yet stairs vary greatly in how well they function. This has enormous implications for aesthetics, convenience, and safety. With that in mind, here are 12 tips for better stairs. Code is a minimum. By going slightly beyond, your stairs will be safer.
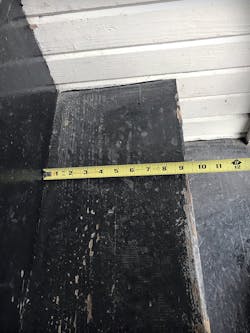
Many old homes have stairs that are so steep they could almost be called “sloping ladders.” In the case above, the treads measure 9½-inches, but with nosing subtracted, this run is only 8½. When working on homes like this, encourage the clients to expand their remodel to include the stairs if at all possible. They will thank you for it later.
1. Use A More Gentle Rise
The International Residential Code 2015 allows up to a 7¾-inch rise, so that’s what most builders do. But on the commercial side, the code limits rise to 7 inches (and run to 11 inches), based on research by the Occupational Safety and Health Administration and others. A 7-inch rise is comfortable and easy to navigate by users of all ages. Seniors living in homes with risers 7 inches or less often age in place longer than those with 7¾-inch or higher risers which can limit access to upper floors.
When my mother bought a newly built home in 2005, I recommended certain upgrades to make it easier for her to age in place. At the time, the code in New Jersey allowed 8¾-inch risers and 10-inch treads! Mother paid a substantial amount to add risers to the main and basement stairs, getting the rise under 7½ inches and the run to 11 inches, and to add a second railing. Today, at age 95, she still gets downstairs to work on hobbies.
2. Create Longer Runs
Short treads are an accident waiting to happen. I have big feet, almost 12 inches long. It’s difficult for me to use stairs when the run is so minimal that the front quarter of my foot hangs over the nosing. I encounter it frequently. The only safe way to descend is by turning your foot at an angle so more of it engages the tread.
The construction industry has fought code change for years that would mandate a 7-inch rise and 11-inch run. The argument is that those stairs take up more space, but the average stair only accounts for about 40 square feet per floor in a typical home. To add 2 inches to each tread, and perhaps one extra tread and riser, the additional room needed would be only 7-8 square feet total.
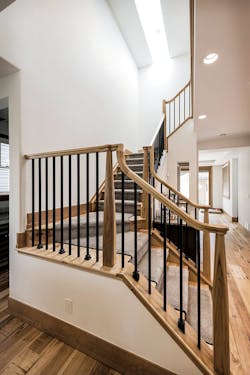
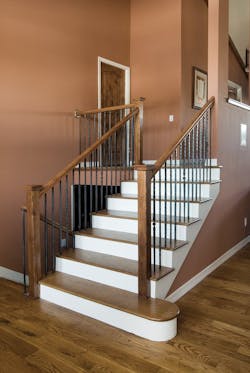
During this remodel, a builder-grade stair in Denver was dramatically improved. Hickory hardwood was installed to match the new flooring, and the clunky newel and rail system was replaced by a tapered metal baluster and newel system with handrail continuous over newels. This allows the users hand to remain in contact with the rail from top to bottom. In addition, a single, 2x4 glass skylight in a flared shaft now floods the stairway with daylight. For night lighting, there is a decorative fixture and three track heads up in the skylight shaft, as well as new can lights at the top and bottom.
3. Add a Second Railing
Watch people using stairs sometime: It’s fascinating. Many don’t really hold the railings, instead they just run their fingers down them, knowing the safety net is there if they need it. People who are right handed might hold a railing going up, but not going down (and vice versa) since it isn’t their dominant hand. Two railings provide added security for everyone in both directions.
Commercial code requires railings to start about a foot beyond the stair at top and bottom; this is also a good practice to adopt, when possible.
4. Increase Lighting
Descending a stairway is one of the most dangerous things we do in the home, and poorly lit stairs are an accident waiting to happen.There are many solutions: windows; skylights; lights at top, bottom and middle; motion sensor night lights or dedicated dusk to dawn nightlights; lighted handrails; lights in base; lights under nosings; and electroluminescent grip edges, to name a few. It’s easier to get natural light to a stair that abuts an outside wall, but it’s not impossible for an inside stair with the use of skylights or solar tubes.
5. Think About Rail Diameter
The average person must be able to grasp a rail and curl his or her fingers around it to hold tight. In the ‘80s, there was a trend of using 2x6s mounted upright, and calling that the handrail. Cheap, easy, and oh so modern. But your ability to hold that type of rail depends on grip strength, which declines with age.
I did some work on a home where the rails were not only 2x6s, but were mounted lower than code minimum (34 inches). The senior homeowner lost her grip and fell to the landing below, ending up in the hospital. By designing a 1¼-inch diameter pipe rail that mounted to the existing 2x6, we created a functional rail that had the added benefit of being 4 inches higher.
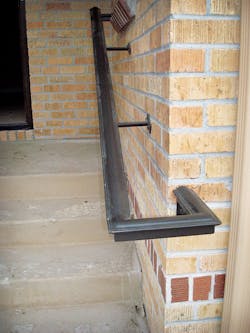
For this residential entry stair, we continued the handrail past the first riser, and returned it to the wall. The practice was actually stipulated in the International Building Code for commercial properties.
Although wood stairs are lovely, they can be slippery, and that’s why I prefer carpeted stairs or at least a runner. Carpet also provides a cushion so that if someone does fall, the chance of injury is lower. As to the rounded, gentler nosings; anyone who has slipped going up and hit their shins can appreciate that a rounded nosing is less painful.
7. Design Wider Stairs
Code minimum for residential stair width is 36 inches, but often that is the measurement of the shaft, not the walkable surface, which is reduced by stringers and handrails. I find 42 inches a better width: easier for passing someone going up or down, and easier for carrying things. People notice and welcome the extra room, and it’s an inexpensive luxury.
8. Provide Visual Cues
We need to see where we are stepping to avoid an accident. Commercial stairs are required to feature nosing with a contrasting color or texture to signal the edge of a stair, so why not residential? Stairs can be a different material or color than the landing floor with accented nosings.
9. Avoid Solitary Steps
A single step is almost invisible to a inattentive homeowner or visitor. Conversation pits from the 1970s were notorious for this. Homes also often had identical flooring on upper and lower levels, essentially camouflaging the elevation change. If the project absolutely requires a two-level floorplan, design it so the change is at least 12 inches allowing for two 6-inch risers to the lower level.
10. Know Finished Floor Heights
Frequently, during framing a remodel, a carpenter will build stairs before the homeowner has made a final selection on the flooring finish. Depending on the material that’s chosen, this can create a variation in height that’s too great or too little. For this reason, some contractors create temporary stairs that they take from job to job while others will hold off building the stair until the flooring is finalized.
The railings on these older stairs are impossible to grasp and would be basically useless if someone took a fall. Not only is the railing problem beautifully addressed in the remodel, but the new stairs also feature a longer run and rounded nosings on every tread.
11. Remain Consistent
All risers and all treads must be within ⅜ inch of each other, per the International Residential Code 2015. There is a very good reason for this. A veteran carpenter once told me that building stairs is a “sacred trust.” I had never heard that expression, but instantly knew he was right. As designers and builders, we have a sacred trust with our clients, their families, guests, and future inhabitants of the home, that the stairs will be predictable.
After completing just two steps of a stairway, the human brain memorizes the rise and run and adjusts stride accordingly. Inconsistency throws off balance.
We see this code requirement missed most often at the top or bottom of the run, where the carpenter didn’t account for different thicknesses of finished floor. But the top or bottom steps are the most critical to get right.
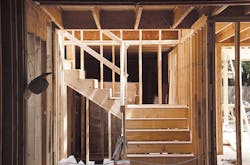
This whole-house remodel features a prominent set of stairs near the home’s entrance. However, at the time of this build the clients still hadn’t decided on flooring material for the first and second story. Depending on product selection, this could throw off riser heights by as much as an inch on the bottom and top of the run.
12. Allow Adequate headroom
Code requires 6-foot 8-inch clearance at a minimum. And there’s good reason, as many people are over 6 feet tall. If they are descending the stair in a hurry, they may smash their head on a low-hanging beam. Most older stairs, particularly basement stairs, fail this requirement, sometimes miserably. In a remodel, you can often reframe a joist or two over the stair to gain a few critical inches of headroom. Even if the stair still doesn’t meet code, adding a couple of extra inches can make a difference
About the Author

Doug Walter
Doug Walter, of Doug Walter Architects, in Denver, has specialized in residential remodeling for 25 years. He has a long history with Universal Design and aging in place. He helped write the NAHB’s Certified Aging-in-Place Specialist curriculum and holds an ICC Certificate as an Accessibility Inspector.
