Are you seeking to refine your expertise in making kickout flashing? In this guide, we'll refresh your knowledge and help you improve your skills with essential tips to ensure correct kickout flashing, the tools you need, the proper steps to make kickout flashing, and the common mistakes you should avoid. Stay ahead of the curve and discover the keys to mastering kickout flashing for every project.
What Is Kickout Flashing?
A kickout flashing is a fundamental component of any successful roofing or siding installation project, as it serves as a crucial barrier against water intrusion. This is especially crucial for structures with cedar, hardi-board, or horizontal siding. Without proper kickout flashing, water can penetrate the wall, causing rot, mold, and other structural issues.
Mastering the proper way of making a kickout flashing is essential as it enhances the durability and longevity of your construction projects. Additionally, following best practices in making kickout flashing helps you comply with building codes and regulations, mitigating potential risks and liabilities.
How to Make Kickout Flashing Correctly
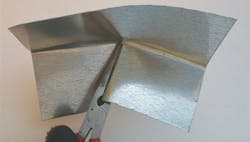
You can make kickout flashing from a piece of step flashing, but there’s a wrong way and a right way. The wrong way is easy: Cut the roof-leg of the step flashing at 90 degrees, then slide the lower half under the upper half. Unfortunately, this is guaranteed to leak, even with caulk or adhesive applied to the seam, especially if you get the overlaps backward. Unless the seam is properly overlapped and soldered, water will eventually make its way underneath. By the time you discover the leak, the damage to the wall will be done.
The right way is to fold the roof leg instead of cutting it. This creates a seam, but one that water cannot penetrate. To get a good fold, you will need a pair of long needle-nose pliers—long enough to reach all the way from the edge of the step flashing to the inside corner. Use galvanized steel or heavy aluminum (light-gauge aluminum may tear at the corner).
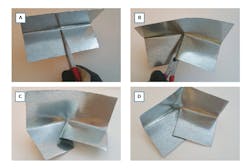
The hardest part is finding the extra-long pliers, but it's essential for the process. If unavailable, cutting the flashing to match shorter pliers can suffice. For instance, the flashing used in this blog (refer to the photos) is cut to match the 2¾-inch throat of the needle-nose pliers.
Tools And Materials Needed For Making Kickout Flashing
To ensure the effective making of kickout flashing, you'll need the proper tools and materials. Here's what you'll need:
- Step flashing - Galvanized steel or heavy aluminum is preferred
- Needle-nose pliers - To fold the roof leg of the step flashing
- Safety gloves
With just these three tools, you can make a proper kickout flashing that effectively diverts water away from vulnerable areas of a home or building, ensuring long-lasting protection against water damage.
4 Steps on How to Make Kickout Flashing
Follow these steps created by Pro Remodeler for a more effective and efficient way of making kickout flashing:
[A] Clamp the roof leg of the step flashing so that the tip of the needle-nose pliers reaches all the way into the corner bend.
[B] Roll the needle-nose pliers “downhill” to create a fold in the roof leg. As you can see in picture B, a “left-hand” kickout is made. Roll the pliers the other way to create a “right-hand” kickout.
[C] Pinch the wall leg to create a vertical crease, then adjust the width of the fold (with gloved hands or with the pliers) until you get enough angle on the kickout bend.
[D] Flatten both edges of the fold, and crease the wall-leg bend again to create a sharper corner. As with all step flashing, fasten the kickout in place through the wall leg and avoid nailing through the roof leg.
3 Common Mistakes To Avoid When Making Kickout Flashing
Aside from the the wrong way of making a kickout flashing, here are some of the common mistakes you should avoid if you are seeking to perfect your craft of making kickout flashing: with integrity and effectiveness:
- Incorrect Measurements and Angles: Failing to achieve the correct angles on the kickout bend can hinder water diversion, potentially allowing water to pass through, leading to water pooling.
- Inaccurate Measurements: Incorrectly measuring the dimensions of the kickout flashing can result in ill-fitting installations, compromising its effectiveness in directing water away from vulnerable areas.
- Neglecting to Reinforce Bends: Skipping the step of reinforcing bends in the kickout flashing can weaken its structural integrity, increasing the likelihood of distortion or failure over time.
Upgrade Your Kickout Flashing Skills With Pro Remodeler Today!
Knowing how to properly make a kickout flashing is the first step in learning and improving your skills in making one. With the blog’s tips and techniques, Pro Remodeler guarantees you expert mastery of making a kickout flashing. Subscribe to our newsletters today to gain exclusive access to industry-leading insights, expert tips, and hands-on tutorials to ensure your roofing projects stand out!
Frequently Asked Questions About Kickout Flashing
While making kickout flashing is easy with the right tools and techniques, some professionals might still have some questions about kickout flashing that every professional might have. Let’s take a look at some of them below:
1. Is Kickout Flashing Required?
Yes, kickout flashing is crucial for effective water management in building construction, particularly at roof-wall intersections.
2. Can You Replace Flashing Without Replacing the Roof?
It is recommended that the flashing be replaced along with the roof, even if it is in good condition. However, adding new flashing to an existing roof is also possible. To install a new flashing correctly, you must remove the shingles around the old flashing and then re-lay them once the new flashing is installed.
3. Is Kickout Flashing Required By Code Yet Often Overlooked?
While kickout flashing may be easy to forget, it's actually been required by the International Residential Code (IRC) since 2009. As a professional construction company, it's essential to follow this rule. State building codes also often specify the need for kickout flashing.
About the Author
Sal Alfano
Executive Editor
Sal Alfano is executive editor for Professional Remodeler. [email protected], 202.365.9070


