Residing and Insulation Upgrades that Work
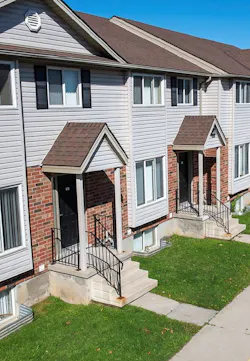
There are roughly 125 million occupied housing units in the United States. Many are old, and some have almost no insulation at all. They leak air through wall cavities, push conditioned air out through gaps around wiring and plumbing, and rely on aging mechanical systems that must work harder every year to maintain a temperature that was never comfortable in the first place.
The case for doing something about this has never been stronger — not just for climate or energy bills, but for the people living in those buildings. Deep energy retrofits address all three, often at the same time. And yet, as Jonathan Smegal, an engineer with RDH Building Science in Waterloo, Ontario, points out, most of these buildings are still waiting.
“There’s a massive market for deep energy retrofits — adding insulation, making buildings more energy efficient. The houses in our neighborhoods. The energy bills we’re surprised by every month.”
Smegal has spent years working on the building science of how to make existing buildings perform the way new ones should. In this conversation — originally recorded for the 7 Minutes of BS podcast — he walks through the case for exterior insulation, the logic of a stepwise retrofit, and the findings of a landmark study that put five different insulation systems head to head on a single block of student housing.
“In Canada, we don’t eat our parkas…”
Wrapping continuous insulation around the outside of a building accomplishes two things that interior work cannot. First, it eliminates thermal bridging — the heat that travels through every stud, joist, header, and fire block, bypassing whatever insulation sits between them.
Second, it keeps the wall sheathing warmer, pushing the dew point out of the wooden assembly and somewhere in the middle of the insulation, sharply reducing condensation risk.
The other advantage is timing. When cladding must be replaced is the best time to upgrade the system, not the part. A home is an investment, and to open a decades-old system to put a band-aid on and cover it up is missing an opportunity, to say the least.
“The best place to put insulation on a building is on the exterior — wrapping it continuously around the building. It reduces thermal bridging and any potential condensation inside the wall assembly.”
Once you strip the cladding, you’re already most of the way there. The incremental cost of adding one or two inches of exterior insulation is far lower when you are already mobilized than it would be if you came back later. Smegal’s mentor, Dr. John Straube, puts it this way: "In Canada, we don’t eat our parkas, we put them on the outside..."
Air Sealing: The Step Most Retrofits Skip
One of the underappreciated benefits of an exterior insulation retrofit is what it does for airtightness. When you strip the cladding and get back to the sheathing, you have a clean surface to apply a continuous air and water barrier membrane. Every corner, window rough opening, and penetration can be inspected and detailed properly.
The Kestrel Court units were blower-door tested before and after construction. Pre-retrofit results ranged from 4.1 to 5.8 ACH at 50 pascals. Post-retrofit, every single unit passed the Canadian Home Builders’ Association Net-Zero Energy Ready criteria, with most landing between 1.2 and 1.7 ACH. That’s a reduction of roughly 70 percent in air leakage across five different insulation systems, all using a different approach to the air control layer.
What Happens Inside the Wall After Retrofit
The central worry with any exterior insulation retrofit is moisture. Too many times, tightening a house has caused moisture issues—beginning with the Great Painters Revolt in the 1930s*.
RDH installed temperature and relative humidity sensors at the 3 critical interfaces at multiple heights. Data acquisition systems in each mechanical room logged readings continuously through the first two winters of occupancy.
“We’ve monitored for a couple of years now, and we have seen no elevated moisture contents in any of the wall assemblies — not in the framing, not in the air spaces, not anywhere.”
The results were unambiguous. Across all five systems, wood moisture content ranged from 8 to 14 percent throughout the monitoring period—well below the 16 to 20 percent threshold at which durability concerns begin. Relative humidity at critical interfaces stayed within acceptable ranges in every unit, through both summer humidity and winter cold.
The Owens Corning XPS units actually showed sensors dropping into ranges too dry to register — a note on the data chart simply read: “Wood moisture contents are too dry to measure during this time.” The Dryvit EIFS units, which applied insulation directly over the existing brick, showed consistently moderate humidity levels at the brick/foam interface. The tremendous buffer capacity of the brick wall, though, all but eliminates risk. The Rockwool vapor-permeable assembly showed a wider range at the exterior surface of the insulation, as expected for a vapor-open system, but the sheathing surface stayed well-controlled.
All five systems passed. Every wall assembly performed as intended from a moisture durability standpoint. The exterior insulation kept the sheathing warmer, not colder, relative to the pre-retrofit condition.
Mechanical: Smaller Equipment, Better Results
One of the payoffs of a performance retrofit is what it does to mechanical equipment sizing. Cut the heating and cooling load of a house by 40 to 60 percent, and you no longer need the equipment you started with. When old equipment reaches the end of its service life, you can replace it with something smaller and far more efficient.
At Kestrel Court, all units received heat pumps as primary heating and cooling — a mix of standard and cold-climate models. All units also received HRVs, replacing the kitchen and bathroom exhaust fans that had previously constituted the entire ventilation strategy. The reasoning: Tighter buildings need intentional ventilation. Student housing produces a lot of hot air. Sorry, I couldn't resist. High moisture loads from cooking, bathing, and occupancy density are coming in student housing units. Without controlled fresh-air delivery, sealing the envelope would have simply concentrated indoor pollutants rather than managed them.
“When you do a retrofit and add intentional ventilation — an HRV or ERV — you have control over where your fresh air is coming from and it’s filtered. The interior environment is healthier.”
Nine of eleven units in the broader project had their gas meters permanently removed. The project demonstrated that an all-electric performance upgrade is not only technically viable in Climate Zone 5 but also measurably effective.
What Separates a great System from an excellent One
All five systems worked. That’s the headline Smegal leads with, and he means it. None produced elevated moisture. All achieved the target airtightness levels. All met the net-zero-ready energy targets.
If he were paying someone to do it on his house (or if he were supervising his boys on a DIY retrofit), he frames his preference not as a product endorsement but as an installation philosophy.
What separates systems, in his view, is the number of passes a crew has to make around the building. Every additional layer of material is another mobilization, another opportunity for sequencing errors, another line item in the budget. His preferred approach minimizes passes while keeping each layer’s function clear and singular.
“We tend to like the least number of layers possible — board foam insulation put up with strapping over top of it, and an air and water barrier put behind it. Remove the cladding, get back to the sheathing, apply an air and water barrier, then apply the exterior insulation with strapping. Simple.”
In practice, that preferred sequence looks like this: remove the cladding; apply a self-adhered or fluid-applied WRB and detail all corners, window transitions, and penetrations; install exterior insulation; apply strapping with long structural screws; hang a wall cladding. The insulation type, EPS, XPS, polyiso, mineral wool, matters less than the sequencing and the detailing.
The Case for EIFS
The system I liked, not necessarily as the best system, but as a system that perfectly fixed the problem at hand: the EIFS system. Dryvit applied foam directly over the existing brick — meaning no one had to knock down all that brick, and the masonry never went to the landfill. More importantly, the brick's thermal mass ended up within the thermal envelope, where it can buffer daily temperature swings rather than sit outside the insulation doing nothing.
When the EPS foam is adhered directly to the substrate rather than mechanically fastened, thermal bridging through the insulation layer approaches zero — there are no fasteners penetrating the foam. EIFS also uses a fluid-applied air- and water-barrier, the highest-performing WRB category available. And the design flexibility is exceptional: EPS can be shaped to create architectural features, trim details, or surface textures without the added complexity of using separate materials. It is the most efficient system on many scales of measurement.
This is basic maintenance
The regulatory pressure to do this work is building. New York City’s Local Law 97 imposes carbon fines on non-compliant buildings starting in 2024, set at $268 per metric ton of excess emissions. Washington State has adopted ASHRAE 100 for existing buildings, with Tier 1 reporting starting in 2026. Toronto is targeting net-zero for all buildings by 2040. Vancouver requires all new and replacement heating systems to be zero-emission by 2025. The direction is clear, even where specific mandates vary.
But besides what the law has finally figured out are superior practices, building professionals are compelled to give homeowners good advice.
What Kestrel Court demonstrates is that the work is achievable at scale, with products available from any commercial insulation distributor and installed by crews who already know how to do it. The technology isn’t the barrier. The barrier is usually recognizing the right moment to move: when the cladding fails, when the roof needs replacing, or when the heating equipment gives out. Retrofit in layers, starting with the enclosure.
Five Field-Tested Details
The study examined various exterior insulation details specified by five insulation manufacturers. RDH helped each manufacturer design a detail that would work, so it was not surprising to RDH Building Science Laboratory when all of the details worked. The variation in system designs and the uniformity of performance show that there are many ways to achieve a desired outcome.
BASF Detail
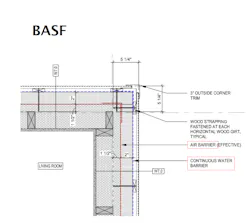
BASF used spray foam. Getting air sealing as part of insulating is a big bonus with spray foam
Dryvit
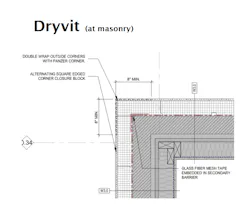
The Dryvit system applies directly to masonry with a liquid flashing base and a liquid exterior coating.
Owens Corning
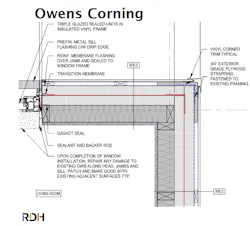
Owens Corning used rigid foam board over house wrap to create a redundant air water, and thermal barrier system.
Plastifab
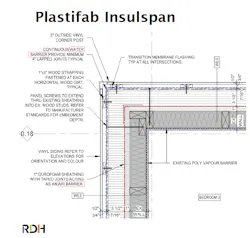
Plastifab is a rigid foam board with an exterior OSB skin. A layer of EPS foam against the wall sheathing details as a water barrier. Another (thicker) layer is added for thermal resistance. A layer of OSB is fastened outside the foam as a nail base for siding.
Rockwool
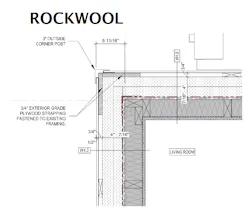
Rockwool used a 4-inch layer of insulation over an air/water membrane. Because rockwool insulation is highly permeable, air and water management must be implemented before the insulation layer.
About the Author

Daniel Morrison
Editorial Director
Daniel Morrison is the editorial director of ProTradeCraft, Professional Remodeler, and Construction Pro Academy.