3 Steps for Installing House Wrap and a Rainscreen
This Minneapolis mid-century modern home may be in great shape, but it's weather-resistant barrier (WRB) needs some love. That's the next step for the OA Design+Build+Architecture team on their Building Resilience series with ProTradeCraft. To keep weather out and air in, the team installs layers of barriers and moisture management on top of leaky, wide tongue and groove siding to ensure a tight home.
The team's moisture management on this siding retrofit includes three necessary steps:
Watch the ProTradeCraft walkthrough video below or continue reading:
Step 1. Install window flashings and WRB around windows
To start, the team hits the windows. Throughout this process, OA chooses Benjamin Obdyke's Hydrogap SA Weather Resistive Barrier, a self-adhered product.
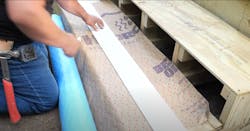
The team cuts wide strips of the WRB to air seal around the window opening.
First, the team installs a piece of siding to the bottom of the opening to push water away from the wall. Next comes in those wide strips of WRB, which they use to wrap around the framing. But there's not as much precision on the corners with the WRB because another layer of flashing—Hydroflash LA—will fill this need.
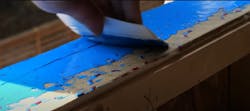
To seal those corners, the liquid flashing is applied around the window sill.
After creating a thick, even layer of flashing, the windows go in. Then comes flashing tape to seal the window to the WRB, adhereing the tape to the window frame, not just the flange.
"This will give a superior air seal, even if it is a little tricky to execute," says ProTradeCraft Editor Dan Morrison.
Step 2. Wrap the home in self-adhered building wrap, starting with the window openings
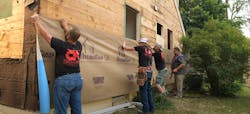
Once the weather-resistive barrier is installed around the windows, and those windows are properly sealed, the team can wrap the building.
The team snaps a line to start the process of installing Hydrogap. Working from this start, they can unstick and re-stick the acrylic wrap as needed for easy repositioning. Once in the correct position, the team removes the release sheet and continues the process to smooth out the wrap.
With each new roll, the team ensures a 3-inch overlap between wraps.
Around obstructions, such as vent ducts, pipes, and wires, the team carefully wraps and cuts the house wrap, then finishes with more liquid flashing.
Step 3. Install rainscreen mesh over building wrap for additional water resilience
And, as it goes in Building Resilience, it's a must to ensure the most optimal, high-performing weather resistance. The team now installs Benjamin Obdyke's Slicker MAX rainscreen, a vertically channeled mesh that permits air movement and encourages water drainage.
The team aligns the bottom of the Slicker MAX rainscreen to the same height as the siding, then staples, ensuring to tuck the bottom and keep bugs out.
"Again, at this point, the wall is already waterproof; the Slicker MAX adds a layer of resilience to the wall system by letting water out," says Morrison. "The facing on this product is for mortar-based claddings like stucco, so layering the flap is unnecessary unless you want your customers to think you might give a darn about your work product."
To watch the whole season three of Building Resilience, visit ProTradeCraft.com


