Here at BOWA, we’ve made a lot of money fixing other contractors’s mistakes. Many of those mistakes appear over and over again, and a lot of them occur in and around showers. The good news is that when you fix something over and over again, you learn the best way to do it right the first time. In this article, I will look at areas that fail most frequently, and discuss the solutions that have worked well for us.
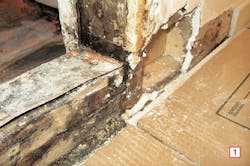
To work effectively, showers must have a complete waterproofing system. Although it’s counterintuitive, glazed tile and natural stone are not actually waterproof. Moisture can penetrate both of those materials even if the surface has no cracks. Grout is also porous, and so is setting mud and thinset. Every time the homeowner takes a shower, water moves through these materials, and if that water makes its way into the wood structure, it creates mold and rot. (In one case, we could actually see the water behind the glass tile). As a result, showers must be waterproof before the tile is installed (see “Secondary Drainage System").

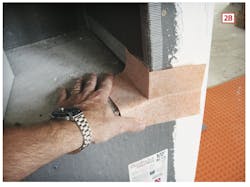


Pre-formed corner patches, like these from Schluter-Kerdi, fit snugly around inside and outside corners at curbs [2a] and benches [2b]. Instead of trimming the waterproofing material at the edge of the curb [2c], make sure it extends out on to the drywall next to the curb [2d].
Curb Flashing
We see the most problems in flat areas, such as drains and half-walls, but benches and, especially, curbs are particularly vulnerable to water damage. [1] At these structures, many planes come together to create corners where water doesn’t drain easily — in the case of curbs, several corners are formed close together at or near the floor of the shower, where there is a lot of splashing and standing water. If a curb isn’t correctly waterproofed, it won’t last long.
One shortcoming of waterproofing membranes is that they come in flat sheets that are difficult to bend neatly around inside and outside corners. Instead, we like to use three-dimensional patches, which work well at curbs and benches, [2] and also at half walls and shampoo niches. Inside- and outside-corner patches are available from Schluter-Kerdi, Noble, Oatey, USG Durock, and others.
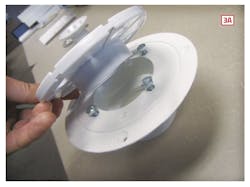
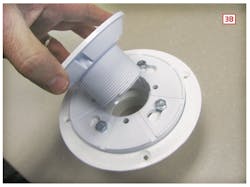
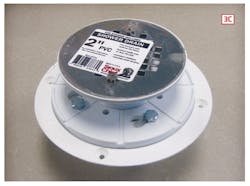
The drain body is set into the shower base and connected to the drain line. A flexible waterproofing membrane or “plumber’s pan” is clamped between the drain body and the clamp ring [3a]. This layer will catch any water that seeps through the tile and grout and direct it to the drain, so it’s critical that the weep channels are not blocked. The beauty ring comes next and is installed flush with the level of the tile [3b], followed by the grate, which is the finished face of the drain [3c].
Shower Drain
The critical connection in the floor of the shower is the big hole in the center of the pan where the drain goes. The correct drain to use is called a “bi-level drain,” which has four pieces: the drain body, the clamp ring, the beauty ring and the grate. [3] The plumber’s pan is clamped between the drain body and the clamp ring. The beauty ring is installed up to the level of the tile, and the grate pops into the beauty ring.
The directions that come with the drain usually say to glue the drain body to the bottom of the pan. Many plumbers omit this step because the clamp ring usually seals the joint, but the directions call for glue, so we require it. But don’t get overzealous with the glue. Glue only the bottom of the membrane to the drain body; do not glue the top of the membrane to the clamp ring — otherwise, you may seal the weep holes, which are what allow water that penetrates the tile to drain from the pan, through the ring, and into the drain.
As a side note, we are concerned that, over time, off-gassing of the plasticizers used to make vinyl shower pans flexible may leave the pan brittle enough to develop cracks. For that reason, we are upgrading to a CPE (chlorinated polyethylene) shower pan liner, such as Noble Chloraloy.
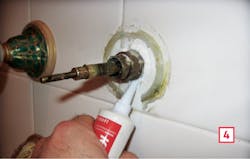
Caulk the space between the tile and the valve. With a large escutcheon, caulk the top three-quarters from about 7 o’clock to 5 o’clock, leaving the bottom opening to let water drain out.
Valves
We see enough leaks at shower valves to make them worth mentioning. We seal valve openings at the waterproofing stage if possible. We’ve had mixed results getting small gasket-like fittings from Schluter-Kerdi to fit at valves, although the small ones are perfect for shower heads and tub spouts. For insurance, after the tile is installed, we caulk the hole around the valve [4]. With a large escutcheon, we also caulk the tile under the escutcheon most of the way around, leaving the bottom open for drainage.
Get more Jobsite Know-How here
About the Author
Doug Horgan
Doug Horgan is a vice president of BOWA, a design-build company in the D.C.-metro area. Doug is also a technical adviser to ProTradeCraft.com. This article is adapted from “Weak Links in the Shower: 4 Shortcomings in Waterproofing Logic” and “5 Step Waterproofing System: Best Practices for Tile Showers” at ProTradeCraft.com.