A Look at the 2017 Model ReModel, Part I
Transforming a small, rural house that’s seen better days into an energy-efficient home suitable for retirement is the challenge behind the 2017 Model ReModel project.
Each year, the editorial team at Professional Remodeler selects one project to represent the Model ReModel, a concept that’s part pictorial, part how-to journalism, and part reality TV for remodelers. Model ReModel tracks the project online and in print from concept to completion, providing construction tips, design inspiration, and guidance on products and material selection.
One priority for this year’s home was to showcase a remodel that represents the types of jobs—along with their challenges—that remodelers undertake every day. The primary mission was to turn a modest house into a modern home on a modest budget.
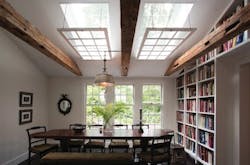
Everything fell into place when Ben Bogie, owner of Built to Last Design & Build, in New Milford, Conn., was brought onboard. Bogie, a second-generation custom builder and remodeler, is a master carpenter with a passion for historical renovation. Bogie knew his way around a jobsite. His vision was to turn the rundown structure into a modern home with amenities for an aging-in-place client, blending universal design, historical elements, and energy-efficient upgrades while maintaining the home’s New England-rooted aesthetic.
“We wanted the home to blend with the local vernacular. We’re surrounded by classical-styled, Colonial homes here and we wanted something that wouldn’t look out of place,” he explains. “Modern and maintenance-free was important, but keeping a country cottage, Colonial aesthetic with historical elements was also essential.”
From the Ground Up
Before work even began on the house, issues with the building site had to be addressed. One major problem was that the house sits not only at the bottom of a hill, but in a hole surrounded by dense tree canopy. The basement was a sieve for stormwater runoff. Remnants of an old patio retaining wall bore evidence of water problems. The old patio area was actually higher than the sill plate line on the house, which was also the cause of some of the rot on the home, so regrading was necessary to move water away from the structure.
After taking down a portion of the tree canopy and excavating for a parking area that will eventually house a garage, a gravel-base parking area was created. Bogie then dug in swales that will direct stormwater runoff away from the building site, allowing water to passively filter into the soil, preventing erosion and a wet basement.
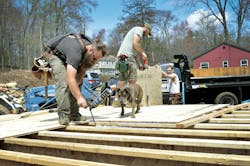
Laying the Subfloor
Once the foundation had been leveled and the rim joists were set and sealed, the team went to work laying the subfloor. Bogie was eager to try AdvanTech’s new aerosol adhesive, a polyurethane product designed to create a strong panel-to-joist connection for squeak-free floors. The aerosol application helped make short work of laying the subfloor.
Bogie uses AdvanTech subfloor on all his projects. He says the high-density engineered wood creates a stiff, quiet floor that’s durable and moisture-resistant. “It withstands rain, snow ice, heat, beating sun,” Bogie says. “It stands up to the rigors that you can put a subfloor through duringa remodeling project.”

With a flat, level floor in place, framing began on the walls. Gaps were sealed with silicone, followed by sheathing, which spanned all the layers.
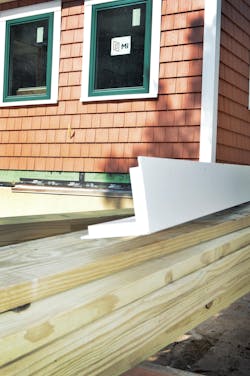
Bogie, a big believer in exterior insulation, used Huber Engineered Woods’ Zip System R-12 Sheathing for the project. The extra-thick panels create a continuous insulation layer on the outside walls. Bogie says he likes Zip System’s R-12 panels not only because of the robust air-barrier values, but also because they save time and labor. “We would have been sheathing the building, applying exterior insulation, then having to strap and detail on top of that, so this removes a tremendous amount of labor from the whole process,” Bogie explains.
After walls were in place, the team taped the panel joints, creating a super air-tight seal with high energy-efficiency ratings as well as a strong moisture barrier. “Our clients aren’t going to ever be having moisture or mold problems or air-quality issues,” Bogie says. “It’s a product that’s going to last.”
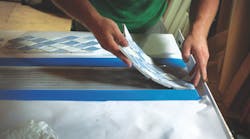
The final step was taping windowsill membranes using Zip Stretch Tape, a new favorite of the crew: “Its workability is nice. It can get really smooth wrinkle-free sill membranes,” Bogie says.
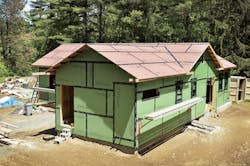
Raising the Roof
To save time and labor, the team went with manufactured trusses and Zip System Roof Sheathing for a quick roof install. The crew didn’t have to rush to get the roof on, as the sheathing offers a weather-tight roof, allowing subcontractors to move ahead with interior work.
“Once the sheathing is down, we’re ready to have HVAC and electrical start the rough-ins,”Bogie says.
He choose “raised-heel” trusses for the frame, which sit higher than standard trusses, to make more room for thicker attic insulation. The trusses selected for the Model ReModel will allow 13 inches of space for insulation at the outside edge of the roof-wall connection. Going with raised-heel trusses is a simple way to increase the home’s energy efficiency.
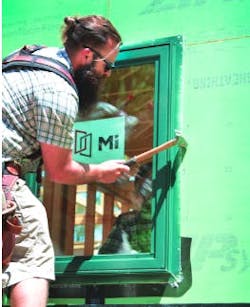
Once the roof was sheathed and taped, the team went to work installing windows. MI Windows and Doors supplied triple-glazed vinyl windows, which are made in the U.S. Bogie’s process for installing windows includes first flashing the pans using Zip Stretch Tape, then detailing the interior of the opening to seal against air leaks. The backside of the openings are then prepped with caulk, and windows are set and taped. The final step is inserting horseshoe shims at the bottom of the window, which create a weep channel for drainage. Window casings were assembled on site and hung.
Inorganic Insulation
Inside the walls, the Model ReModel project features Roxul’s stone-wool insulation. This lightweight, noise-dampening product is fire resistant up to 2,150º F and won’t create smoke or toxic fumes. “Roxul is one of my favorite insulations and my go-to for a couple of reasons,” Bogie says. “First and foremost is its performance: The product has really good R-values and air sealing and moisture management abilities.” Second, Bogie says he likes the components that go into the material itself. “Roxul is completely inorganic,” Bogies says, “so you don’t end up with any mold issues or biological growth.” He adds that it cuts nicely and is easy to install, too.
This year’s Model ReModel was located in an architecturally historical area of New England. A Greek Revival style—popular on churches, farmhouses, and mansions in the area—was chosen for the exterior.
Kleer’s premade corner boards with rabbeted edges went on first. Next were the top frieze boards, followed by mud boards below. Kleer’s pre-rabbeted trim boards save on installation time, Bogie says, and look great.
“One thing I don’t like about vinyl siding is the J-channels,” he says. “Kleer’s pre-rabbeted trim is a tremendous time-saver and offers incredible quality in the finished look.”
When selecting vinyl siding, the challenge was to find a shingle style that didn’t look like ... well ... vinyl. Bogie went with a 7 ½-inch red cedar vinyl shingle that closely matches the original wood shingles, and the team was sold on the quality of Grayne’s composite vinyl siding. “Grayne’s engineered composite panel allows remodelers to hit a cost point that’s achievable while giving a higher-dollar look to the home,” Bogie says. When matched with Kleer’s rabbeted trim with no J-channel, it’s a really sharp look, he adds.
Aging-in-place principles were a consideration, and Bestbath’s shower unit incorporates ¾-inch plywood, eliminating the need to reinforce the walls for grab bars. The shower curb in Bestbath’s unit is easily removable for barrier-free entry, if needed. The shower’s 5-foot diameter clearance circle affords wheelchair-bound homeowners enough room for a 180-degree turn. With a 3-foot diameter entrance and shower door, Bogie’s client is prepared for the future.
Bogie especially liked Bestbath’s ease of installation, which drastically cut down on labor. The entire unit can be framed and installed in less than a day. The decorative tile pockets allowed the team to incorporate more detailed tile work for a customized look, and—in under six hours—the shower was ready for plumbing fixtures.
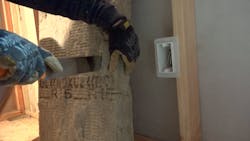
For exterior wall outlets, Allied Moulded vapor-barrier electrical boxes were installed for added airtightness. The silicone ring molded onto the box offers an airtight connection for increased energy efficiency.
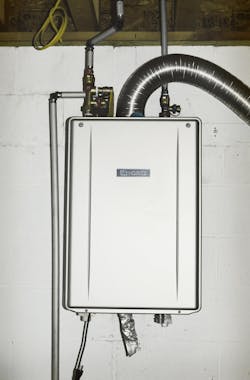
A high-efficiency tankless water heater from Noritz will not only take up less space than a traditional water heater, but will also cut down on energy costs. The tankless water heater will deliver hot water to the new five-piece Bestbath shower unit.
Read more about the 2017 Model ReModel in Part II, here.
About the Author
Elizabeth Mack
Elizabeth Mack is a freelance writer based in Nebraska.