Introducing the 2018: Model ReModel
The site has been selected, the plans finalized, permits pulled and construction is in full swing. It’s official: The 2018 Model ReModel is underway!
For those unfamiliar with this undertaking—the fourth annual for Pro Remodeler magazine—let’s get you up to speed, STAT: Each year, we select a whole house remodel to follow from the first swing of the demo sledgehammer to the final item on the punch list, working closely with contractors and product manufacturers to detail for you every critical step in the process. Along the way, you’ll learn invaluable tips, pick up time- and money-saving techniques, discover innovative new products and how best to install them and much more. Consider it a tuition-free master class for industry professionals of every experience level.
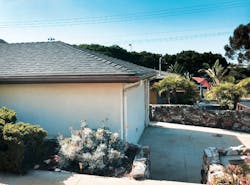
The rock placed over the front-yard block retaining wall, shown here, had worn down significantly over the years, so it will be removed and replaced to update the exterior look.
California Dreaming
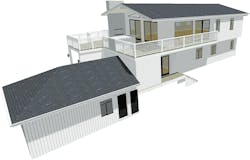
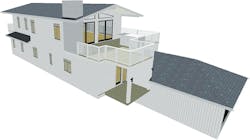
This year’s Model Remodel project is located just a few breezy blocks from the sand in the beach community of El Segundo, Calif., and it promises to be our biggest yet: A rough-around-the-edges, 1250-square-foot, 1920s-era, single-story, single-family dwelling that’s morphing into a contemporary, two-story, 2,900-square foot home with a unique layout that maximizes coastal living: Three bedrooms, a master suite, and three baths with on-trend appointments downstairs; a chef’s kitchen and living quarters upstairs in a great room–style open floor plan that takes advantage of ocean views. Swing open the 16-foot clear view tri-fold doors onto the west-facing balcony to extend the living space outdoors. Then, open the adjacent doors to the east-facing balcony to enjoy the gentle onshore breezes wafting end to end throughout the entire second story.
Extensive dry rot and termite damage were found in the wall studs, so they had to go.
The mastermind behind it all is Bill Simone, an architect, builder, and owner of Custom Design & Construction. “I started the company in 1986 out of a spare bedroom in my condo,” says Bill, who has 32 years of industry experience, “and today, we’re a full-service design-build company with 15 employees.”
A New Foundation
The demo process goes quickly and mostly without a hitch. The original plan was to retain the garage, foundation, and exterior walls. However, demolition reveals that the wall studs have extensive dry rot and termite damage, so they must go, along with many of the floor joists.
One other small hiccup: It’s decided that a front-yard block retaining wall with a 90-degree return that is cosmetically faced with rock that has become quite worn will have that rock removed and replaced. However, when the rock is removed, it turns out that one of the two sections, in fact, has no block wall underneath—just mortared rock. So, that small section of block wall will need to be added and then faced.
With the old structure gone, it’s time to get on with the business of prepping the foundation for the much larger, two-story structure. The challenge in this case: The original is a combination of concrete slab-on-grade and raised foundation, which will later require some compensation and leveling of walls. But first things first: Existing footings need to be dug deeper by as much as 5 feet or more in some areas; forms for continuous footings need to be constructed; and everything has to be tied in to the old footings and pad with rebar.
In order to make digging access easier, the old floor sheeting is removed and will eventually be replaced with AdvanTech 1⅛-inch flooring and AdvanTech subfloor adhesive for a stiff, squeak-free underlay that has the added benefit of insulating and soundproofing qualities.
The same goes for the slab, where areas of concrete are cut out to allow for access to excavate those deeper, reinforced footings. Remember, we’re in earthquake country, so building-department codes are strict about such reinforcements and tie-ins, the goal being that the entire structure is securely “tied together,” adequately anchored and able to support itself. But Southern California is not alone in this regard—pretty much any area of the country is potentially susceptible to shakers.
Strong Bones
With the concrete poured, set, and curing, it’s time for the next steps. Simone is using AdvanTech for the subfloor. “The AdvanTech 1⅛-inch flooring is just stupid thick,” says Dixon. “It’s gonna be soundproof, we used their adhesive to install it … it’s great stuff.”
On-site contractor, Julio Mejia concurs, and he’s particularly happy with the install process. “Their adhesive applicator makes installation fast and easy,” he says. “The long tube means you’re not hunching over or getting down on your knees, and the adhesive itself is soft and pliable, so it goes on easily with the trigger applicator.”
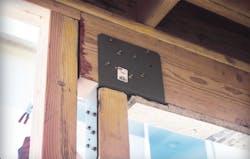
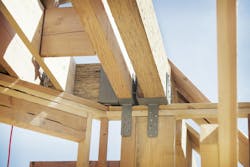
Just as a chain is only as strong as its weakest link, so it is with a building’s interconnected framing components: All those individual beams, floor joists, wall studs, and rafters really only gain their strength when joints are fastened together properly with sturdy, well-designed hardware. For the Model ReModel, the builder is going with MiTek holdowns for wood-to-concrete connections, saddles, hangers, plated trusses, angles, straps, and all the necessary fasteners. Not only does MiTek feature hot-dip galvanized, stainless steel and Gold Coat corrosion-resistant finishes, but their extensive line offers complete flexibility to meet any on-site need with reliable, code-compliant products.
Individual beams, floor joists, wall studs, and rafters are fastened together with MiTek brand holdowns.
Room With a View
Now that the second-story floor joists are in place, we’re ready to go top-side and lay in the AdvanTech subfloor panels. Again, the adhesive system works like a charm for a fast install and lifelong durability. From up here, you can really see why Bill envisioned the house this way.
The second floor will be an indoor-outdoor living space, incorporating a chef’s kitchen and great room, with no walls except for the bathroom.
“On the second floor, there’s a chef’s kitchen, great room, and no other walls except the bathroom. It’s an indoor-outdoor living space to take advantage of the views by day,” he says, “and beds and baths downstairs for nighttime sleeping.” Makes sense to us.
With framing done and the subfloor in place, the fun is just beginning for this ambitious project. You can follow the ongoing progress of the Model ReModel at 2018.PRmodelremodel.com.
