How to Flash a Dormer

Roofing contractors can take comfort in the fact that manufacturers are creating products to help with the labor shortage. During the International Roofing Expo 2023, it was seen that some companies are now making shingles with wider nailing areas to make installation faster and more accurate.
All roof penetrations need to be properly flashed to prevent water damage. This is especially important with dormers because they expose a large wall area to the weather and create many linear feet of vulnerable roof-wall intersections. As home remodelers dealing with dormer flashing, you understand the importance of executing this task meticulously. This article is based on a dormer flashing animation from ProTradeCraft, common mistakes to avoid when flashing a dormer wall.
Tools and Materials You Need for Flashing a Dormer
Before working on any dormer flashing project, make sure to have these materials ready:
- Roof Underlayment
- Peel-and-Stick Membrane
- Roof Shingles
- Roofing Cement
- Metal Base Flashing
- Step Flashing
- Housewrap
- Metal Closure Flashing
- Nails/Fasteners
7 Steps in Flashing a Dormer Wall
Here’s a step-by-step look at how to flash a dormer wall on your client’s house so that water is carried away from those vulnerable areas.

Step 1: Install roof underlayment up to the dormer, cutting it a few inches short of the roof-wall joints at the front and side walls. Apply peel-and-stick membrane to the dormer's front wall, ensuring it overlaps the roof underlayment and wraps up onto the wall 6 or 8 inches. Then do the same at the dormer sides, either stretching the membrane (or folding it, after making a small cut) around the corner.
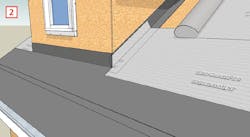
Step 2: Install the rest of the roof underlayment, making sure to roll it up the side walls. Both the peel-and-stick membrane and the underlayment should extend up the wall higher than the vertical leg of the step flashing.
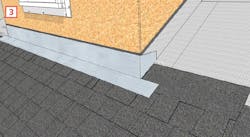
Step 3: Install roof shingles to the base of the dormer, notching around the corners as needed. Lay a bead of roofing cement along the shingles just below the dormer and bed the metal base flashing into it. Ideally, this custom flashing will have soldered corners, but if not, carefully notch the metal at the dormer corners and wrap the vertical leg around the corner onto the side wall. Fasten this flashing to the dormer walls, keeping the fasteners as far from the roof-wall joint as possible.
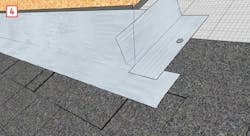
Step 4: The first piece of step flashing should extend over the base flashing. Carefully cut it at the bend and turn the vertical leg around the corner onto the front wall. Fasten only the roof leg, nailing through the flashing and the shingle into the roof sheathing. Fastening only the roof leg will avoid problems that may be caused by movement at the roof-wall joint.
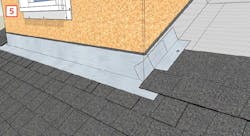
Step 5: The next asphalt shingle overlaps the first piece of step flashing, completely concealing it. Install the next piece of step flashing on top of this shingle, aligning the bottom edge just above the nailing strip. Again, fasten only to the roof with a nail through the flashing and the shingle. Repeat—shingle, step flashing, shingle, step flashing—all the way up both sides of the dormer.
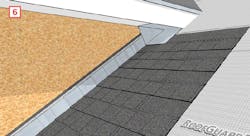
Step 6: At the top, roll the roof underlayment up onto the soffit and use peel-and-stick to seal the roof-soffit connection. Cover the membrane with a metal closure flashing. This area won’t get a lot of bulk water, but the flashing layers will keep windblown rain and snow from getting behind the roofing.

Step 7: Finally, install housewrap on the dormer wall, being careful to overlap the top of the step flashing and base flashing by several inches.
8 Tips on Flashing A Dormer
In addition to the steps, you may also consider these essential tips on properly flashing a dormer wall.
- Always begin with proper preparation. Ensure the dormer surface is clean, dry, and debris-free. Any debris or dirt may affect the flashing's adhesion.
- Invest in high-quality flashing materials, such as peel-and-stick membranes with weather resistance or metal flashing.
- Ensure that flashing materials are appropriately overlapped to prevent water infiltration. Each step flashing piece should overlap the lower piece underneath it to keep water away from the dormer.
- Ensure that junctions and corners where flashing materials meet are properly sealed by using roofing cement or sealer. This lessens the chance of water leaking through cracks or gaps.
- Pay close attention to any flashing that occurs at the dormer's angles and corners. Metal flashing should be properly bent and notched to fit tightly around corners and provide a tight seal.
- Use the proper fasteners, such as roofing nails, and ensure they are firmly inserted to avoid lifting or movement.
- Check the flashing regularly for any indications of deterioration, damage, or gaps.
- Repair or replace any broken flashing as soon as possible to preserve the integrity of the dormer's waterproofing.
5 Common Mistakes to Avoid When Flashing A Dormer
When flashing a dormer, it's crucial to be precise and pay close attention to detail. This will help with waterproofing and prevent any future problems. As a contractor, pay attention to these common mistakes and avoid them when flashing a dormer wall.
1. Improper Installation: One of the most common mistakes in dormer flashing is installing flashing materials incorrectly. Water entry and leaks might result from improper overlap, insufficient sealing, or faulty fastening.
2. Using Incorrect Materials: Using low-quality or incorrect flashing materials can compromise the effectiveness of the flashing system. Always use flashing materials that are specifically designed for the intended usage and the weather conditions at all times. For instance, flashing made of rubber or plastic may be less expensive than metal. However, due to temperature variations, these materials are more prone to erode and degrade quickly than their more durable counterparts
3. Improper Sealing and Fastening of the Flashing: If not enough sealant is applied, the flashing's capacity to form a watertight seal may be affected. Inadequate sealing allows water to continue onto your roof, eventually leading to serious damage. However, more than simply sealing the flashing is required. Make sure to use rivets, screws, or nails to secure it to your roof securely.
4. Neglecting Routine Maintenance: If the flashing is not routinely inspected and maintained, it may eventually deteriorate or sustain damage.
5. Rushing the Installation: Take your time installing the flashing to ensure accuracy and precision. Hastily finishing the installation can result in errors and reduce the flashing system's effectiveness.