ProTradeCraft has been following Mark IV Builders as they undertake a remodeling project in the Washington, D.C.,  metro area that includes a 1,000-square-foot, 2-story addition at the back of the house. An earlier single-story addition had water problems caused by poor flashing details and a finished grade that directed backyard runoff toward the house. We join the project after the old addition and its foundation have been demolished, the new excavation has been dug, the grade has been altered to create a swale behind the addition that will direct runoff from the hillside around the building, and the crawlspace foundation is ready for waterproofing and insulation.
Unvented Crawlspace Details
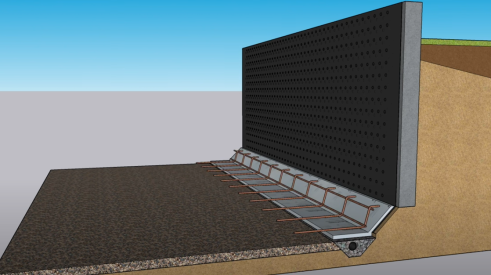
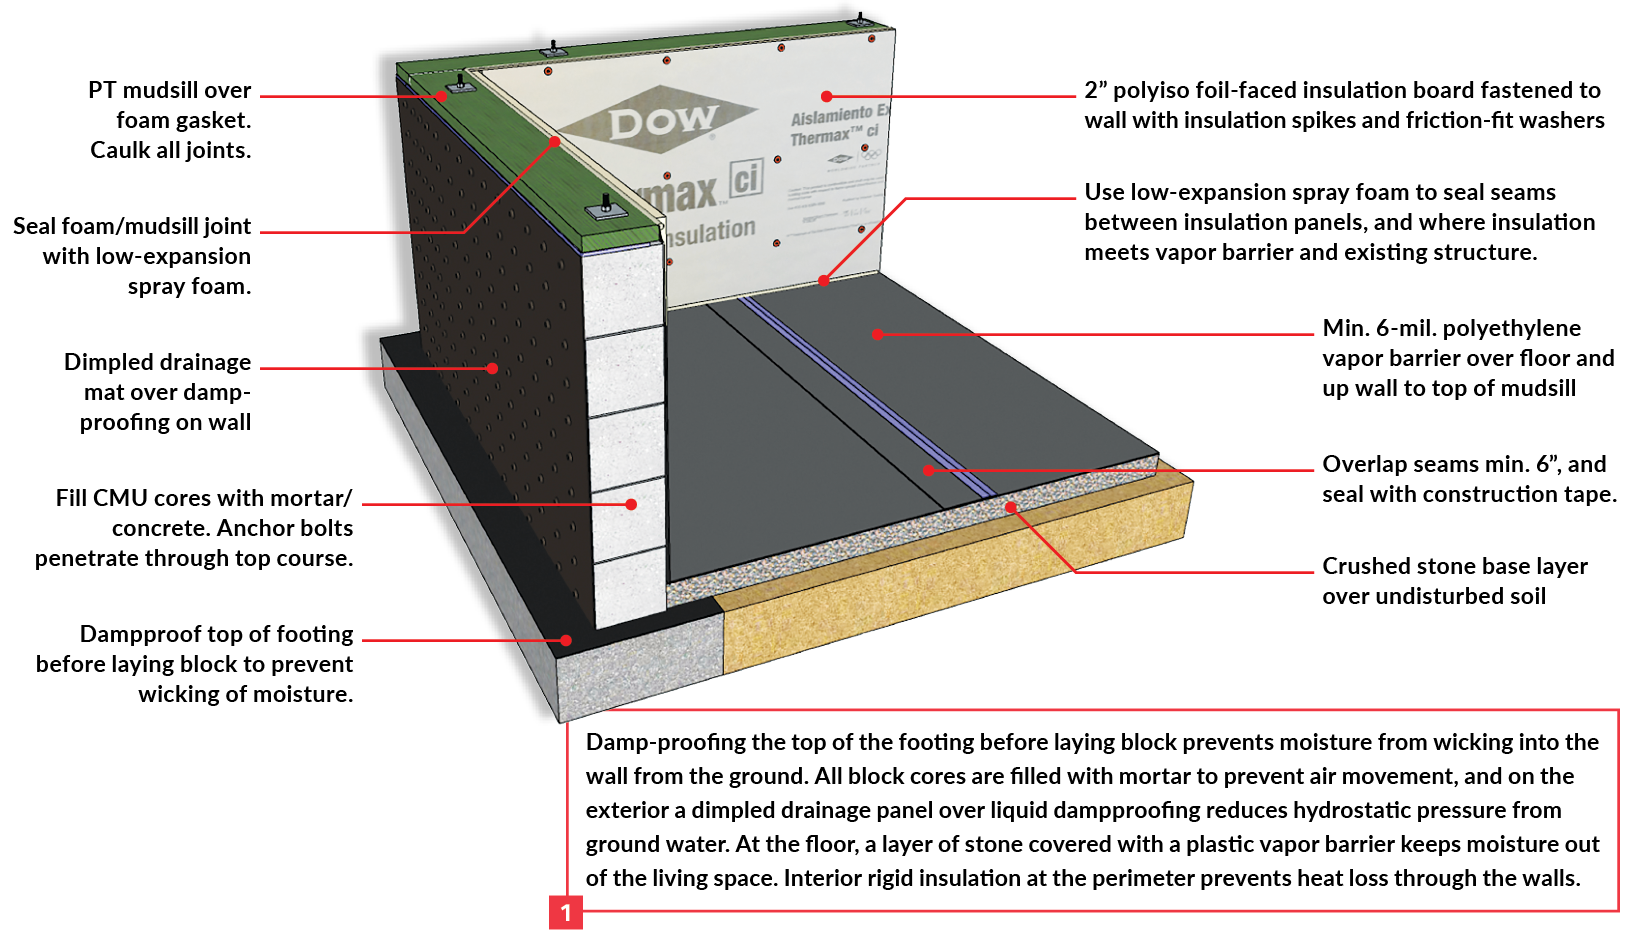
The effort to keep water out of the new foundation actually began at the footings. To prevent ground moisture from wicking up into the new block walls via capillary action, the footings were coated with dampproofing before the block walls were laid [1]. The block walls were also dampproofed, to which the crew added a dimpled-sheet material that will direct groundwater and runoff to the footings drains before it develops hydrostatic pressure that might drive water into cracks or imperfections in the walls. Given the water issues previously experienced at the site, this belt-and-suspenders approach provided relatively cheap insurance.
 Where the pressure-treated mudsills meet the existing house, the sill sealer gasket folds up onto the wall to seal the gap [2], which will also be foamed later. Joints between pieces of mudsill were sealed with elastomeric caulk, which was applied to the butt end during installation, and then again to the finished joint after the sills were bolted down.
Prep for Foam Insulation
To hold both the vapor barrier and the insulation in place, perforated insulation spikes were glued to the wall with a special adhesive [3]. Keeping the layout of the 4x8-foot rigid foam insulation boards in mind, the spikes were spaced every two feet, staggered up and down, and doubled up where two sheets of insulation would join. Because the adhesive requires 24 hours to cure, the spikes need to be installed at least a day in advance. That means taking care to avoid bumping into them, which can result in injury and may bend the spike, making it more difficult to install the insulation panels.
Plastic Vapor Barrier
The next step was to install a plastic vapor barrier over the layer of crushed stone on the crawlspace floor and run it up the walls to the mudsills. First, the crew adds a buffer layer.
 “We’ve found that when we do this with the gravel down, as you’re working on it you stretch it out and sometimes you can tear, rip, or puncture the plastic,” explains project manager Ray Williams. So as a precaution, they’ve taken to re-using leftover poly to create a buffer, even if it’s just to cover heavily trafficked areas [4]. “That way,” Williams says, “when we put our 6-mil or 8-mil on top of it and we’re walking and working on top of it, we’re not actually making holes in the vapor barrier.”
With the buffer layer in place, installing the finished vapor barrier involves pulling the plastic roughly into position on the floor of the crawlspace, then working it up the walls from one end to the other, being careful to leave enough slack at corners to avoid any tightness. As the plastic is run up the walls, it also has to be poked onto the insulation spikes without bending or deforming them, so the more hands available to help, the better. Once the plastic is in place, it is tacked to the mudsill with staples to hold it in place until the rigid foam is installed.
Why use black plastic? Some contractors believe black plastic doesn’t get brittle or doesn’t tear as easily as clear plastic. Be that as it may, the best reason we’ve heard to use it in this application came from Dr. Joe Lstiburek of Building Science Corporation. He reasons that it’s inevitable that moisture will collect underneath the plastic—after all, its purpose is to keep moisture out of  the living space. If you use clear plastic, the homeowners will call you, maybe in the middle of your dinner, to ask why there is so much water under their crawlspace plastic. If you use black plastic, that call will never come.
Rigid Insulation
Installing the polyisocyanurate insulation boards is a two-person job [5]. The trick is to carefully align the panel just shy of the spikes, then slide it straight toward the wall slowly and with even pressure. At the top, each sheet is fastened to the mudsill with a couple of button-cap screws. In the panel field, friction-fit washers slide over the insulation spikes until the insulation is tight to the wall, then the business end of the spike is snipped off. Williams covers the washers with scraps of flashing tape, which prevents nicks and cuts to workers, and also interrupts the slight thermal bridge the spikes create. But based on experience, he also adds foil tape over top; the only reason for this is to reduce the number of times he has to answer the same question: “Why are there little pieces of tape everywhere?” and the inevitable follow-up: “Why are some of them white and others are red or black?”
The final step is to cut off the excess plastic at the top of the wall [6], then seal all the seams in the insulation with low-expansion spray foam.

Thanks to MARK IV Builders company president, Mark Scott; project superintendent, Ray Williams; and carpenters Sorel Gossin and Mike Beverly for sharing their time and methods with us. This article is adapted from two videos: “Weatherization Nation: A Warm, Dry Crawlspace,” part of a ProTradeCraft.com series that follows an ongoing remodeling project to demonstrate building envelope best practices; and from “Animation: Sealed Insulated Crawlspace Details,” based on the same project.
Add new comment
Related Stories
How to Retrofit Foundation Footings
To make a low-height basement a more comfortable living space, this remodeler digs deeper but needs to add support to do so
Crawl Spaces to Basements: Proceed with Caution
Converting a crawl space to other uses can upgrade a home and add significant value, but when done incorrectly, it can also be disastrous
The Ins and Outs of Pedestal Tile Systems
A non-exhaustive overview of all things pedestal tile systems
How to Attach a Patio Roof to an Existing House
A graceful integration may mean more work but improved functionality and aesthetics
6 Tips for Electric Floor Heating Systems
These quick tips and tricks provide a base knowledge to begin your floor heating education
How To Improve Energy Performance in Existing Attics
There’s more to insulating the attic than attic insulation; there’s venting, air sealing, and misery
How to Install PVC Bevel Siding Over Rainscreen
It’s a lot like installing wood bevel siding, except it won’t warp or rot. And it expands and contracts differently and for different reasons
Understanding How PVC Trim Moves
Anybody who’s used PVC in an exterior application knows that it moves seasonally. Just like wood, right? Not exactly
To Vent or Not to Vent: A Discussion
In an attempt to strike a middle ground between high-performance and attainable, these three remodelers engage in a candid conversation


