Storm-Proof Roofing: Building a System that Stands Up to Wind and Water
When high winds rip through a neighborhood, roofs often fail first. Once wind and water get under the shingles, damage spreads quickly through the structure. Even if a tree doesn’t land on the roof, small holes can let in a lot of water, which can increase damage by orders of magnitude. But with the right details—such as those specified in the IBHS FORTIFIED Roof program—remodelers can build roof systems that deflect wind, shed water, and protect homes when the next storm rolls in. The FORTIFIED program is a product of the Institute for Business and Home Safety, a nonprofit organization funded by property insurers and reinsurers.
The IBHS Research Center located near Richburg, South Carolina, conducts weather simulations to evaluate the structural designs that inform their FORTIFIED roofing and building standards. The program is designed to strengthen homes and commercial buildings against specific types of severe weather (high winds, hurricanes, tornadoes) by requiring stronger roof decks and edges, impact-resistant shingles, and wind- and rain-resistant attic vents. They also do wildfire tests, hail bombardments, and long-term UV testing, but this is about roof edges.
Hip beats gable in the wind
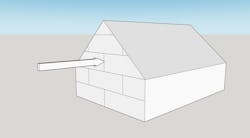
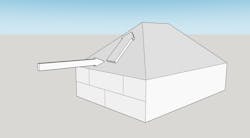
One of the best ways to resist uplift is to avoid gable roofs. Gables act like sails, catching the wind and funneling pressure into the attic. That pressure can blow the roof off from the inside. Hip roofs perform better because they deflect wind up and over the structure.
Gable roofs create gable walls, which look a lot like sails to the wind. Wind driving against a gable wall will find the cracks quickly, pressurize the home, and can blow the roof off from the inside.
Hip roofs deflect wind. Because the roof is slanted on all sides, it deflects wind up and away. Below-roof walls are still vulnerable to wind pressure, but upper elevations deflect wind.
Start at the deck
No matter the roof shape, the first line of defense is sealing the sheathing. Work from the eaves upward, sealing the bottom edge of roof panels to the fascia or subfascia. On gable roofs, continue sealing up the rakes.
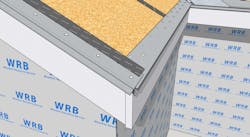
Eaves and rake protection should extend over the edge to the fascia or subfascia.
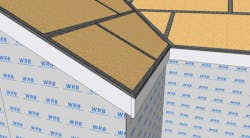
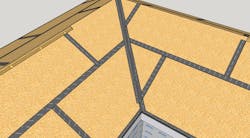
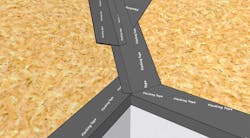
Valleys are especially vulnerable: tape or peel-and-stick membranes should overlap an inch past either side of the valley. Vertical seams should overlap the eave tape, horizontal seams should overlap the verticals, and hips should be sealed last. Every strip of tape should be pressed firmly into the deck with a J-roller for maximum adhesion. The key is overlapping in sequence and folding over edges to keep wind-driven rain out.
Begin sealing roof sheathing at the bottom, and work your way up. Layers should overlap in shingle fashion as you work up the roof.
Valley flashing can be done with skinny tape. If you don't have wide flashing tape for roof valleys, use two pieces of 3-inch tape, slightly overlapping in opposite directions.
Lock down the edges
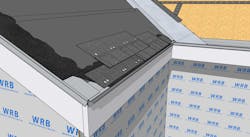
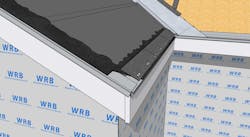
Once the deck is sealed, it’s time to flash the edges. Metal drip edge should extend at least two inches onto the roof—more is better. On long runs, overlap seams at least two inches and always lap them opposite the prevailing wind.
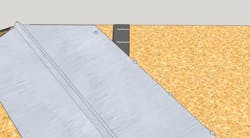
Rake pieces should overlap eaves, nailed every four inches in a staggered pattern. At valleys, metal goes on top of the sealed membrane, nailed only at the top to the deck. Other nails should trap the edges so the metal can expand and contract without buckling. For extra security, tape over the edges of valley metal, rake flashing, and eave flashing.
Rakes should overlap eaves. Nailing pattern is every 4 inches, staggered. Seal the rake seam with flashing tape.
Let metal valleys move. Metal valleys can be fastened directly to the roof deck at the top of the flashing run. To prevent puckers (and potential leaks), all other fasteners should NOT penetrate the valley metal. Drive roofing nails into the roof deck, allowing their broad heads to hold the valley in place.
Double protection at the eaves
Because eaves are the most common failure point, they need belt-and-suspenders protection. Install peel-and-stick membrane extending at least two feet inside the exterior wall line. That usually takes more than one strip, and some contractors cut rolls in half to reduce waste.
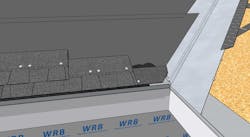
Before installing starter shingles, scuff the flashing tape or clean it with acetone, then apply an eight-inch band of roofing cement along the eaves and rakes. This ensures the starter course bonds tightly. Starter shingles should be storm-nailed within two inches of the bottom edge, followed by the first course, nailed per the manufacturer. From there, work your way up the rake and into the valleys.
A starter strip for the long haul. Bed the starter strip in roofing cement and storm-nail it to the roof deck. This critical layer is what separates living space from flooding and sideways rain.
The valley should fold under the drip edge. A generous bed of roofing cement for the starter strip, and successive storm-nailing atop peel-and-stick edge protection means belt, supports, and a rabbit's foot in reroofing jobs.
A system that works together
Storm-proofing isn’t about one product or one step. It’s about layering defenses—sealing seams, overlapping membranes, securing edges, and reinforcing eaves—so that when the storm hits, water has nowhere to go but off the roof.
This article was derived from a ProTradeCraft.com animation and video series.
