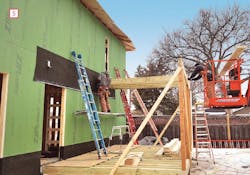
For a large gut rehab and addition in Minneapolis, Minn., we came up with a framing and insulation system that uses Huber’s ZIP System R-12 Sheathing, which has two inches of polyisocyanurate foam laminated to ½-inch ZIP wall sheathing. The system has several advantages:
• It allows us to build with 2x4s, which are lighter, a little less expensive than 2x6s, and definitely faster to work with.
• It eliminates the need for housewrap because the water-resistive barrier (WRB) is built-in to the ZIP sheathing.
• It incorporates a pressure-balanced, ventilated rainscreen.
• It eliminates the need for a plastic sheeting vapor retarder on the heated side of the wall.
• It achieves an effective R-28, with R-12 rigid foam on the exterior and R-12 open- or closed-cell spray polyurethane foam (SPF) on the interior.
• It keeps old and new exterior planes aligned.
Here’s how we build it.
In Plane
The new 2x4 exterior walls overlap the foundation by ½-inch so that the 3-inch-thick XPS foam board coming up on the outside of the foundation will plane out perfectly with the 2½-inch-thick R12 Sheathing panels [1]. While installing siding, we added a layer of coil stock to protect the foam from mechanical damage.
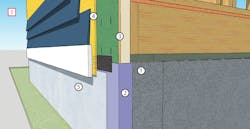
[FOUNDATION TRANSITION]
1. 2x4 framing overhangs concrete foundation ½ inch
2. 3-inch-thick XPS foam board
3. 2½-inch-thick ZIP System R-12 Sheathing aligns flush with XPS; seam is taped
4. Slicker Classic rainscreen with bug screen termination
5. Coil stock mechanical protection layer glued over XPS foam
By eliminating Z-flashings and other goofiness on the outside of the structure, this approach reduces the chances of making an error during installation. Plus, with this arrangement I can run the R-12 sheathing across the new framing and over top of the original exterior board sheathing without a jog or any indication of where the old work stops and the new work begins [2]. That solves one of the great challenges for remodelers: How do you hide the transition and make the addition look like part of the original house?

ZIP Sheathing Insulation
The ZIP sheathing provides a thermally-broken R-12, and the ZIP tapes and “Liquid Flash” should provide the air seal. But the panel seams are not perfect everywhere, so I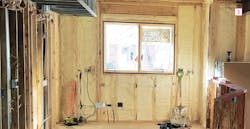
A high-performance enclosure requires high-performance windows. We used triple-glazed Sierra Pacific H3 windows, which have U-factors ranging from 0.23 to 0.28 (about R-4.3 to R-3.6). Their unique vinyl frame houses solid-wood sashes, and is sandwiched between solid wood extension jambs on the inside and extruded aluminum on the outside. The unique material combination results in an off-the-charts Condensation Resistance (CR) factor of 69.
A Pressure-Balanced, Ventiliated Rainscreen
The secret sauce in the durability of this wall assembly is the pressure-balanced ventilated rain screen, which in this case is Benjamin Obdyke’s Slicker Classic rainscreen. (It will also work behind brick veneer, as would something like Mortairvent.) The reason I prefer these kinds of open-matrix products is twofold: 1) They are easy to install—one person with a hammer tacker and a knife can do it; and 2) they provide omnidirectional ventilation that can’t get blocked and requires no mental gymnastics to ensure the air keeps flowing. Strapping, by contrast, uses more materials, takes much longer to install, requires lots of thinking around windows and doors, can actually block the airflow, and requires venting under and over each window.
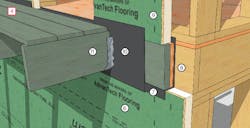
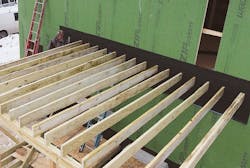
[DECK LEDGER DETAIL]
6. Fasten ZIP System R-12 Sheathing to framing
7. Seal joints with peel-and-stick membrane between wall plates, subfloor, and rim joist; extends over and adheres to face of ZIP panel below ledger
8. Add blocking so ledger is flush with ZIP panel
9. Install ZIP panels above padded-out ledger
10. Completely seal ledger under peel-and-stick membrane
11. Fasten joist hangers through membrane
Dealing with the Deck
We also had to deal with a deck ledger. Typically, that’s fastened on top of the sheathing and bumps out from the house, with flashing to direct water away from the house. With our system, however, the deck ledger is flush with the outer plane of the ZIP sheathing [4]. A single sheet of peel-and-stick membrane goes over the ledger, but it’s in-plane with the rest of the wall, with the ledger behind it. The joist hangers are mounted through the membrane, so there’s a good seal [5]. Where the siding meets the deck, all we have to do is keep the sun off the membrane—the water barrier is taken care of.
And that to me is beautiful—it’s clean and it’s simple.
Find more Building Science here
About the Author

Michael Anschel
Michael Anschel is president of Otogawa-Anschel Design + Build, in Minneapolis, and a founding board member of Minnesota Greenstar.