flexiblefullpage - default
interstitial1 - interstitial
Currently Reading

Eliminating Building Envelope Confusion: X Marks the Spot

Advertisement
billboard -
Construction Practices

Eliminating Building Envelope Confusion: X Marks the Spot

A simple way to check for continuous air, vapor, thermal, and drainage layers


By By Michael Anschel April 8, 2016
Building Envelope: X Marks the Spot, Building Science, Professional Remodeler April 2016
This article first appeared in the April 2016 issue of Pro Remodeler.

There’s a lot of confusion around how to treat the building envelope. Despite everything that’s been written about air sealing, insulation, and drainage planes, a lot of myths persist. Perhaps that’s because the science gets lost in minutia, or maybe it’s just our tendency to reject facts that call into question what we think we know. Then, too, as the number of material choices increases, product selection, compatibility issues, and installation details can be tedious. It all seems so complicated.

But the rules are really quite simple. Let’s start with some basic concepts using a metaphor I call “The Naked Carpenter in Minnesota.”

Air sealing. Our carpenter goes to work in the dead of winter wearing nothing but plastic wrap. He is perfectly air sealed, but he quickly freezes to death.

Insulation. Our carpenter goes to work wearing nothing but a fluffy fleece body suit. He is warm for a while, but the wind blows right through his suit, and after a few hours he freezes to death.

Insulation plus air sealing. Our carpenter goes to work wearing a fluffy body suit under a hard shell. He works all day, warm and dry, and goes home happy.

Super insulation plus air sealing. Our carpenter gets a gig in a really cold place, like Newfoundland or Antarctica. He wears a super-insulated down suit with a hard shell. Warm, dry, happy.

The North Face and Mountain Hardware have the whole insulating and air sealing thing down pat. Our carpenter’s skin corresponds to a home’s vapor-permeable drainage plane, to which insulation (his fleece) and air sealing (his windbreaker) are added. Unlike our carpenter, on a house, it usually doesn’t matter where you put air sealing in the assembly, as long as it’s included somewhere. Insulation, on the other hand, belongs on the outside of the structure, where it’s continuous, not on the inside, where it’s interrupted by the framing.

These are simple rules that we didn’t understand for a long time, and that we still tend to ignore. But virtually every building failure is a result of breaking these rules.

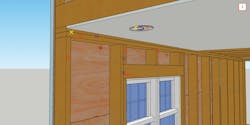
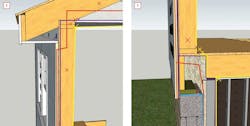
Continuous colored lines mark critical control layers—thermal (red), air (purple), vapor (yellow), and capillary break (blue)—that reduce heat loss and air and moisture migration. Trouble spots include thermal shorts through framing members, air, water, and vapor leaks at joints, penetrations, and foundation-to-wall and wall-to-roof transitions. Images: Dan Morrison

The Right Question

The focus on energy efficiency often centers around how much insulation we need, but that question reduces treatment of the building envelope to a calculation of the depth of the stud bays. As our Minnesota carpenter showed us, however, other factors, such as air movement and moisture, are in play.

How much insulation do you need? Probably more than you have but less than you think you need. It’s the wrong question—or more accurately, it shouldn’t be the first question. Instead, we should focus on determining “continuous insulation value,” which considers all of the factors affecting the building envelope.

Here’s a simple tool that will allow you to identify 99 percent of potential envelope problems in any project. Get four pens in four colors. Now take out the plans and, without lifting the pens from the paper, see if you can draw an uninterrupted line around the structure to mark each of these four control layers:

  • Thermal (red)
  • Water—drainage plane and capillary breaks (blue)
  • Air (purple)
  • Vapor (yellow)

Work with 3-D views [1, main image] as well as floor plans and sections through walls, floors, and roofs [2 & 3, above] to visualize tricky intersections. Wherever your pen encounters an obstacle, make an “X” on the paper—those are the problem spots. The more X’s you have, the more lipstick you will need for that pig.

Remember the following:

  • Insulation gets a red X every time it’s interrupted by a framing member.
  • Concrete is porous and is a poor insulator.
  • Everywhere two pieces of wood touch each other gets a purple X for air sealing.
  • Anytime a pipe, duct, or wire travels through a framing member, passes from one floor to the next, or crosses a thermal plane, it gets three X’s, one each for the air, thermal, and vapor control layers.

---

Michael Anschel is president of Otogawa-Anschel Design+Build in Minneapolis, and a founding board member of Greenstar.
A simple way to check for continuous air, vapor, thermal, and drainage layers.


Add new comment

Plain text

  • No HTML tags allowed.
  • Web page addresses and email addresses turn into links automatically.
  • Lines and paragraphs break automatically.
leaderboard2 - default

Related Stories

6 Must-Knows for Installing Pocket Doors

Save your sanity: Do it right the first time

Crawl Spaces to Basements: Proceed with Caution

Converting a crawl space to other uses can upgrade a home and add significant value, but when done incorrectly, it can also be disastrous 

Webinar: Project and Trade Management Musts—The New American Remodel 2023

Access the webinar here to learn project and trade management lessons from The New American Remodel 2023

How to Attach a Patio Roof to an Existing House

A graceful integration may mean more work but improved functionality and aesthetics 

How To Improve Energy Performance in Existing Attics

There’s more to insulating the attic than attic insulation; there’s venting, air sealing, and misery

Model ReModel 2022: A Case Study in Sustainable, Thoughtful Construction

The eighth annual Model ReModel project features an accessory dwelling unit, designed for aging in place, attached to a 19th-century Victorian

Installing a Curbless Shower

Model ReModel 2022 features an ADA-compliant bathroom. The contractor shares the install process

How to Install PVC Bevel Siding Over Rainscreen

It’s a lot like installing wood bevel siding, except it won’t warp or rot. And it expands and contracts differently and for different reasons

Understanding How PVC Trim Moves

Anybody who’s used PVC in an exterior application knows that it moves seasonally. Just like wood, right? Not exactly

Step-by-Step Install of a High-Performance Cathedral Ceiling

See how Model ReModel 2022 constructed its vaulted ceiling

Advertisement
boombox2 -
Advertisement
halfpage2 -
Advertisement
native1 -

More in Category


Advertisement
native2 -
Advertisement
halfpage1 -
Advertisement
leaderboard1 -