Kickout Flashing Is the Cheapest Insurance You Can Buy
Where roofs meet walls, water problems often follow. Roof-to-wall connections are especially prone to water intrusion because the roof can direct significant runoff against the wall. Siding helps, but it isn’t designed to be the primary waterproofing layer.
If there’s a window in that wall, water can find its way into the opening and cause structural damage even faster. The cost to repair this type of rot can be significant—but the solution is both inexpensive and straightforward: kickout flashing. Available at most home centers and online, kickout flashing can also be made on-site from a piece of step flashing and a pair of needle-nose pliers.
Installation sequence
Here’s how to install a kickout flashing, based on a detail from Hammer & Hand, a design-build firm in the Pacific Northwest. This sequence is for mechanically fastened WRBs, but if you’re working with peel-and-stick or fluid-applied house wraps, the process is even simpler.
Step-by-step:
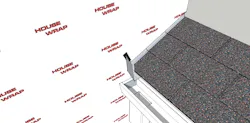
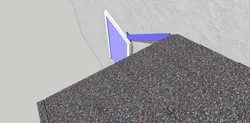
- Install a starter strip along the bottom of the roof. Place the kickout flashing in the position of the first step flashing at the base.
- Install the first course of shingles. Place step flashing, overlapping the previous piece by about 2 inches and aligning the top with the shingle.
- Apply a flashing membrane or peel-and-stick housewrap over the step flashing. Cut a slit for the kickout flashing. Leave a 2-inch gap between the membrane and the roofing.
- Overlap the housewrap onto the flashing legs, with a slit for the kickout. Maintain a 2-inch gap above the roofing.
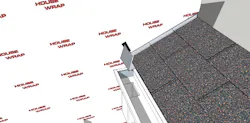
- Install siding as normal, keeping the bottom edge a couple of inches above the roof, regardless of siding type.
- Install a gutter behind the drip edge to collect water and direct it into the downspout.
Framing Tip: During framing, leave a gap between the subfascia and the wall sheathing. This allows you to slide the WRB and flashing behind before installing the fascia, improving water management from the start.
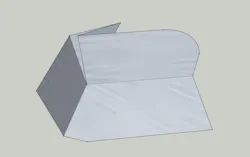
You can make it onsite in under a minute
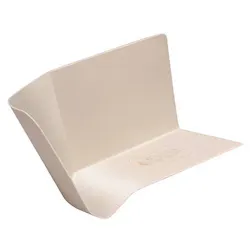
To make your own, grip the upturned leg of a step flashing piece with needle-nose pliers, perpendicular to the fold. Rotate the pliers counterclockwise to twist the bottom leg—the part that sits on the roof—away from the wall to form a diverter. Flatten the fold with a hammer. In a few minutes, you’ll have a functional kickout flashing without needing a special trip to the store.
This bent-metal detail is more reliable than solutions that rely on cuts and caulk. Metal won’t fail when the weather is at its worst.
For a video tutorial on bending kickout flashing from step flashing in about 15 seconds, visit: www.protradecraft.com/55182005.
Kickout flashing sources:
- Masonrydirect.com: Universal Kickout Flashing by Demand Products, $19.74
- Kickoutflashing.com: Powder-Coated Kickout Flashing, Bronze, available in four colors, $22/each (bulk pricing available)
- Homedepot.com: Polypropylene Roof to Wall Kickout Flashing/Water Diverter, Right, $27
About the Author

Daniel Morrison
Editorial Director
Daniel Morrison is the editorial director of ProTradeCraft, Professional Remodeler, and Construction Pro Academy.