Installing Stucco Above a Deck Ledger
Integrating a ledger into a stucco-clad wall isn’t complicated, but it needs to be done carefully to ensure the durability of the ledger. And because the stucco is likely to last significantly longer than the decking, it’s also important to make sure it will be easy to replace the decking without disrupting the stucco. When the layers of flashing are correctly lapped and spaced, the ledger will last as long as the stucco. Here’s a step-by-step look at how to do it #TheRightWay.
Sheathing. Inspect the sheathing. Ideally, sheathing panels should be spaced ⅛ inch apart. This prevents buckling, which can crack the stucco. Wet studs and even wet sheathing (if it’s saturated) can also cause movement if the stucco is applied before the wall dries out. Some cracking of stucco is inevitable, particularly around doors and windows, but movement at sheathing joints can cause cracking, so gapping the plywood helps, especially on south- and southwest-facing walls in hot climates.
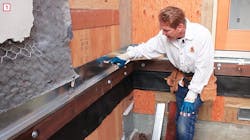
Weather resistive barrier (WRB). Install #30 felt or peel-and-stick membrane to the wall sheathing behind the ledger, extending it several inches above a line marking the top of the ledger [1]. This ensures that any water that gets behind the ledger doesn’t soak the sheathing and find its way into the house.
Fasteners. Use lag screws or through-bolts to install a pressure-treated ledger board into solid framing. Most codes specify the number and spacing of fasteners and require tying the ledger back into the floor framing of the house.
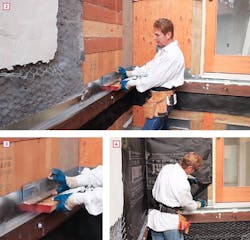
Z-flashing. Install metal Z-flashing over the ledger. Ideally, seams should be soldered; if that’s not in the cards, overlap seams several inches and seal them with polyurethane caulk [2].
Weep screed. The weep screed is a terminal flashing at the bottom of a stucco wall that allows any water that penetrates to drain away from the building. Stucco will last longer than most deck boards, so in the case of a deck that meets a stucco wall, the weep screed also makes it easy to replace worn deck boards without disturbing the stucco wall. Code in most places requires a minimum ½-inch clearance between the bottom of the weep screed and the top of the decking [3], so it’s essential to know the thickness of the decking when placing the screed.
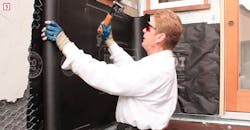
WRB (again). These photos show two layers of Fortifiber two-ply Jumbo Tex installed over wall sheathing, lapped over the Z-flashing [4]. The easiest way to install the paper is to place the whole roll against the wall. Use a hammer stapler to tack the upper corner of the loose end [5], then roll out the paper over the area you want to cover. When it’s level and properly overlapping the metal flashing, tack the opposite corner, then cut the paper. You can get a straight, clean cut by placing a utility knife against the roll as a guide.
Wire lath. Stucco netting, whether 17- or 18-guage, is sold in rolls and is furred on one side so that it stands off the wall about ¼ inch and the stucco can key in behind it. The easiest way to install it is to cut a piece to fit the area you’re working on, then push it against the wall the way it comes off the coil, with the curve toward the wall [6]. Staple the top corner in position, flatten the rest of the section, and staple the opposite top corner [7]. Then staple every 6 inches vertically at every stud location—use the ledger lags to locate the studs, then just follow the line of the mesh. If you miss the stud with a staple, staple it again. Too many staples are better than too few. Obviously, this goes faster with a pneumatic stapler.


