Installing Shower Wall Tile Correctly
Tile showers should not only be leakproof, they should look good. In this shower wall tile installation, I’ve protected against leaks by substituting DensShield for drywall, and using a liquid membrane to waterproof the floor, all seams at corners and niches, and all fasteners.
The next step is to set the 8x12-inch porcelain wall tile in a running bond or brick pattern so that it looks good and stays put.
How to Tile a Bathroom Shower
1. Plan the Layout of the Tile

I always plan the layout to make sure the tile is centered and symmetrical. The goal is to maximize the size of tiles at the bottom and top, avoiding narrow pieces. I avoid using a full piece at the top because the ceiling is usually not perfectly level. By cutting the top course of tile on all three walls, I can keep the joint width consistent all the way around.
In this case, I also had to consider two niches. To ensure they would be symmetrical, I sized and located them in advance so that the picture-frame trim tile at the top and bottom will fall on the horizontal joints between full wall tiles [1]. This results in nearly equal 6-inch-wide courses at the ceiling and shower pan.
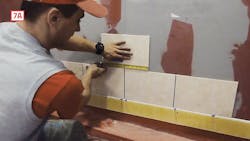
2. Butter the Tile, Don’t Slather the Wall
In showers and wet areas, I always use latex-modified thinset mortar, not mastic to tile a shower wall. When exposed to water, mastic simply turns to liquid, which can cause the tile to crack and eventually fall off the wall.
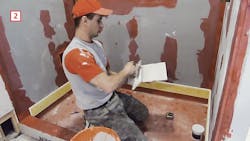
Rather than spread thinset on the wall, I prefer to butter thinset onto the back of every tile with a ¼-inch notched trowel [2]. This keeps the work area neat and clean, and also reduces the amount of mortar that works into the joints, which makes grouting easier.
3. Skip the Spacers Between Tiles

I begin on the long wall, applying tile from the centerline outward toward the corners. I start with the first full course, which I set on a temporary ledger that I’ve leveled and fastened around all three walls. After all the wall tile mortar has cured, I will remove the ledger, set the floor tile, then fill in the course of cut tiles at the shower pan.
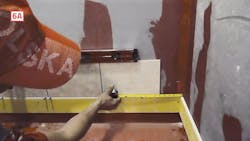
I’m spacing these tiles an inch apart [3], but I don’t like to use spacers. Spacing the tiles by eye is faster and, after many years of setting tile, I’m pretty good at it. More important, with some tile, the dimensions vary, so using spacers will lead to crooked grout joints. The -inch grout joints allow for some irregularity in the edges of the porcelain tile. With tile that is more uniform, I can use ⅛-inch or even 1/16-inch joints.
4. Keep the Tile In Plane
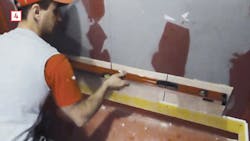
With the first course set except for the cut pieces at the corners, I use a 4-foot level to check that the tile is flat and in plane [4]. This is especially important with larger tiles in a running bond pattern because irregularities in tile thickness or bulges or depressions in the wall can skew the corners and create a lip at the joints. I adjust as needed by tapping the tile or resetting a tile after adding mortar.
5. Check for Level

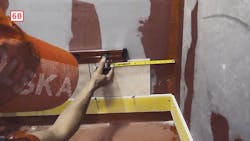
Even though this first row of tile is laid on a level ledger screwed to the wall, I double-check with a level [5]. This first row of tiles is critical because if these tiles are crooked, the whole wall will end up crooked. This is also one place where shims come in handy. I use shims as needed to bring the tops of the tiles perfectly snug with the level.
6. Measure Twice, Cut Tiles Once
I’m going to have cuts in every course, but I like to install as much tile as I can before making a trip to the saw. I wait until I have dimensions for several courses, then cut them all at once.
7. Check Level at Every Course
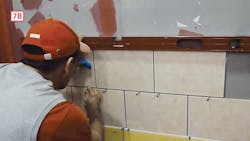
Again, I level across the second row to keep the horizontal joints consistent [7B]. As with the first full course, I use spacers where needed to bring the tile into alignment.
8. Dry Tiles After Cutting
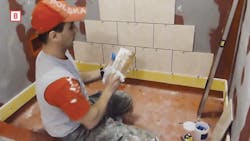
If cut tiles are wet from the saw, the thinset will not bond as well. I always wipe them with a rag to remove any moisture [8]. After setting the cut pieces, I use a level again to check alignment.
9. Work Outside In on Sidewalls of Shower Remodel
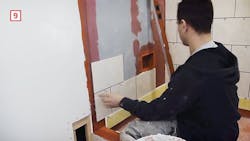
When setting the sidewall tiles, start at the outside edge and work toward the corner [9]. Ideally, the outside edge of the sidewalls will start only with full and half tiles. As with the back wall, lay as much tile as you can before making a trip to the saw for cuts.
10. Plan the Corner Cuts for the Shower Wall
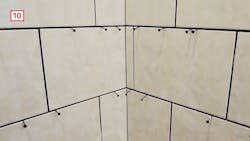
The goal when planning layout of the sidewalls is to avoid narrow slivers of tile on both sides of the corner. With larger tiles like the ones I’m using here, I try to make it look as if the tile folds or bends around the corner [10]. So, where a long cut tile on the back wall dies into the corner, a short piece of tile should come out of the corner on the sidewall.