


Sooner or later, every carpenter has to build a run of stairs. It’s a lot like roof framing but, like framing a hip for roofs of unequal pitches, it’s not an everyday thing.
It also gets more complicated if the stair is L- or U-shaped or, heaven forbid, a winder. And there are quite a few code requirements for railings, handrails, open and closed risers, exterior stairs, and so on, that are easy to forget or misunderstand. But none of that matters if you don’t get the framing right, so I’ve limited this article to the basics of layout for a typical straight run of interior residential stairs. (Cutting and attaching stringers will be covered in a future article, along with layout tips for L- or U-shaped stairs.)
Rise and Run
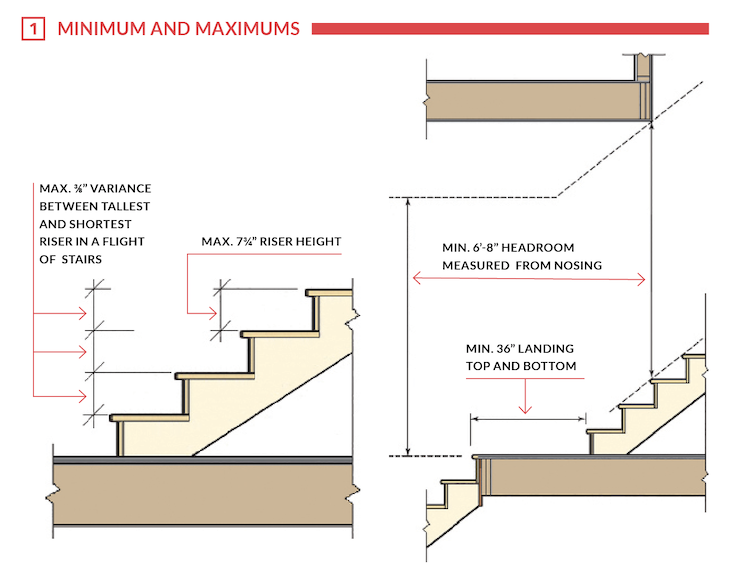
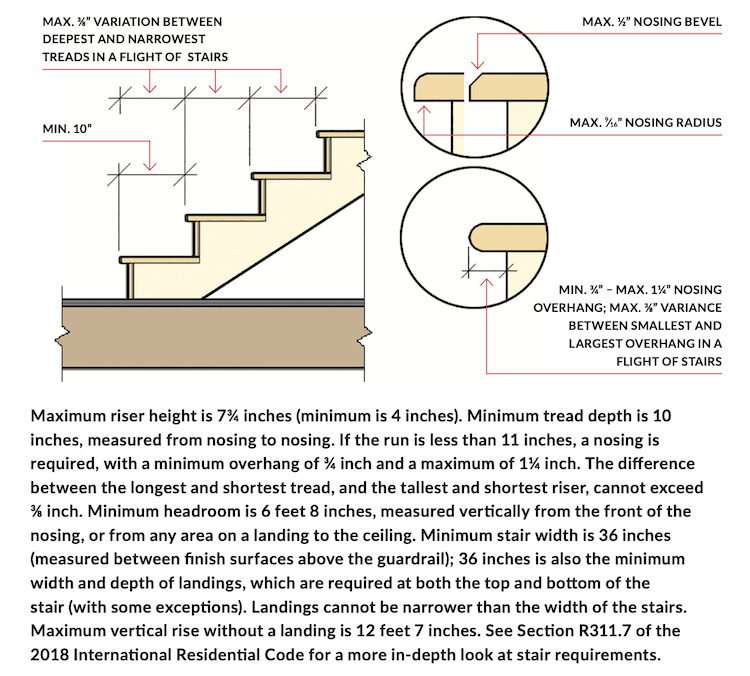
The International Residential Code for One-and Two-Family Dwellings (IRC) sets standards for stair construction. Designed to prevent falls and other accidents, stair codes control factors such as railing heights, baluster spacing, stair width, headroom, etc. [1]. But for basic stair layout, we’re mainly interested in two key dimensions: 10 inches, which is the minimum tread depth (measured nosing to nosing), and 7¾ inches, which is the maximum allowable riser height. These dimensions control the number of treads and risers the stair will have, which also determines how much horizontal space the stair will occupy.
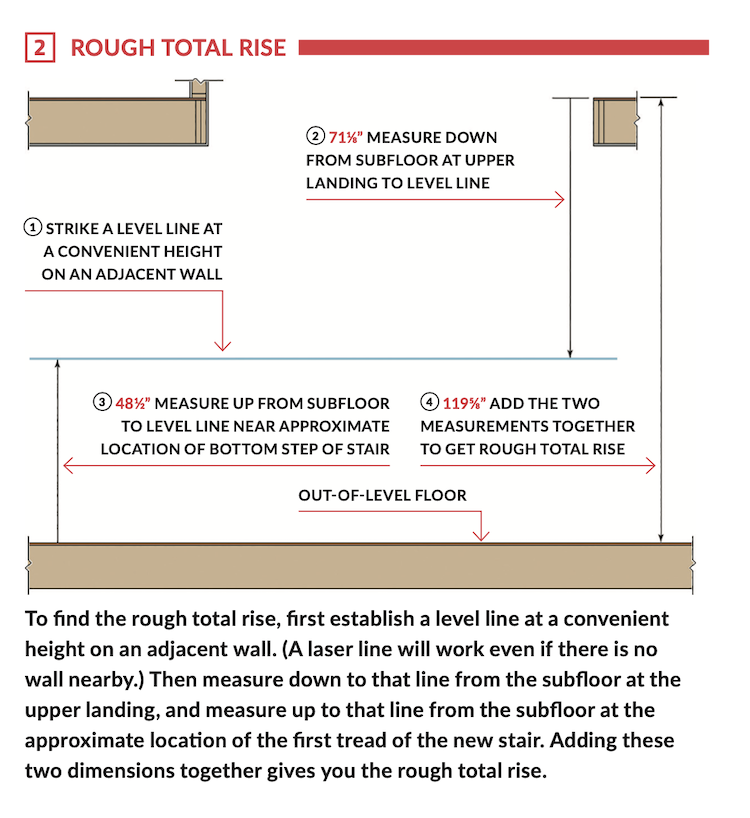
Most site-built stairs are roughed in before finish materials are installed, so to find the total rise, measure from subfloor to subfloor, then adjust for the thickness of the finish floors. In older buildings, however, it matters how you take this measurement because the floors may not be perfectly level. In the case of a straight stair in a home with 10-foot ceilings, the lower and upper stair landings are nearly 16 feet apart, so if you measure only at one end and the floor sags, your dimensions might not work.
The measurement you want is the vertical distance from the approximate location of the bottom riser of the stair to the landing area on the floor above. The best way to do that is to strike a level line on an adjacent wall and measure up to it from the bottom of the stair at one end and down from the top at the other [2]. Add the two dimensions together to get the rough total rise.
Adjusted Total Rise
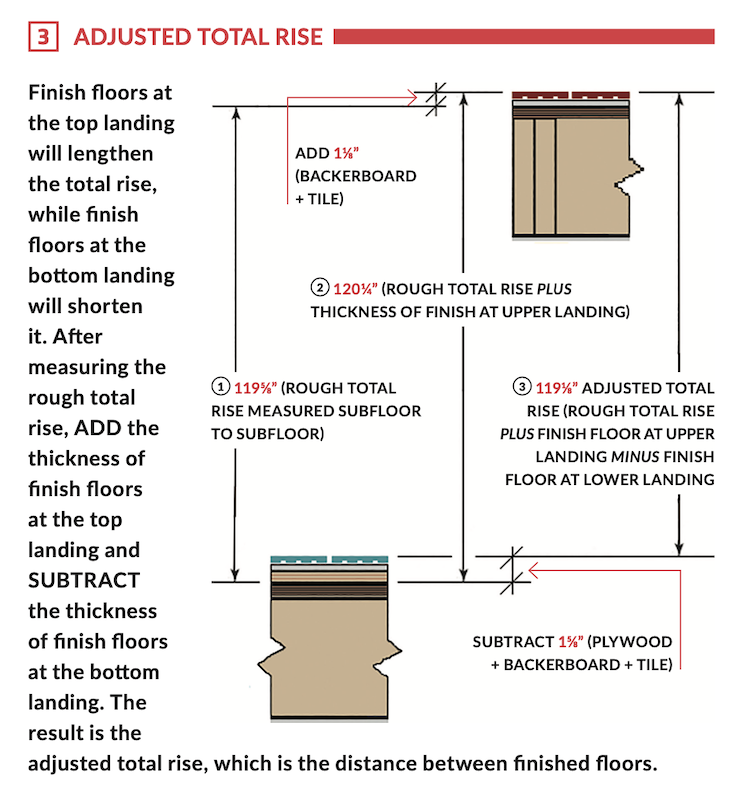
I say “rough” because, unless the flooring will be the same on both levels, you’re not done with the rise calculation. If the flooring on one level will be thicker than the flooring on the other, you’ll need to make an adjustment. Do this by adding the thickness of all materials on the floor above that will be installed on top of the subfloor, then subtract the thickness of materials that will be added to the subfloor on the lower level. The result is the adjusted total rise [3]. In our example, the calculation looks like this:
119⅝” Rough Total Rise
+ 1⅛” Upper landing finish flooring
- 1⅝” Lower landing finish flooring
119⅛” Adjusted Total Rise
Find the Number of Risers
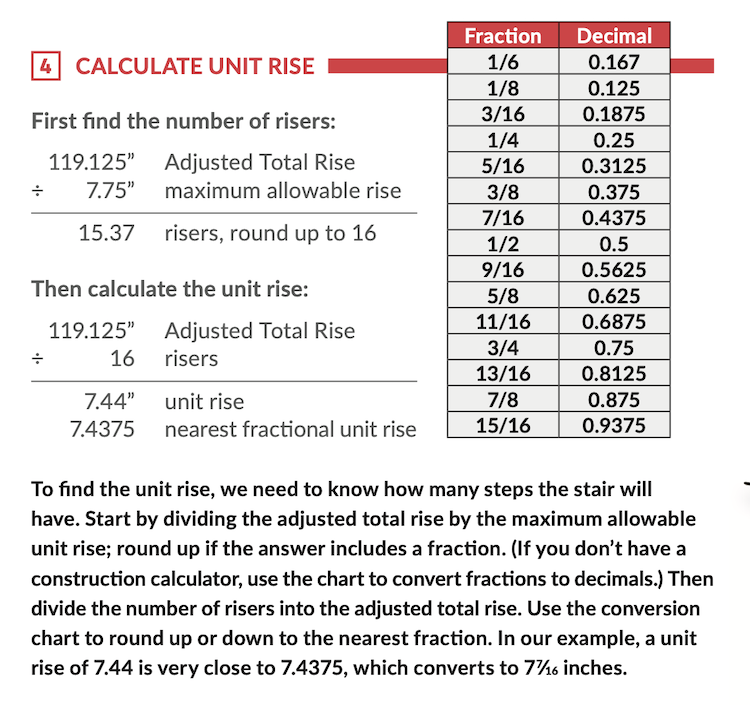
Now that you know the total rise, you can figure out how many steps the stair will need and what the unit rise of each step will be. First, divide the adjusted total rise by the maximum allowable unit rise of 7¾ inches. The result is the total number of risers on the stair. Using the dimensions from our example, this results in 15 plus a fraction [4]. Since we can’t have a partial riser, we round up to 16 risers, then divide that into the adjusted total rise to find the unit rise, which is 7.44 inches. That’s not quite 7½ inches, but 77⁄16 converts to 7.4375, which is close enough, so that’s our unit rise.
Check the Total Run
To make sure you have enough room at the lower landing, find the total horizontal difference covered by the stair treads. Using the number of treads, which is one less than the number of risers, first multiply by the minimum allowable unit run of 10 inches, then add the maximum allowable overhang. In our case, 15 treads cover 150 inches, plus a 1¼-inch overhang, for a total of 151¼ inches. Use this to measure from the face of the finish riser at the upper landing; if that riser isn’t in place, add its thickness as well. Then check that you have minimum clearance, measured to the finish wall surface.
Finally, if the landing header isn’t deep enough to provide full bearing for the plum cuts, you might want to add a hangerboard, which for interior stairs is typically a piece of plywood that extends down beyond the bottom of the landing header. If so, add its thickness now. (More on hangerboards in Part 2 of this article, "How To Cut and Install Stair Stringers")
If you have room to spare, you can experiment with a shorter rise, which makes for a more comfortable and safer stair (especially when combined with a deeper tread). Start by adding one more riser and divide again to see what happens. Just remember that adding a riser also adds a tread, which might lengthen the stair just enough to shrink the landing area below the required 36-inch minimum.
Laying Out the Stringers
I used 2x12 SPF for the stringers in the stairs I’ve built, which were open stringer or “carriage” stairs, but these days I would seriously consider using LVL or LSL, which are stronger, straighter, and more stable (no knots either). It’s also more expensive, but for a typical 36-in-wide stair you only need three stringers. And for freestanding stairs, (not attached to walls on the sides or without supporting walls underneath) I might also consider using a 14-inch-deep stringer, which leaves more meat after making the tread and riser cuts.
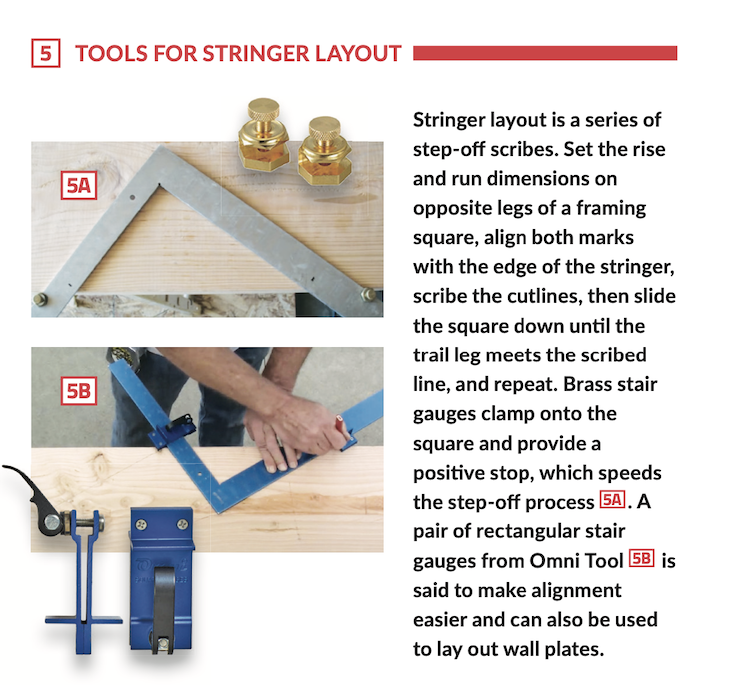
Regardless of what material you use, layout will involve stepping off treads and risers along the full length of the stringer. That said, there are different ways to go about that. I was taught to align the rise and run dimensions on opposite legs of a framing square with the edge of the stringer and mark the cut lines, then slide over and repeat. It wasn’t too long before I discovered stair gauges, which clamp to the square and speed up the alignment process [5]. These days, there are some fancy variations on stair gauges, such as those from Omni Tool, which appear to offer easier setup and scribing, and have other uses for framing layout.
The step off method can, however, lead to accumulated error. Although stair gauges help reduce dimension creep, common practice is to lay out and cut one stringer, test it, then use it as a template to mark the other two stringers. Some carpenters go one better and gang cut stringers, but to make it worth doing, you need a saw that can cut deep enough.
The biggest difference-maker in the accuracy department has been the construction calculator, which does all of the rise/run math for you, including the conversion to fractions. It also calculates the hypotenuse of the triangular rise/run cutouts, a dimension that can be used to increase the accuracy of the layout.
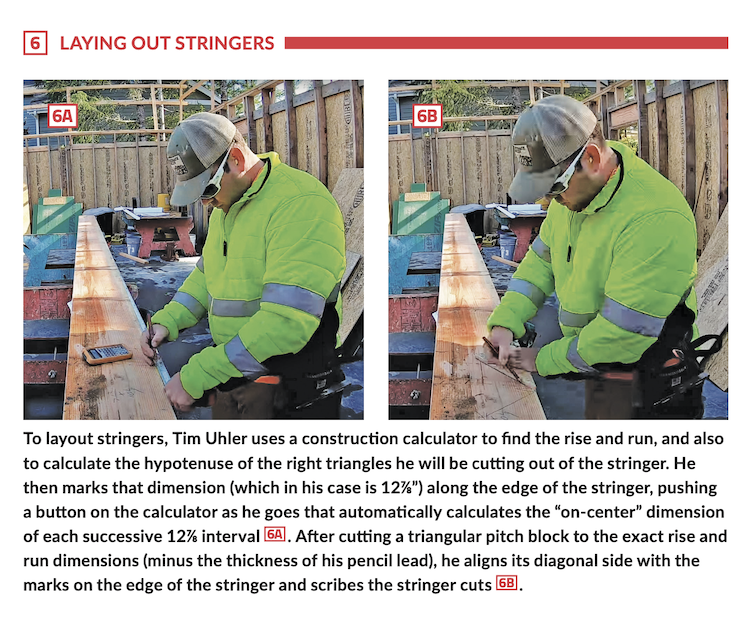
In “Stair Layout and Framing,” a recent video embedded in a ProTradeCraft.com page, Tim Uhler shows us how it’s done while demonstrating his method for site-building stairs [6]. (The page links to Uhler’s AwesomeFramers YouTube channel, which is well worth a visit.) To step off the stringer, Uhler uses a “pitch block”―a right triangle made of plywood cut to the rise and run dimensions on either leg of the 90-degree corner. Before stepping off the stringer, Uhler uses a construction calculator to find the hypotenuse, which in his case turns out to be 12⅞ inches. Next, he uses a special calculator function that gives the sequence of dimensions he needs to pull a tape from one end, marking what amounts to 12⅞-inch on-center spacing along the edge of the stringer. He then steps off the layout by aligning the pitch block with those marks. It’s a belt and suspenders approach that is also helpful if you’re cutting stringers one at a time because it eliminates cumulative error. Uhler only does the layout once because he also gang cuts all three of his stringers using a 16 5⁄16-inch Magnesium Worm Drive Skilsaw.
RELATED: Safe Stairs
By the way, you can find the hypotenuse using the Pythagorean theorem and an ordinary calculator―or even pencil and paper―but it helps to use the chart shown earlier [4] to convert decimals to fractions. When it comes to repeatedly multiplying the hypotenuse to get the sequence of dimensions needed to layout the tick marks on the stringer, a construction calculator is the way to go because it does everything with just a few keystrokes, converts all the fractions, and accurately rounds off the results.
Adjust at the Bottom
At this point, you are this close to cutting the stringers, but you may still have to adjust the layout. To understand why, recall that the adjusted total rise is the dimension between the top of the finish floor at both the upper and lower landings. Now imagine our sample stringers laid out with a 77⁄16-inch unit rise, and installed with the finish floors already in place. When you add 1-inch treads all the way up, the bottom riser ends up an inch too tall (87⁄16) and the top riser is an inch too short (67⁄16). To compensate when installing on a finish floor, remove the thickness of one tread from the bottom of the stringers.
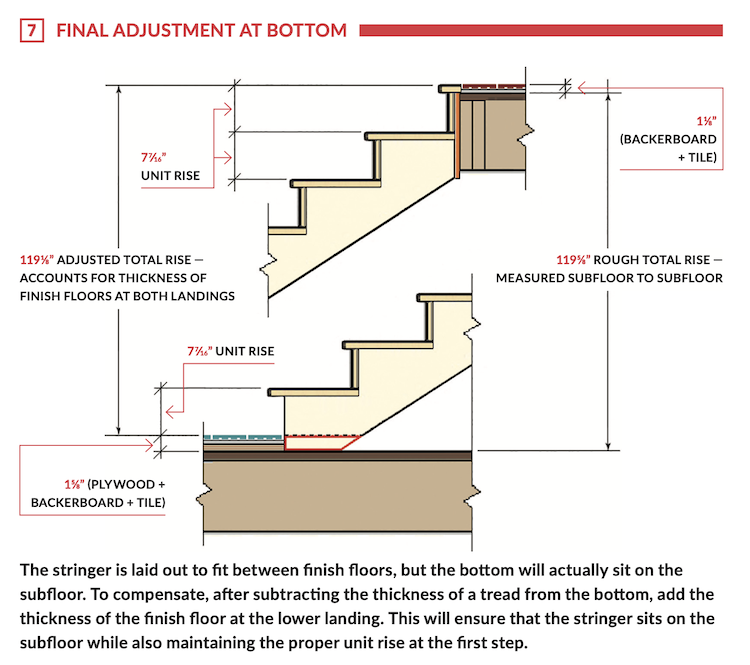
But remember that we’ve assumed we’re working from the subfloor, which is 1⅝ inches below the finish floor [7]. After subtracting the thickness of a tread to bring the stringer bottom flush with the finish floor, we have to add back 1⅝ inches so the stringer will sit on the subfloor. Assuming our treads will be 1-inch thick, this adjustment makes the rough bottom riser taller than all of the others, a total of 715⁄16 inches (75⁄16 unit rise minus one tread thickness plus 110⁄16 finish floor thickness).
All that’s left is to cut and install the stringers, which I’ll cover in another article.
Add new comment
Related Stories

How to Retrofit Foundation Footings
To make a low-height basement a more comfortable living space, this remodeler digs deeper but needs to add support to do so


Crawl Spaces to Basements: Proceed with Caution
Converting a crawl space to other uses can upgrade a home and add significant value, but when done incorrectly, it can also be disastrous

You Need to Talk About It: Mental Health in Construction
Men in the construction industry die by suicide at a rate nearly four times the national average. What should business leaders do about it?

How to Attach a Patio Roof to an Existing House
A graceful integration may mean more work but improved functionality and aesthetics
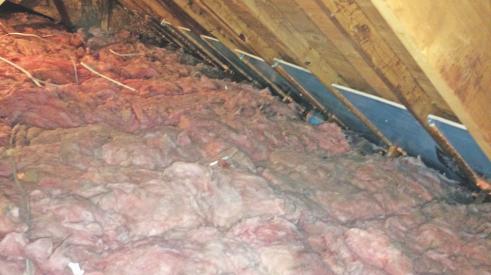
How To Improve Energy Performance in Existing Attics
There’s more to insulating the attic than attic insulation; there’s venting, air sealing, and misery
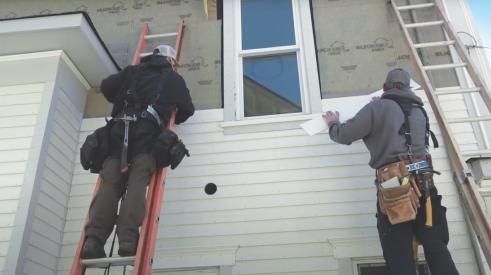
How to Install PVC Bevel Siding Over Rainscreen
It’s a lot like installing wood bevel siding, except it won’t warp or rot. And it expands and contracts differently and for different reasons
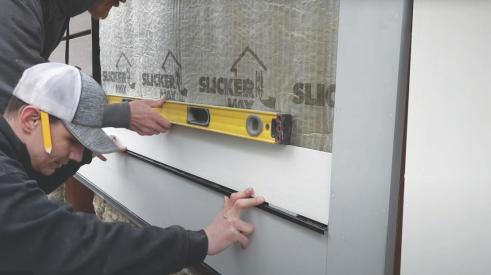
Understanding How PVC Trim Moves
Anybody who’s used PVC in an exterior application knows that it moves seasonally. Just like wood, right? Not exactly
To Vent or Not to Vent: A Discussion
In an attempt to strike a middle ground between high-performance and attainable, these three remodelers engage in a candid conversation
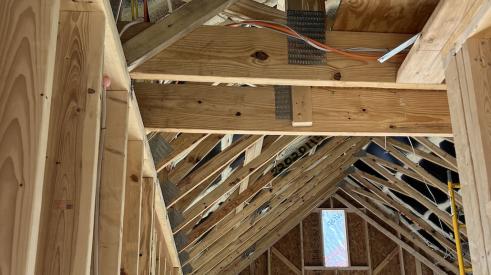
Ceiling Insulation and Installation at Model ReModel
Watch the building process of this accessory dwelling unit's vaulted ceiling