


About five years ago, after looking at Fu-Tung Cheng’s book, Concrete Countertops, I decided that when I replaced my kitchen cabinets, I would build concrete countertops. That moment arrived last summer, and when I couldn’t find Cheng’s book, I bought his new one, Concrete Countertops Made Simple, which came with a DVD.
I had assumed I would pour the concrete countertops in place, so I had been wrestling with how to ensure a flat and smooth surface and create a round-over on the front edge. Cheng’s new book revealed all the answers: I would pour the tops upside down into a form made of melamine, and for the round-over, I would lay a bead of black silicone caulk and shape it by smoothing it with my finger. (Why black? So it’s easy to see!)
Three Countertops, Three Challenges
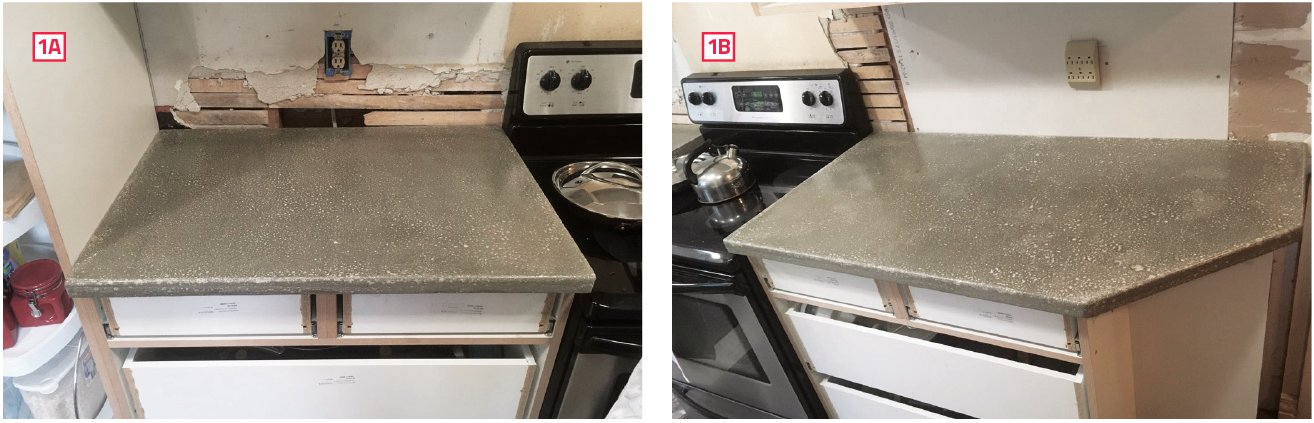
I needed three concrete countertops, each with unique issues: one 36 inches long, with square ends that fit between a tall pantry cabinet and the range [1A]; one 48 inches long, with an overhang at one end with the corner clipped off at a 45-degree angle to create more clearance for entering the galley kitchen [1B]; and one almost 10 feet long that fits between the fridge and a wall with the sink nearly centered in it [2].
Building the Forms
Ordinarily, I would make a template for each concrete countertop, but in this case, I didn’t feel the need because the 1½-inch-thick backsplashes gave me plenty of extra room. So after checking the wall corners for square, I set about making separate forms for each piece.
I used 4x10-foot sheets of white melamine to fabricate all of the forms in one piece, including the long one. The bottom piece of each form was sized to accommodate the cabinet box dimensions, plus overhangs and an additional ¾ inch all the way around to allow for the sides of the form, which I ripped to 1½ inches (the thickness I wanted for the countertops).
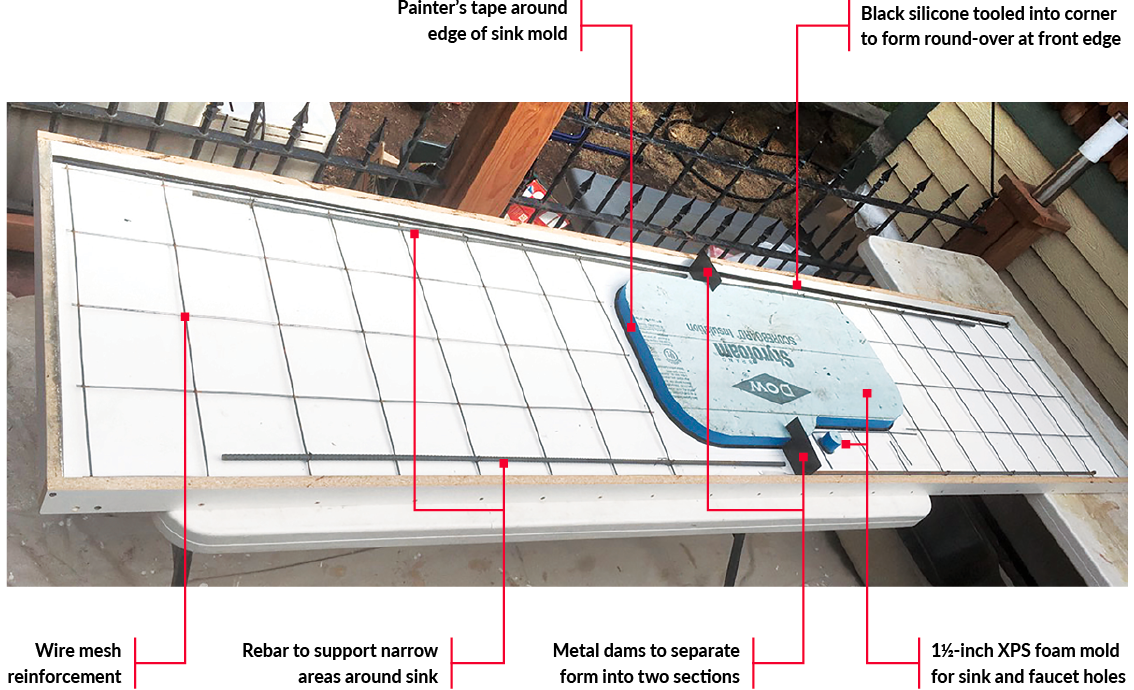
After drilling countersunk pilot holes and screwing the side pieces in place, I applied a large bead of black silicone to only the front edges of the two smaller tops (including the 45-degree edge and return on the 48-inch top) and smoothed it into a round-over with my finger. While waiting for the caulk to dry, I cut pieces of 6x6 wire mesh to fit into the forms, allowing about 1½ inches of clearance at the edges.
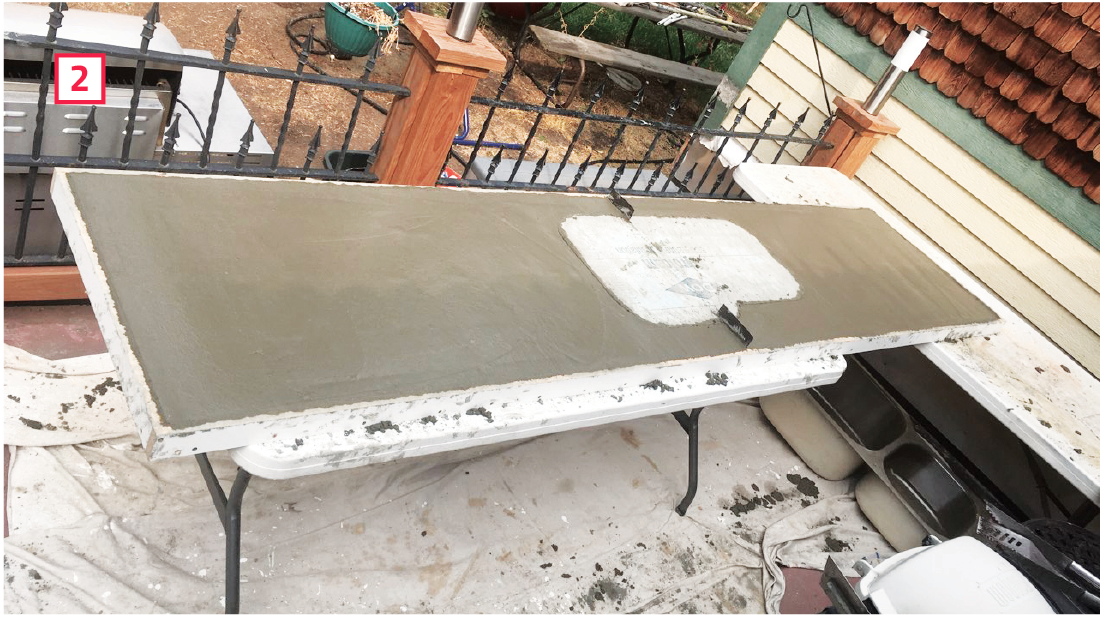
The long top also needed a hole for an undermount sink. To form this, I used a piece of 1½-inch XPS foam board that I had cut to fit the shape of the sink (photo, page 40). After marking its location, I used a few dabs of hot glue to secure it to the melamine, then wrapped the perimeter with painter’s tape, thinking this would make for a smoother surface on the exposed edge above the sink. Next, I used a hole saw to cut a 1½-inch plug for the faucet hole and hot glued it to the form. Finally, I used black silicone to create a round-over at the front edge of the long counter and all the way around the foam sink mold.
Is self-healing concrete the future? Read more here.
This long top had a weak point in the middle where the sink was, so I took Cheng’s advice and split the form into two pieces. I placed two pieces of thin metal vertically in the form—one at the front of the sink and one at the back; I would fill the narrow gaps they would create with silicone caulk during installation. In addition to the wire mesh, I placed ⅜-inch rebar along the front and back edges of the countertop form to reinforce the narrow strips at the sink. Now all three tops were ready to pour.
Pouring the Countertops
After reading about Cheng’s custom concrete mix, I decided to use Quikrete Countertop Mix. Like Cheng’s recipe, it contains sand, Portland cement, and very small aggregate. To prevent shrinkage and cracking, it also contains an additive that allows the mix to flow while using as little water as possible. I needed six and a half bags for the whole project, including backsplashes.
I used a small, electric cement mixer to mix one or two sacks at a time to the consistency of thick oatmeal, then filled the first form with a ¾-inch-thick layer of concrete, tamping it into place with the flat surface of a trowel. I was particularly careful to make sure I completely filled the area along the front edge where the silicone round-over mold was located. After placing the wire mesh in position, I added more mud until the form was slightly overfull. After tamping again to make sure there were no air pockets, I used a straight 3-foot length of 2x4 as a screed across the top edges of the form. By sliding it back and forth and pulling the excess mud to one end, I was able to get a relatively smooth bottom on the countertop, which I finished with a trowel.
Filling and Polishing
I let the tops sit for a couple of days before I removed the sides and foam blocks, and it was almost a week before I turned the countertops over to take a look. The tops were very smooth, but were peppered with small, pock-like voids created by escaping air bubbles. Also, the vertical edge around the sink opening had an interesting texture where the masking tape had puckered.
Using my half-sheet and random orbital palm sanders, I began “polishing” the tops, starting with 150-grit paper, then 180-grit, and finally 220-grit. This process brought even the tiniest voids into sharp relief, and I decided to fill them with a sand and cement grout mixture. This not only improves the appearance, but prevents food particles and bacteria from becoming trapped in the small pockets. I used Rapid Set Cement All, which the box describes as an interior/exterior, high-strength, fast-setting, nonshrink repair material used for underlayment, anchoring, industrial grouting, casting, and concrete repair.
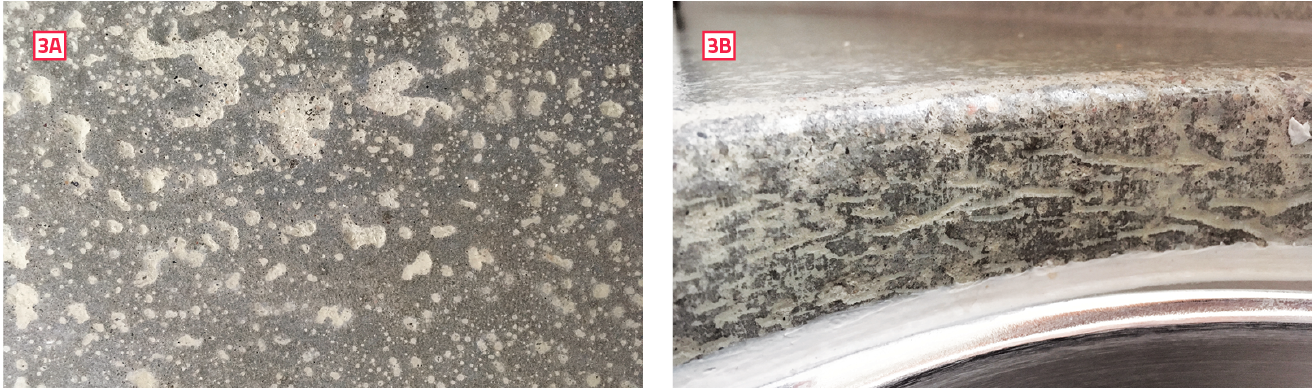
That it was also a light color turned out to be what makes these countertops unique [3A]. I mixed up a batch and spread it over the top, exposing the edges of the countertops with a rubber grout trowel. After letting it dry, I sanded off the excess with successive passes using 150-, 180-, and 220-grit aluminum oxide paper. Where I’d filled the exposed edges, it appeared as if the light-colored surface speckles ran through the thickness of the concrete. This effect was especially interesting at the sink hole, where the grout created a vein-like look [3B]. I was delighted with the overall effect, even more so after I sprayed the surfaces with numerous coats of a concrete wet-look sealer, which brought out some green color.
 I set the two smaller tops by myself and placed the two pieces of the long countertop with a little help. Once I verified they fit, I lifted the front edge of the two smaller tops; placed a few blobs of clear silicone on the cabinet tops; and lowered the countertops into their final position, making sure that the overhangs were consistent.
Check out Pro Remodeler's Top Surfaces for 2020.
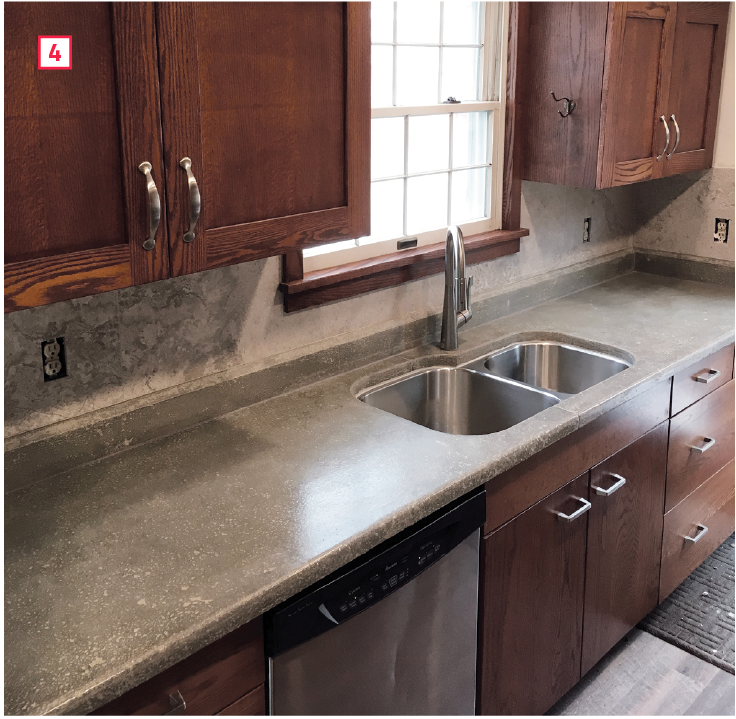
I did the same for the long countertop [4], except that I applied some gray silicone at the joints I had created at the sink cutout, pushing the pieces together until some of the silicone squeezed out and I was sure the joint was loaded. Where the sink and countertop met, I masked both sides and applied a bead of the same gray silicone, using a rubber forming tool and my finger to create a rounded seam.
Beveled Backsplashes
For the backsplashes, I reused the long form to build five 4-inch-wide forms of varying lengths, all 1½ inches tall. I provided for miter joints at inside corners, and created a beveled front edge on all of the splashes by tacking cant strips into the corners of the forms where the top and face of each backsplash meet.
I laid two pieces of ⅜-inch rebar on the first layer of cement near the top and bottom of each backsplash and about 1 inch short of each end, topped off the form with concrete, and screeded them off. After allowing the forms to cure for about a week and spraying them with sealer, I put them in place, securing them to the wall with hot glue and construction adhesive. I used gray silicone at the miter joints, then applied a bead of gray latex caulk to the joint between the bottom of the backsplash and the countertop, smoothing with my finger and a wet rag. I didn’t need to caulk the top of the backsplash because I was going to cover the rest of the wall with tile.
Happy Accidents
A couple of unusual things happened during this adventure. First, because I’d decided against vibrating the concrete, air bubbles were able to form on what would be the exposed surface of the countertops. For some, this would be disastrous, especially after seeing the beautiful work done in Cheng’s books. But for me, it was a blessing—I liked the imperfection. I wanted these countertops to look like what they were—concrete—but with a little pizazz. The contrasting grout color turned ordinary, gray, concrete tops into something that looked a lot like stone. Granted, it’s ordinary-looking stone, but stone nonetheless!
Second, when I caulked the foam form for the sink, it deposited a thin film of caulk on the surface of the melamine. After using a very sharp chisel to peel it off, I could still see a gray mark on the melamine where the caulk had been but thought nothing of it when I formed the backsplash over that stain. Lo and behold, it left a mark across the face of one piece of the splash that looks like a vein—more beautiful imperfection!
Third, the blue masking tape I used to wrap the foam sink form puckered and shriveled when it got wet from the concrete. This left a slightly sculpted surface that also looked like veining when the grout was applied. It gives real character to the top at the sink and makes it look even more like a stone countertop.
Unhappy Accidents
As much as I liked the look of these countertops, a couple of things were disappointing. First, along some of the front edge, an irregular line is visible where the two layers of the cement mixture meet [5]. Although I like the interest it adds, I probably should have wet the first layer before placing the rest of the mix, and then tamped it more vigorously along that front edge.
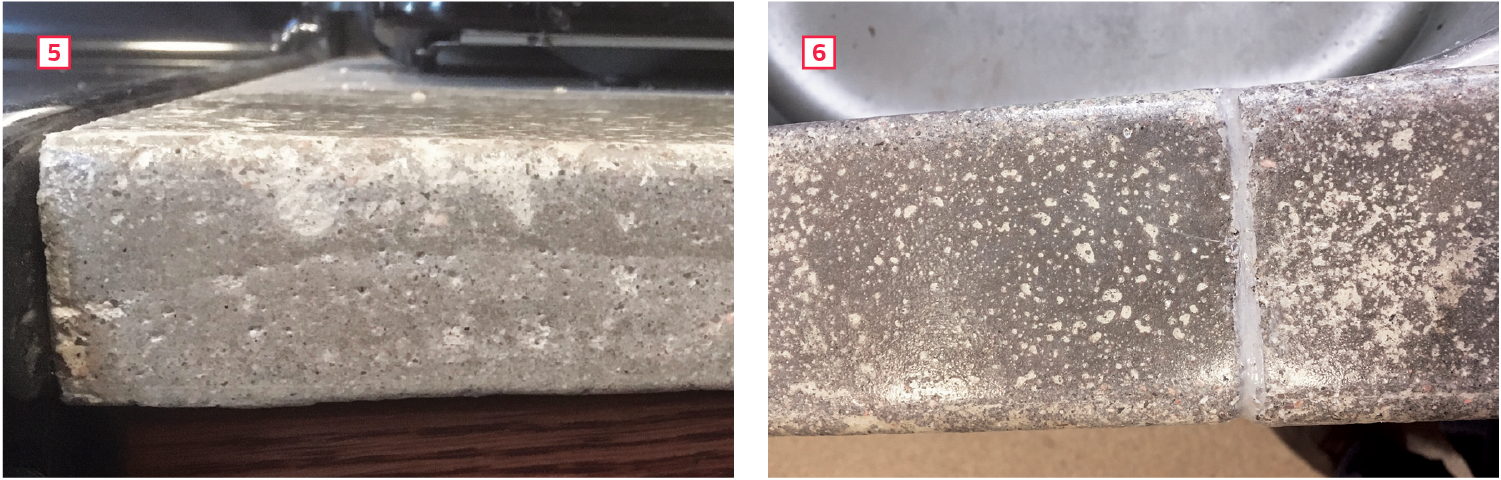
Second, I wish the joints between the two pieces of countertop at the sink were less visible [6]. Wetter concrete, more tamping, and greater care when removing the metal strips would have helped.
Overall, though, I am quite pleased with how these tops turned out—pleased enough that I’ve started thinking about doing this for other people. The process is reasonably simple, the skills required are basic, and the materials are readily available and inexpensive: for approximately 17 running feet of 25½-inch-wide countertop with 4-inch backsplashes, the total cost of materials, including the melamine, was less than $300 (under $10 per square foot). As for labor, it took me between 30 and 40 hours to form, pour, sand, fill, sand again, install, and caulk the tops and back splashes, but that included the learning curve. I’m sure next time the work will go faster.
Up next is the vanity top for the newly remodeled bathroom. I think I will lay dried leaves in the bottom of the form and see what happens!
Get more Jobsite Know-How here
Add new comment
Related Stories

Designing, Building, and Installing a Luxury Custom Wine Cube
An 11-foot wine cube enveloping a pantry is the stand out feature of this customized New York penthouse

Marvin Releases Switchable Privacy Glass Window
The privacy glass windows can be purchased from Marvin's Direct Glaze windows

Building A Small Projects Division from the Ground Up
Through hard work and careful strategy, Harth Home Services has seen big growth

Client Design Choices in the Time of Social Media and AI
Social media speeds up the trend cycles, and now artificially created images are falling into homeowners' hands

Design Trends to Watch in 2024
What’s in and out for the upcoming year? Remodeling designers share insights


Insights for Designing Outdoor Kitchens
Was the pandemic-fueled thirst for outdoor kitchen remodels and additions a fluke, or is it here to stay? Plus: The top design considerations for outdoor kitchens

Home Run Remodeling Lessons: The New American Remodel 2023
A final look at The New American Remodel 2023

Webinar: From Disjointed Design to Cohesive and Efficient—The New American Remodel 2023
Access the recording for the first The New American Remodel webinar held on March 8 at 2 pm CT